Finding ways to customize the WordPress navigation menu is a common request online. That’s understandable since navigation is one of the central elements of any website. It guides visitors around and overall contributes a lot to user experience and user friendliness (or lack thereof).
If you’re looking for ways to customize the navigation menu on your own WordPress website, you have come to the right place. In this post, we will go over several ways how you can change your site’s navigation in terms of content, design, and position. In the end, we want you to be able to make it exactly the way you want and your visitors need.
Ready to navigate this topic together (yes, I have already put a dollar in the pun jar)? Then let’s go.
How to Add and Configure Menus in the WordPress Admin Dashboard
Let’s first talk about WordPress’ built-in functionality. The CMS lets you control everything related to navigation menus under Appearance > Menus.

Here, you can add menu items, change their order and names, apply menus to locations, and much more. Let’s go over it step by step.
(Quick note: You can also perform all of the following actions under Appearance > Customize > Menus and preview the changes in the Customizer).
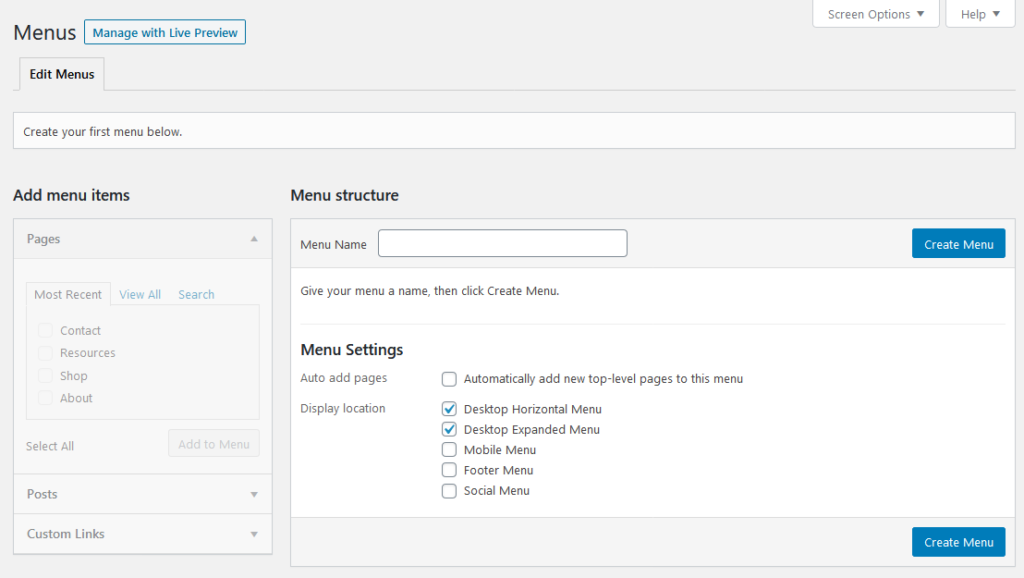
1. Create a Menu
When you first come to this part of your site, you might find it empty like above. If so, your first order of business is to enter a name for your menu at the top. After that, click the Create Menu button.
2. Add Menu Items
When you do so, the options on the left become available.

Here, you can add items to your newly minted menu. For example, under Pages, simply tick the box next to the name of a page you want to have appear in your WordPress navigation menu. Click on View All or Search if you are unable to find the page you are looking for under Most Recent.
When you have located the right page and ticked the box (multiple choices are possible at the same time), hit Add to Menu at the bottom.

Your choices will then appear on the right.

Posts and Categories work the same, only for other types of content. Custom Links is a little different in that you need to input a URL and also a link text (the label that will appear in the navigation menu) before adding it to the menu.

However, aside from that it isn’t any different.
Note: The Custom URL option is a good solution if you want to add an option to send people to an external URL from your navigation menu. WordPress also uses it automatically for the Home option.

3. Customize Menu Items and Labels
Once you have added menu items, it’s time to customize them. The first thing you can do is change their order.
For that, simply drag and drop items with your mouse until they are in the order you want. It’s also possible to move them to the right and create submenu items that will appear when someone hovers over their parents.

When you click the little arrow symbols, they open up additional options.

First of all, there’s the possibility to change the menu label (the text that will appear in the menu on site) to whatever you want. WordPress also displays the original title, so you don’t get confused which page is which.
Secondly, you find links that allow you to make the same changes to the menu item positions as you did earlier via click. Plus, you can make more options available here.
4. Take Advantage of the Screen Options
At the top of screen, you find the screen options that you can open with a click.

Here, you get access to additional options for customizing your WordPress navigation menu items. Some of them are quite technical, but we should still mention them for completion’s sake.
At the top, you are able to switch on more options for the Add menu items part, namely the possibility to add tags and other content types or taxonomies on your site.
In the bottom rung are additional settings for your menu items:
- Link Target — With this active, you can set single menu items to open in a new tab when clicked. This is especially useful for third-party links.
- Title Attribute — Text here appears as a tooltip in the browser when someone hovers over the menu link.
- CSS Classes — Allows you to add custom CSS classes to menu items to apply custom styling to them. More on that below.
- Link Relationship (XFN) — A special attribute you can add to external links to show your relationship to the site you are linking to. Details here.
- Description — Lets you add a description for the menu item for your visitors, which will show up if your theme supports it.
All clear? Then let’s get this menu out there.
5. Publish Your Menu
When you are happy with your choices and the content of your menu, it’s time to publish it. You have two options do so: One is to pick a Display location under Menu Settings.

Simply choose a location by ticking the box (the options here depend on your theme and some might be pre-selected) and click the big blue Save Menu button. Done.
Alternatively, under Manage Locations at the top, you also find a list of menu locations in your theme.

Here, pick which menu you want to assign to a particular location from the drop-down list and hit Save Changes at the bottom. Either will result in your new menu being pushed out onto your site.

By the way, you can also add any of the menus you create to any widgetized area on your site, such as a footer. For that, simply go to Appearance > Widgets, drag the Navigation Menu widget to any available widget area, and select the desired menu from the drop down.

Save and you are done.
Advanced Ways to Customize WordPress Navigation Menu
Alright, that’s it for WordPress-native ways to customize the navigation menu. However, what if you want to do more sophisticated changes like modify colors, other design aspects, or the menu position? That’s what we will talk about now.
For the examples below, we will be using the Twenty Twenty theme, so the code examples are not always applicable to every other theme. However, we’ll also show you how to figure out how to make them work with your current theme’s markup.
Also, we are just showing this in the desktop view (otherwise the post would get too long). Don’t forget to take care of your responsive design to make the menus look good on mobile devices as well!
1. Find the Right CSS Selectors
If you want to completely change the WordPress navigation menu to your needs, you don’t get around a bit of CSS (or, alternatively, a WordPress page builder).
For that, you need to understand that the standard WordPress nav menu is built as an unordered HTML list. The typical HTML output of a WordPress menu looks something like this:

The above gives you the following CSS selectors for styling your menu:
- Menu container:
#site-header .primary-menu-wrapper - Menu list element:
#site-header ul.primary-menu - Navigation items:
#site-header .primary-menu li - Navigation item links:
#site-header .primary-menu li a - Sub-menu list elements:
#site-header .primary-menu li ul - Drop-down sub-menu items:
#site-header .primary-menu li li - Drop-down sub-menu item links:
#site-header .primary-menu li li a
As mentioned, this changes a bit from theme to theme. To find out the right selectors for what you are working with, use the browser developer tools.
Basically, right-click the element you want to modify and choose Inspect Element.

This will open the developer tools, where you can see both the HTML structure of your menu as well as CSS selectors and styling applied to them.

This knowledge will allow you to change or overwrite them (if you are going to make a lot changes, use a child theme).
Clear so far? Then let’s go over some examples of how you can customize the WordPress navigation menu in this way.
2. Change Menu Colors
Changing the colors of menus and menu items is one of the easiest changes. Here, you have several options. Let’s go through them one by one.
Modify the Menu Background
First is the menu background. In many themes the navigation menu is part of the header, so in order to change its background, you would change the color of the header like so:
#site-header { background: #ced0ce; }Here’s the result:

However, this isn’t always the case, some themes have standalone navigation bars. Here, you can adjust the menu background color by targeting the wrapping element of the menu itself.

This is what the markup looks like:
.navigation-top { background: #ced0ce; }Which element is the right one depends on your theme, so take advantage of the developer tools.
Playing With Font Colors
When you change the background color, chances are it no longer fits the font. Therefore, it’s important that you know how to make changes to those, too, in order to make everything fit together.
Generally, because WordPress navigation menus are made up of unordered lists (ul in HTML) with list items (li in HTML) that contain links (a in HTML), you can target them with the following markup:
#site-header .primary-menu li a { color: #000; }The code above has the following effect:

The same markup also allows you to use the :hover pseudo class to add effects to menu items when someone hovers over them with a mouse like so:
#site-header .primary-menu li a:hover { text-decoration: underline dotted; }While you are at it, you might also want to look into :active, :link, and :visited. W3schools is a good place to get started on that.
Finally, you can use the aforementioned functionality in the WordPress menu settings to assign custom classes to menu items and target them individually if needed.

When you now use the markup below:
.highlight-shop a { color: #cd2653 !important; }You get this effect:

3. Change the Menu Position
One of the most requested ways online to customize a WordPress menu is to move the navigation menu or change its position. In order for additional menu locations to be present on your site, you first need to register them.
This happens inside your theme’s functions.php with either register_nav_menu (for one menu) or register_nav_menus (for create more than one menu position at the same time). So, if you want to know more about your site’s menus, the first step is to check your (parent) theme’s functions.php file for something like the snippet below.
function twentytwenty_menus() { $locations = array( 'primary' => __( 'Desktop Horizontal Menu', 'twentytwenty' ), 'expanded' => __( 'Desktop Expanded Menu', 'twentytwenty' ), 'mobile' => __( 'Mobile Menu', 'twentytwenty' ), 'footer' => __( 'Footer Menu', 'twentytwenty' ), 'social' => __( 'Social Menu', 'twentytwenty' ), ); register_nav_menus( $locations ); } add_action( 'init', 'twentytwenty_menus' );This tells you both the name used for the menus in WordPress template files as well as in the back end (note the corresponding labels in the function that we saw earlier in under Manage Locations).
Once you know a menu’s name, you can then a) find where it’s located in your theme files, and b) move the navigation menu to wherever you want it to appear. For either, you need the wp_nav_menu function, which tells WordPress where to display the content of registered navigation menus.
For example, we already know what the primary menu looks like in Twenty Twenty by default. The corresponding markup inside header.php looks like this:

When now modify the file to move the menu below the site-header element (again, please use a child theme), we get something like this:

Of course, this took a bit of styling as well. wp_nav_menu a whole lot more options to modify its output, which you can find in the official documentation. Of course, you can also use the function to register a menu anyplace you want, not just move around existing markup.
Create a Sticky Menu
WordPress navigation menus are usually at the top of the site and vanish when you scroll down. With a sticky menu, it stays at the top even if you move downward.

This can be very useful to give your visitors continued access to the navigation without having to scroll all the way back to the top of your site.
It’s generally not too hard to accomplish. The main part is to add the CSS property of position: fixed to the navigation element. However, depending on the theme markup, you might need a few more things.
For example, here’s what the code looks like for the demo website:
#site-header { position: fixed; width: 100%; }I’m sure you can figure it out for your own site with a little detective work.
How Will You Customize Your WordPress Navigation Menu?
Site navigation is a central pillar of any WordPress website. Without it properly set up, a site becomes fairly unusable.
There are numerous ways to make changes to your navigation menus. WordPress has built-in features that already let you do a lot. If that is not enough, you can make more complicated modifications with a little CSS and PHP. Now you know all you need to make this happen.
In what way did you customize your WordPress navigation menu to improve it? Let us know in the comments section below!


