WordPress user roles are super useful when you have more than one person needing backend access to a website. In most cases you’re likely to have, at the very least, multiple contributors. Regardless, it’s not necessary that each person who has access to your site have the same permissions. And that’s where WordPress custom user roles come into play.
Here, we’ll be discussing how to add custom user roles in WordPress and both with plugin-based and code-based solutions. But first, let’s take a moment to discuss the default user roles that come with WordPress and why limiting permissions is something you should consider.
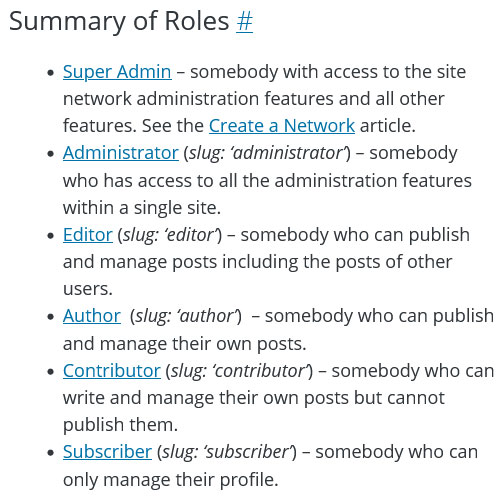
WordPress Default User Roles
When you first install and set up WordPress, you’ll find that it comes with a set of default user roles you can select from. These user roles are defined as follows:
- Administrator — This user has access to every administration feature within a WordPress website. They can add themes and plugins and make site customizations (including editing PHP files).
- Editor — This user role has permission to access, edit, and publish blog posts by any other user.
- Author — With this user role you may write and publish your own blog posts.
- Contributor — For this user role level, someone can write a blog post and make edits but they can’t publish it.
- Subscriber — This is really only applicable to sites with memberships or user profiles. At this level, a user can access and manage their site profile but that’s all.
If you have a multisite network, there’s one more user role to be aware of and that is the Super Admin. It offers access to all administration features across all websites within the network — including the network settings themselves.

How to Use Permission Levels Correctly
Often, these roles serve the needs of most WordPress users. But a big mistake a lot of people make is not using them properly. For example, there is no reason to assign Administrator level permissions to those merely contributing to your website on occasion. Someone writing a one-time blog post doesn’t need to have access to all of your site’s back end files. There’s also certainly no reason why they should be able to edit your site’s theme, add or remove plugins, or otherwise make site-wide changes.

In addition, giving blanket permission to every user puts your site at an increased risk of hacking attempts and even user error. It’s a much better idea to only allow users the level of access they require to complete their job. A one-time contributor only needs Contributor level access. Someone making regular posts might need to be designated an Author. However, again, if the user doesn’t need access to a feature to complete their assigned tasks, there’s no reason to provide it.
Why Custom User Roles?
So, if WordPress already comes with this feature what are custom user roles for? Well, sometimes the default roles don’t meet the specific needs of every website owner. As an example, let’s say you have an Author who contributes to your site regularly. They don’t need to have Editor access as they won’t be editing and publishing other people’s posts. Yet, you want them to have access to the Admin-level capability of installing plugins for testing purposes. If you don’t want to provide full Administrator access, you can instead create a custom user role to serve your specific needs.
Plugins for Adding Custom User Roles in WordPress
If you don’t feel like dealing with editing code, then using a custom user role plugin is a great idea. We’ve gathered three options here that greatly simplify this process.
1. User Role Editor

The most popular plugin for this purpose is User Role Editor. It allows you to change user roles and capabilities with relative ease. You can view all the available capabilities and then simply click a checkbox next to each that you want to assign to a given user role. Afterwards, if you want to remove a capability, you only need to — you guessed it — uncheck the applicable box. We will go over an example of it below.
This plugin also allows you to add new user roles or copy existing roles to make customizations. Other features include the ability to:
- Change the automatic user role given to new users.
- Add capabilities to user roles and/or individuals.
- Assign multiple user roles to an individual user.
- Remove irrelevant capabilities that no longer apply (usually happens when you delete a plugin that added user roles).
- Make user role changes on a multisite network.
A Pro version of this plugin is available that adds more features, removes advertising, and bumps you to the top of the support queue.
2. Capabilities

Next up is the Capabilities plugin. It makes it super easy to create highly-specific user roles and permissions levels across every aspect of your website. With it, you can:
- Create a new user role or copy an existing one to modify as you see fit.
- Set who can read, edit, delete, and publish content.
- Select permissions for posts, pages, custom posts and pages, tags, and categories.
- Create permission levels for multisite networks.
- Add allowances to site taxonomies.
- Perform automatic backups of your user role settings.
There is a free version available that offers a wide range of features. However, if you want to add on navigation and admin menu restrictions, post status permissions, and to remove ads, the Pro version may be a better bet. Capabilities Pro is currently priced at $69 for a single site license.
3. Members

Another option is the Members plugin. This one allows you to customize the roles and capabilities attached to each user with ease. With it, you can do all sorts of things like set permissions to restrict content as well as:
- Edit existing user roles and set their specific capabilities.
- Add brand new user roles.
- Delete the user roles.
- Assign more than one user role to a single user.
- Deny capabilities to specific user roles.
- Set content permissions and restricted content.
- Clone user roles to save time in creating new ones.
You can also use this plugin to make your site entirely private, add a login widget, and configure shortcodes for accessing content. While the Members plugin is totally free, you can gain access to a wider-range of features for building membership sites if you upgrade to MemberPress.
Adding Custom User Roles to WordPress with the User Role Editor Plugin
Getting started with the User Role Editor plugin is straightforward. Once installed, you should be able to go to Users > User Role Editor in the WordPress dashboard. From there, you can add a new user role by clicking Add Role on the right hand side of the screen.

This will reveal a prompt where you can input a name for the new role and select a default user role to serve as the basis for it. Click Add Role again and then you can click the checkboxes next to Capabilities to add or remove which are assigned to your new user role.

Using Code to Add Custom User Roles in WordPress
Now there are some cases where you might want to manually code in your desired user role changes rather than relying on a plugin:
- You don’t want the added bloat — Even streamlined plugins can add to the overall bloat of your website and if single-feature plugins aren’t your thing, then using code is a solid option.
- You don’t anticipate needing to make user role changes very often — If this sounds like you, you should probably bypass a plugin. That way, you can hard code in your user role modifications and leave it be without having to worry about keeping an extraneous plugin up-to-date.
- You only want to add a user role or change capabilities for a single user — Why bog down your site with an extra plugin if you don’t need to?
Now with this in mind, we can move on to the specifics. We’re going to discuss two ways you can modify user roles using code alone.
Create a Custom Plugin
Theoretically, you can simply throw the code examples below into your theme’s functions.php file to run them. However, since changes to WordPress user roles are usually one-time events, it doesn’t make sense to do so. Inside the functions file, they will be loaded at every page refresh and constantly attempt to update your site’s database — not very efficient.
For that reason, it’s better to create a custom plugin in which you can include the code in question so that it will only run once when the plugin is activated. The first step for that is to, create a file named customize-user-roles.php (or whatever else you want to name it), open it with a code editor, and include the following snippet in it:
This is simply a header that allows WordPress to understand that this is a plugin file. After saving, upload the it to wp-content/plugins on your website’s server (you can opt to give it its own directory or not). When done, you should be able to see it in the back end of your site.

From here, you can simply open the file again via an FTP client, input whatever code you need, and then execute it by simply activating and deactivating the plugin once.
Adding and Removing WordPress User Roles
Alright, first let’s talk about the add_role() function. According to the official WordPress Code Reference, this function will add a new user role to WordPress so long as one with the same name doesn’t already exist. Here is its basic structure:
add_role($role, $display_name, $capabilities = array() )Let’s break it down what all these different parts mean:
$role— This is the name of the role as it will be saved in the WordPress database.$display_name— The name of the role that users will see in the back end.$capabilities— This array describes the capabilities of the new user role. You find a list of them here.
An Example
Let’s go over a concrete case to make it clearer. Let’s say you wanted to add a new role to your website called Maintenance Guy. The only thing that person is supposed to be able to do is update WordPress and any themes and plugins, nothing else. Here’s what the code snippet for that looks like:
function add_custom_user_role() { add_role( 'maintenance_guy', 'Maintenance Guy', array( 'read' => true, 'update_core' => true, 'update_plugins' => true, 'update_themes' => true ) ); } register_activation_hook( __FILE__, 'add_custom_user_role' );As you can see, the role’s name is maintenance_guy and its display name is defined as well. The important part are the capabilities in the array. Besides read (which you need to add so that the person can even see the back end), it’s only update_core, update_plugins, and update_themes. The register_activation_hook at the function call is what makes it execute when activating the plugin.
If you activate the custom plugin, create a new user on your site with this role, and then log in with that user, all you should be able to see is the WordPress dashboard, the profile menu, and the update page.

Now, whether or not it makes sense to create a user like that or simply automate the update process is a different story but the above should make it clear how the add_role function works. Now you can apply it to your own needs.
Removing WordPress User Roles
By the way, if you wanted to remove the role again and also use code, you would do so with the remove_role function. Just add this to your custom plugin and activate it once:
function remove_custom_user_role() { remove_role( 'maintenance_guy' ); } register_activation_hook( __FILE__, 'remove_custom_user_role' );Presto, the Maintenance Guy role is no more.
Adding and Subtracting Role Capabilities
In the above example, you can already clearly see how you can turn on and off capabilities with markup. However, you don’t need to always create new roles to change what users on your site can do. You can also add and subtract capabilities to existing or WordPress user roles.
For that, let’s first go over the add_cap() function. Here’s how you can use it to add capabilities to existing user roles:
function add_custom_user_caps() { $role = get_role( 'maintenance_guy' ); $role->add_cap( 'install_plugins' ); $role->add_cap( 'activate_plugins' ); $role->add_cap( 'delete_plugins' ); $role->add_cap( 'install_themes' ); $role->add_cap( 'upload_themes' ); $role->add_cap( 'switch_themes' ); $role->add_cap( 'delete_themes' ); } register_activation_hook( __FILE__ , 'add_custom_user_caps');Building on what we know from before, this is relatively easy to understand. The function simply uses get_role to choose the user role you want to assign new capabilities to. This is followed by a list of new tasks you want users of this level to be able to perform. With the new capabilities, the Maintenance Guy user role now also has access to the plugin and theme menus in the WordPress back end.

Of course, you can also do the opposite and take away capabilities from user roles. For that, you can use the remove_cap() function. It works like so:
function remove_custom_user_caps() { $role = get_role( 'maintenance_guy' ); $role->remove_cap( 'install_themes' ); $role->remove_cap( 'upload_themes' ); $role->remove_cap( 'switch_themes' ); } register_activation_hook( __FILE__ , 'remove_custom_user_caps');As you can see, it is basically the same as add_cap before. When executed, the above takes away the ability to manage themes from the Maintenance Guy role.
Assign Users to a Role
Once you’re done tinkering with adding custom user roles and custom capabilities, it’s time to actually assign users to the roles you’ve designated. You can find all of this under Users > All Users.
Check the box next to any user you want to assign a role to or change their current role. At the top of the screen, use the drop-down menu that says Change role to… to select the user role you’d like to assign.

Once selected, click the Change button. That’s literally all there is to it.
WordPress Custom User Roles in a Nutshell
Website owners and developers may find they need to create custom user roles and capabilities for a whole host of reasons. Those reasons will vary from person to person and industry to industry. So long as you assign user roles with the lowest level of capabilities required for a user to complete their job, you should find your site will remain more secure and everyone will still have access to what they need. Now it’s time to put user role customization into practice.
What’s a custom user role you use on your WordPress website? Let us know in the comments below!


