Have you noticed that some of your competitors seem to be more visible in search results? You may note that their search listings contain rich snippets, which display elements such as ratings, product prices, and reviews. These snippets can boost your visibility in the search engine rankings, but they’re not generated automatically.
Fortunately, the All in One Schema Rich Snippets plugin enables you to add rich snippets easily to your posts and pages. With this tool, you can configure your extracts for search engines and make them more accessible to your readers too.
In this article, we’ll discuss what rich snippets are and why you should consider using them. Then, we’ll explain how to set them up with the All in One Schema Rich Snippets plugin. Let’s get started!
What Rich Snippets Are (And Why You Should Consider Using Them)
To understand what rich snippets are, we’ll first need to look at structured data and schema markup. Fortunately, the concepts are relatively simple.
Structured data is a way of providing contextual information to search engines. As such, this format helps the search engines better understand the data on a web page. Schema markup, on the other hand, is a type of structured data that produces rich snippets.
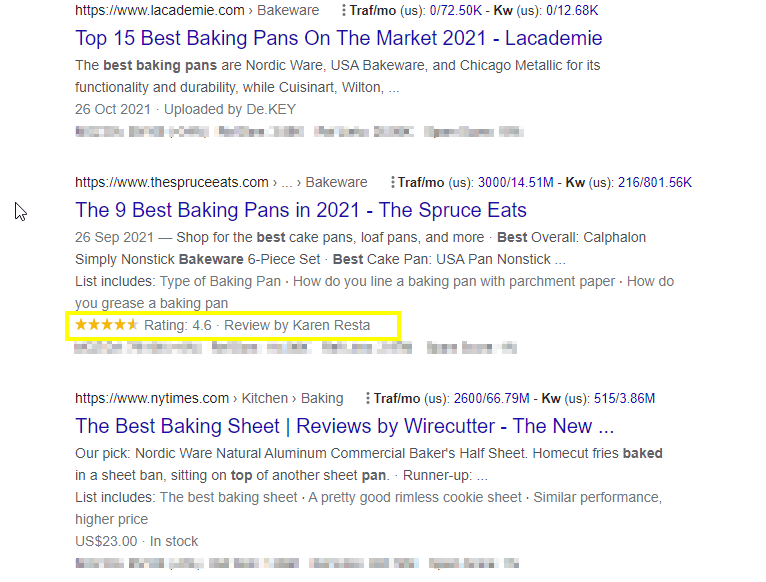
Schema markup provides the data to search engines. The information is then displayed to readers as a rich snippet:

Rich snippets can be helpful in a variety of contexts. For example, you can use them to display products on offer in an eCommerce store, an event, videos, or reviews.
Using reviews, in particular, is among the top eCommerce practices to boost conversions. Furthermore, if you have videos in your content, you should let Google know by adding schema markup. This is one of the seven essential tips to follow when adding video to your website.
Furthermore, rich snippets can give users a better picture of what to expect from the content. Therefore, they may increase the chances of users clicking through to your website. One case study showed that including rich snippets increased the number of sessions for a particular site by 516 percent!
How to Add Rich Snippets to Your WordPress Website (In 4 Steps)
Now that you know what rich snippets are and why you should use them, let’s get into the nuts and bolts of how to set them up. Here are the steps you’ll need to take!
Step 1: Install and Activate the All in One Schema Rich Snippets Plugin
You can create and integrate schema markup in a WordPress website manually. However, the process requires some technical skills and time investment. Therefore, you might be looking for a more user-friendly method to make rich snippets.
Fortunately, the All in One Schema Rich Snippets plugin makes the process easy:

To get started, you’ll need to install and active the plugin. In your WordPress dashboard, navigate to Plugins > Add New.
Search for “All in One Schema Rich Snippets”. Click on the option to Install > Activate, and that’s it. The plugin is now ready for use.
Once you activate and configure the plugin, it automatically generates schema markup. Then, you can add it to your relevant posts and pages. We’ll explore that process in the next step.
Step 2: Configure the Plugin Settings
You should now see an additional menu item in your WordPress dashboard called Rich Snippets:

Click on this to access the configuration options:

In this tab, you’ll choose the schema markup to use for your posts and pages. Here’s a quick overview of each option:
- Item Review: Reviews can help you leverage social proof and can be used with products you would like to promote. You can show text, ratings, and the name of the reviewer.
- Events: If you’re promoting an event, this type of schema markup can provide key details such as the venue, date, and price.
- Person: If your website or business relies on prominent members, the person markup type can enhance the profiles of key figures such as partners.
- Product: Product markup helps to put your eCommerce goods in front of your customers even before they click through to your website.
- Recipe: Food bloggers, restaurants and other businesses that offer recipes for public viewing can use this schema markup type.
- Software Application: This markup type enables you to show that your software meets certain specifications. You can also offer data such as price and the developer name.
- Video: Creating a video marketing strategy can be a smart move for your business. When you implement it, you can let Google know with the video markup type.
- Article: Search engines are already good at understanding and differentiating articles from other content types. However, it can’t hurt to add a little more information.
- Service: If you offer a service, this markup type enables you to display important information such as your coverage area.
You can expand each markup type to configure its strings. These are the data fields with the essential information:

For example, schema markup for a product would have a brand name, product name, price, and other string types.
Step 3: Add Markup to Your WordPress Pages
The next step is to add some markup to your WordPress pages. Fortunately, this is an easy process.
First, navigate to the post or page where you would like to add some schema markup. Scroll down below the page content, and you will see some options to configure schema markup (rich snippets) for that page:

Click on the button labeled Select What this Post is About. This will open up a drop-down menu that allows you to choose from the different types of markup that the plugin supports.
If you’re running an eCommerce store, for example, you’ll likely want to choose Product. This selection will open an interface where you can enter details such as the product rating, brand name, and the product image:

Save your changes, and that’s it! Your post or page will now display a rich snippet in search engines.
Step 4: Validate Your Rich Snippets
By now, you’ll have successfully incorporated schema markup into your WordPress website. Before you finish, though, you’ll need to be sure that everything is working as intended.
This means you’ll need to validate your rich snippets. The easiest and most popular way to do this is by using Google’s Structured Data Testing Tool:

This tool tests all forms of structured data. Furthermore, it offers a dedicated rich results test for evaluating rich snippets. As such, you can utilize the tool to see if your snippets are displaying correctly and optimized for search engines.
All you have to do is open the tool and paste the URL of your website. Click on TEST URL and wait for the results.
Conclusion
Rich snippets can quickly improve the visibility of your website in search results, improving clickthrough rates and increasing your chances of making sales. Using them is also a valuable way to highlight the benefits of the products in your eCommerce store. Fortunately, it’s easy to set them up with the All in One Schema Rich Snippets plugin.
To recap, you can add rich snippets to your WordPress website by following these four steps:
- Download and install the plugin.
- Configure its settings by selecting your preferred schema types.
- Add some markup to the relevant posts and pages.
- Validate the results with Google’s Structured Data Testing Tool.
Do you have any questions about how to add rich snippets to your WordPress website? Let us know in the comments section below!


