A headless Content Management System (CMS) can give you greater control over your online presence. However, you’ll need to create a front end for it so users can interact with it. This is where a headless setup can quickly become far more complicated than a traditional website builder.
Thankfully, there are frameworks that can help you create a beautiful front end for your headless WordPress configuration. This is where Frontity comes in. Designed specifically with WordPress in mind, this React framework has lots to offer your headless website or web app.
In this article, we’ll explore what this framework is, and why you might want to use it. We’ll then show you how to build, customize, and publish a WordPress web app using Frontity. Let’s get started!
An Introduction to Frontity (And Why You Might Want to Use It)
The Frontity framework enables you to build a React-based front end for your website. This makes Frontity particularly popular amongst developers who are looking to set up a headless WordPress website.
As part of this headless environment, you’ll decouple WordPress from its front end. This leaves only your database, admin dashboard, and your content management tools.
By going headless, you’ll have the freedom to design and build your own front end, independent of WordPress’ usual constraints. You could even use the WordPress back end in new contexts, such as a Single Page Application (SPA) or a mobile app.
When you build a front end using Frontity, this framework will consume your data over the REST API. It will then render this data as a SPA.
SPAs are distinct from traditional websites, as visitors aren’t required to navigate from one page to the other. Instead, Frontity will dynamically rewrite the same page with new data that it retrieves from the server. This can reduce your page load times.
Frontity also responds to requests with a fully populated HTML file. This specifically reduces the time required for the first contentful paint, which can have a dramatic impact on perceived page loading times.
This performance boost is great for the visitor experience. Studies suggest that your typical internet user is impatient, with 40 percent of people abandoning a website that takes longer than three seconds to load.
By reducing your page load times, you can encourage visitors to spend more time on your website, which will help drive conversions. You may also experience a Search Engine Optimization (SEO) boost, as Google has confirmed that it uses page speed as a ranking factor.
How to Build a WordPress Web Application Using Frontity (In 4 steps)
To build a web application using Frontity, you’ll need a WordPress installation. You can either host it on a web server or host it locally.
We’ll also run Frontity commands using Node.js. If you don’t already have this runtime environment installed, you can download and install it from the official website. With this setup out of the way, you’re ready to build a web application.
Step 1: Create a New Frontity Project
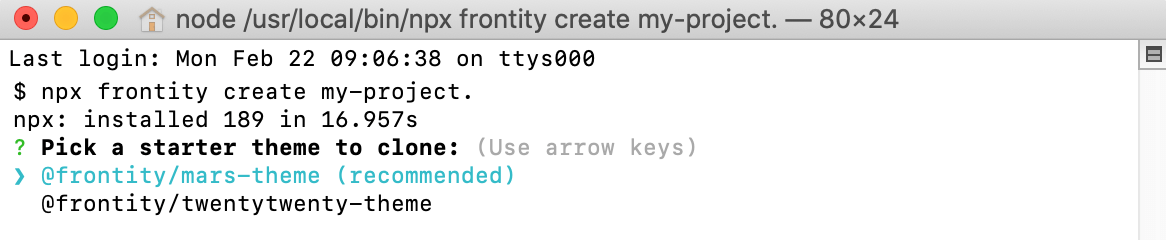
You interact with Frontity from the command line, so start by launching either Command Prompt (Windows) or Terminal (macOS). You can then create a Frontity project, using the following command: npx frontity create my-project.
This creates a project named my-project. Frontity will then prompt you to choose a theme for your front end:

Since it’s Frontity’s starter theme, we’re going to use Mars. Make your selection, and Frontity will clone your theme and create a local directory containing all the required files and dependencies:

We’re going to edit these files from the command line. This means you need to change directory (cd) so that Terminal or Command Prompt is pointing at your project’s root directory. By default, Frontity creates projects in your users directory, so your command should look something like this: cd /users/my-project.
To start development, run the following command: npx frontity dev. A new page will now open in your web browser:

By default, Frontity displays demo content. Let’s update it to pull data from our WordPress back end.
Step 2: Connect Frontity to WordPress
You can connect Frontity to your WordPress back end by editing the frontity.settings.js file in any text editor:

By default, this file references the following URL: https://test.frontity.org/wp-json. To display your own content, replace this placeholder with the address of your WordPress installation, and then append the wp-json extension. For example, if your WordPress back end is located at https://mysite.com you’d use https://mysite.com/wp-json.
After making this change, save your file. In your web browser, click on the Refresh button. The page should now update to display content pulled directly from your WordPress back end.
At this point the Mars menu still contains some demo content. If visitors are going to navigate your website, you’ll need to replace these placeholder links.
In the frontity.settings.js file, find the packages section. This section defines your website’s menu:

You can now replace each link with your own content. For example, if you wanted to link to https://mysite.com/contact, you’d use the following:
"packages": [ { "name": "@frontity/mars-theme", "state": { "theme": { "menu": [ [ "Contact", "https://torquemag.io/contact/" ], ... ... ... ] ], Rinse and repeat to add more links to your menu. Once you’re happy with the information you’ve entered, save your changes and refresh your browser. The menu should now include links to all the pages you specified.
Step 3: Customize the Frontity Theme
Perhaps the biggest advantage associated with headless WordPress architecture is the freedom to design your own front end. With Frontity, you can customize your front end by editing the theme files. You’ll find them in your project’s packages/mars-theme directory:

There are lots of ways that you can customize your front end, but let’s start with something simple. In this section, we’ll change the font color used in the header component. To make this change, navigate to packages/mars-theme/src/components. You can now open the header.js file for editing.
In HTML, colors are defined using color codes. In your text editor, find the following section:
const Container = styled.div` width: 848px; max-width: 100%; box-sizing: border-box; padding: 24px; color: #fff; display: flex; flex-direction: column; justify-content: space-around; `;We can see that the color code for the header is #fff. This is why the text appears white. You can change the font color by replacing #fff with the HTML color code of your choice. For example, you can turn the header text yellow:

After making this change, save your text file and refresh your browser. The header should now update to reflect your new color code. It’s well worth spending some time exploring the various theme files to see what different effects you can create.
Step 4: Publish Your Project
Once you’re happy with your front end, you can deploy your Frontity project to production. To create a production-ready bundle, run the following command in your Terminal or Command Prompt window: npx frontity build.
This will generate a build folder in your project’s root directory. This folder contains your React application and a Node.js server:

You can deploy this build folder to any hosting solution that’s capable of serving a Node.js application. For example, you can run your project like a standard Node.js app, using the following command: npx frontity serve.
Alternatively, you can deploy your project using AWS Lambda, Netlify, or Google Functions. However, if you’re looking for a serverless solution, then the Frontity team recommends Vercel.
If you want to follow Frontity’s recommendation, you’ll need to create a Vercel account and run the following command: npx vercel login. When prompted, enter your Vercel login credentials.
Next, create a vercel.json file in your project’s root directory. Inside this file, add the following:
{ "version": 2, "builds": [ { "src": "package.json", "use": "@frontity/now" } ] } After saving your vercel.json file, run the following command: npx vercel. When prompted, opt to set up and deploy your project.
You can now choose your project’s scope, and whether you’re deploying to an existing project. If you’re deploying to a new project, you can give it a descriptive name. You’ll also need to specify the local directory where this project is located.
Once you’ve entered this information, Vercel will assign your project a URL and a project settings URL. The settings URL launches the Vercel console, where you can perform tasks such as adding more domains to your deployment. That’s it – your web application is now live!
Conclusion
When you’re building a front end for your headless CMS, it’s easy to get caught up in the complexities. By opting for a framework that’s optimized for React and WordPress, you can fast-forward through much of this configuration, and get straight to the fun stuff – building your front end.
If you do decide to craft your interface using the Frontity framework, just follow these four simple steps:
- Create a new Frontity project.
- Connect Frontity to WordPress.
- Customize the Frontity theme.
- Publish your project.
Do you have any questions about the Frontity framework? Let us know in the comments section below!


