The WordPress Representational State Transfer (REST) Application Programming Interface (API) opened up a world of possibilities for website owners and developers. However, sometimes you may need to work with content and services that REST doesn’t support out of the box.
Fortunately, it is possible to extend this powerful API with a custom REST endpoint. By defining your own endpoints, you can get WordPress chatting to practically any application or service, including your own bespoke mobile applications.
In this post, we’ll discuss why you may want to create a custom endpoint for the WordPress REST API, and then show you how. Let’s get started!
What a Custom REST Endpoint Is (And Why You Might Want to Create One)
The REST API provides an easy way to push and pull data out of WordPress. This gives you the flexibility to integrate the platform with a wide range of third party applications and services.
It is also popular with developers who want to use WordPress as part of a headless Content Management System (CMS). It’s also a great solution for anyone working with React-based tools such as the Frontity framework or the Gatsby site generator.
The WordPress REST API provides a set of built-in routes and endpoints. These represent the default posts, pages, taxonomies, and other standard WordPress data types. You can use these routes and endpoints to interact with your site by sending and receiving JavaScript Object Notation (JSON) objects. This is great news if you want to interact with your WordPress content using external services and applications.
However, it’s also possible to create a custom REST endpoint. These endpoints instruct the REST API to respond to a given request with a function defined by you. This can be a powerful method for integrating WordPress with additional applications and services, and for working with custom post types.
A custom endpoint can also be useful if you’re developing a mobile application and want to use WordPress data inside it. For example, you might be creating an eCommerce app for your WooCommerce-powered online store, and want to extract data from WordPress to use it in this mobile application.
How to Create a Custom Endpoint for the REST API (In 4 Steps)
Creating a custom endpoint does require you to write some code, but it also opens up a whole new world of possibilities for your WordPress data. In this post, we’re using Ahmed Bouchefra’s REST tutorial as a code reference, in order to create a custom endpoint in four easy steps.
1. Create a Child Theme
Whenever you want to customize a theme, it’s recommended that you create a child theme and apply your changes to it. If you edit the original theme, then you’ll lose all your customizations every single time you update it. By using a child theme, you’ll be able to add custom endpoints without losing the option to update.
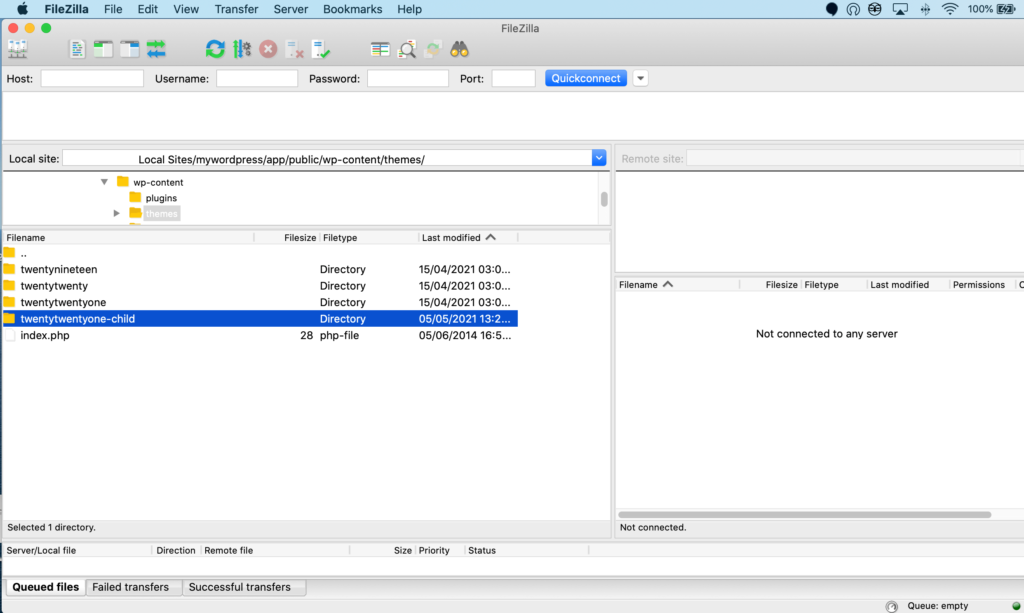
You can create a child theme using a File Transfer Protocol (FTP) client such as FileZilla. In your FTP client, navigate to the app/public/wp-content/themes/ folder and create a new directory.
When naming your folder, it’s a good idea to use the parent theme’s name, appended with -child:

Next it’s time to create a style sheet, which we’ll name style.css. You can create this as a regular text file, and then convert it to a CSS file by renaming it with the extension .css, as shown below:

A style sheet contains the code that determines your theme’s design. To create an eye-catching and engaging child theme, you’ll usually need to get your hands dirty and write some code. The WordPress Codex provides some boilerplate that you can use to quickly create a basic child theme.
Next it’s time to create a functions.php file, which you’ll use to add features to your theme. Again, you can create this as a plain text file, and then rename it to functions.php.
Inside your functions.php file, add the following code:
Here, we’re inheriting information from the parent theme’s style sheet. Now that you have the basic elements in place, navigate to Appearance > Themes in your WordPress dashboard:

Your child theme should be visible in the dashboard. Give the Activate button a click, and your new theme is now ready to use.
2. Define Your Route
In this section, we’re going to create a new route that will enable us to retrieve the latest posts by category ID. We’ll use the following URL:
http://localhost/wp-json/twentytwentyone-child/v1/latest-posts/Remember to modify this URL to point at your own domain or local site. You’ll also need to replace
http://localhost/wp-json/twentytwentyone-child/v1/latest-posts/1If you’re unsure about a category’s ID, you can check this value in the WordPress dashboard. Navigate to Posts > Categories and you’ll see a list:

You can now hover over the category that you want to query, and open it for editing. You’ll find the category ID in the URL. In the following screenshot, the category ID is “1”:

You can now add this category ID to your endpoint. At this point, if you enter the completed URL into your web browser, you’ll encounter an error message:

This is because we haven’t defined this route yet. In FileZilla, open your theme’s functions.php file and add the following:
add_action('rest_api_init', function () { register_rest_route( 'twentytwentyone-child/v1', 'latest-posts/(?Pd+)',array( 'methods' => 'GET', 'callback' => 'get_latest_posts_by_category' )); }); You can now save your changes and exit this file. In your browser, try reloading the URL. Your browser should respond with a 500 error:

Since we’ve defined this route, WordPress now recognizes it. However, we still need to specify the get_latest_posts_by_category() function as our callback, so let’s do that now.
3. Implement the Callback Function for Your Custom REST Endpoint
Our next task is implementing the callback function, which we’ll use to process and handle our GET request. Inside your functions.php file, start by retrieving the category_id argument from the $request parameter:
function get_latest_posts_by_category($request) {Next, we need to create an $args array with the category key set to the value of category_id. This ID will be extracted from the route:
$args = array( 'category' => $request['category_id'] );Then, query for posts with the specified category ID. You can achieve this by calling the get_posts() method:
$posts = get_posts($args);If the array is empty, then we’ll display an error message that contains the empy_category code, plus a 404 status code. You can customize this based on your requirements. We’ll pass all of this information to the constructor of the WP_Error class:
if (empty($posts)) { return new WP_Error( 'empty_category', 'There are no posts to display', array('status' => 404) );After completing this setup, it’s time to create a new instance of the WP_REST_Response class. We can then pass in the $posts array, and return the REST response. By using the WP_REST_Response and WP_Error classes, we can ensure that our endpoint returns a valid JSON response:
$response = new WP_REST_Response($posts); $response->set_status(200); return $response; }If you’ve been following along, then your completed code should look something like this:
function get_latest_posts_by_category($request) { $args = array( 'category' => $request['category_id'] ); $posts = get_posts($args); if (empty($posts)) { return new WP_Error( 'empty_category', 'There are no posts to display', array('status' => 404) ); } $response = new WP_REST_Response($posts); $response->set_status(200); return $response; } After adding this code to functions.php, save and close the file. Now, the only thing left is to put your custom endpoint to the test.
4. Test Your Endpoint
In your browser tab, try visiting the URL we defined in the previous step. Make sure you replace

You should now see a list of all the posts belonging to this category. It’s also worth entering a category ID that isn’t registered with your website. If your custom endpoint is working correctly, the browser should display the error message you defined in your functions.php file:

This is all you need to create a simple custom endpoint for the REST API. If you want to continue developing this project, then we recommend providing sanitization and validation callbacks in addition to your main callback. This can help protect your site against code injections, including Cross-Site Scripting (XSS) attacks.
To further protect your site and data, we recommend restricting access to your custom endpoint. You can achieve this by using the permission_callback() function.
Conclusion
The Representational State Transfer (REST) Application Programming Interface (API) was a game-changer for the WordPress community. However, even this powerful API has its limits, and it’s possible that REST may not meet your exact needs.
If you’re struggling with this API’s limitations, you can create a custom endpoint in four easy steps:
- Create a child theme.
- Define your route.
- Implement the callback function for your custom REST endpoint.
- Test your endpoint.
Do you have any questions about how to create a custom endpoint for the REST API? Let us know in the comments section below!


