Local (formerly known as Local by Flywheel) is a powerful tool with loads of useful features for local WordPress development. It has all necessary the functionality to create a local server and run WordPress sites on it. We also have a detailed tutorial for how to use it.
As a more casual user, there might be a number of Local features that you might not be aware of. In order to make up for that, in this post we will look at some of those less obvious capabilities of the program that can make your life a lot easier. Knowing them can give you an edge so you can work with Local more efficiently and create WordPress websites faster and more comfortably.
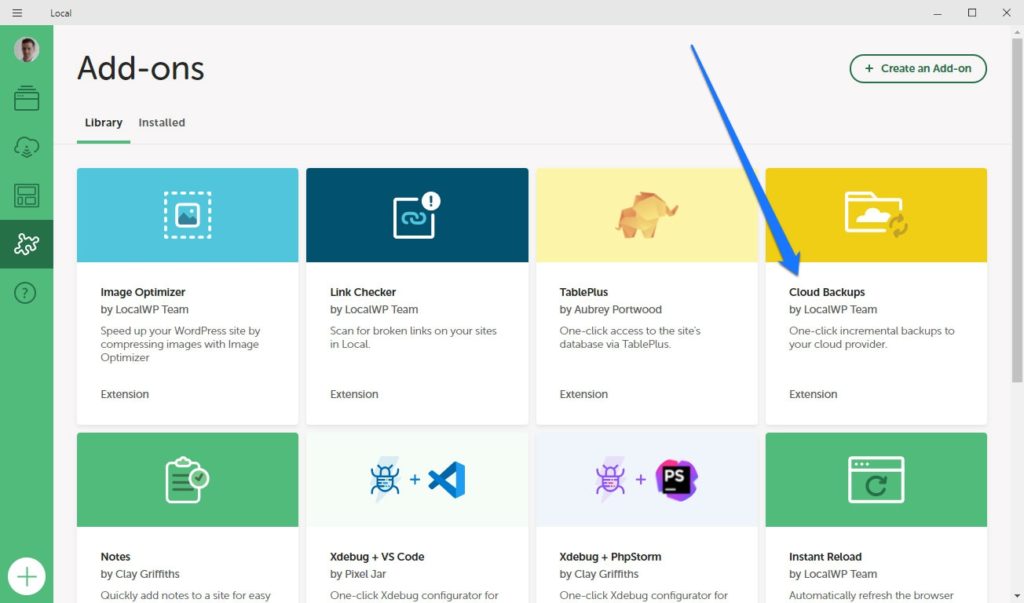
1. Use Cloud Backups to Keep Your Data Safe
Cloud backups allow you to save versions of your local WordPress websites in a cloud storage like Google Drive or Dropbox. That way, if something happens to the installation on your hard drive, you still have off-site backups and don’t lose all your hard work.
The functionality is available as a free add-on inside Local. Simply go to the Add-ons section and find it in the list.

Click on it, then hit the Install Add-on button on the left of its page.

Note that you have to be logged in to you Local account for that. If you already have an account, simply log in. If not, create one (it’s free).
Once on your hard drive, the next step is to click Enable & relaunch.

The add-on will then install and Local will restart. Once that has happened, you will find the option to upload your sites to the cloud in the Tools tab.

Connect to a Storage Provider
Before you can use it, however, you need to connect to a storage provider. For that, click on Connect to provider in the upper right corner to get to your online Local account. Here, you will find buttons to connect to Google Drive and Dropbox.

Click Connect for whichever you prefer and go through the authorization process. Then, back in Local, click on Refresh Cloud Backups. This should connect the program with the cloud storage provider you just enabled.
Run a Backup
When the site is active in Local, you can also start the backup by simply clicking Back up site.

It will give you an estimation of the size and let you add a description. You can also choose files to ignore during backup.

Make your choices and hit Start Cloud Backup. It will take a little while depending on the site size and Internet connection. In the end, it should show up in the list.

With a click on the three-dot icon, you can now always restore to this version or clone a new website from it.
2. Save Time With Blueprints
Blueprints are one of those Local features that make website development faster. They allow you to save pre-configured WordPress setups for reuse. That way, you don’t have to install frequently used themes and plugins or change database settings each time you begin a new project. Instead, you can have them in a new site from the start, allowing you to hit the ground running. This feature is especially useful for freelancers or agency owners who often build similar types of websites.
Creating a blueprint is very easy. Right-click the name of a site you want to be able to reuse and that is running and pick Save as Blueprint.

Local will ask you for a name and also give you the option to exclude certain file types from being included in the blueprint.

Once satisfied, click on Save Blueprint. Local will then make a copy of the website for later reuse. Once finished, you find any blueprints that you created in separate menu item on the left.

Here, you can rename and delete them if you want.
If you have blueprints available, whenever you create new website inside Local, you can choose to use them. Simply pick the option during setup, pick the blueprint you desire and continue as usual.

3. Create a Multisite Network Locally
Another one of Local’s features is the ability to create Multisite installations. In case you are not familiar with this term, Multisite allows you to create several websites from one WordPress installation.

It offers several benefits such as running several websites from one place or creating several language versions of the same website. For more details, check out our in-depth Multisite tutorial.
As for using Multisite in Local, it is something that you can choose when setting up a new local site. Follow the steps until you get to where you set up WordPress. Here, under Advanced Options, you are able to choose that the new site should use Multisite and also the structure of the site network.

If you choose Subdirectory, your subsites will appear at the end of the URL like yourdomain.com/subsite. When using Subdomain, they will appear at the beginning instead in the form of subsite.yourdomain.com.
Be sure to think about this beforehand so you can make the right choice. Continue and Local can start setting up the site.
Once done, you can use it for development as usual, however, it will have some key differences. The most striking is the Super Admin profile that allows you to create new websites and control the network’s themes and plugins.

If you want to understand all the implications, please refer to the Multisite tutorial linked above.
4. Use Live Links to Share Your Work With Stakeholders
Live Links are a really neat feature for collaboration and showing development sites to clients without having to upload them to a staging environment.
For this feature, too, you need a Local account. If you have that and are logged, you find the option to use Live Links in Local either at the bottom of the screen or under Tools > Live Links inside the website view.

When you enable or switch it on, it will provide you with a URL, username, and password (that you can edit). Others can use those to view the local site. There is even a handy-dandy copy button that makes sharing them easier.

When someone accesses the URL and enters the credentials, they can then access the website.

5. Directly Upload Development Sites to Your Live Host
In a similar vein to Live Links is the ability to directly connect Local to a remote host and push and pull website data in between your local and live installation. The downside is that, at the moment, this feature is only available to customers of WP Engine and Flywheel. You can vote on support for other hosting providers in the forum.
As a customer of the existing options, under the Connect menu on the left side, you are able to connect to your hosting account via API.

If you have done that, you are able to establish a connection at the bottom of the screen in Local. Note that this happens on a per-site basis to avoid accidental uploads and downloads.

Once established, you can use the icons in the lower right corner to push and pull site data in between server and PC.

A lot more comfortable than moving sites between local and live server manually.
6. Adjust the Server Type and PHP Version to Your Needs
Local allows you to configure different server environments during setup. You can choose whether to use an NGINX or Apache server as well as the PHP and MySQL version.

What you might not be aware of is that you can change these parameters later on, at least for the server type and PHP version. This makes a lot of sense if you move your live site to a new hosting provider with different stats. In that case, you want to make sure your local environment features the same makeup so that you can test changes there without having unpleasant surprises when you push them live.
It’s also extremely easy. Simply click on a site in your list to open up its menu. Under Web server and PHP version respectively, you find a drop-down menu where you can switch between different configurations. Pick what you need and then click on the Apply link that appears next to it.

Local will ask for confirmation and, once you give it, will make the requested changes.

7. Update WordPress Without Logging In
While we are talking about this topic: Switching to a different PHP version can sometimes necessitate a WordPress update (or at least make it advisable). One of Local’s smaller features is that you can also do this from inside the program, without the need to log in to your WordPress installation.
On the site page, under WordPress version, Local will show you when an update to new WordPress version is possible (it will always use the latest version for new sites).

Click and confirm and Local will automatically run the update on that particular site.
8. Log in Faster With One-Click Admin
Another very small thing that makes a frequent action just a tiny bit easier is the one-click admin function. You find it under the same name in your normal website menu.

Simply switch it on, choose the user you want to log in as from the drop-down menu and that’s it. Now, when you use the WP Admin button for that site, you will automatically land on the WordPress dashboard instead of the login page.
9. Speed Up Development With WP-CLI
WP-CLI is the WordPress console interface. If you know your way around it, it allows you to perform a lot of tasks via text commands, even simultaneously. WP-CLI is popular among developers because it can speed up a lot of development tasks (for more information, see here).
Local gives you quick access to it. You can find an option that says Open site shell under the site title. Alternatively, right-click the site in question in the sidebar and choose the same from there.

Either opens the command interface that also automatically has WP-CLI active.

Plus, it places you inside the directory of the site you are currently editing, so you can start entering commands immediately.
8. Optimize Images in Bulk Inside Local
The Image Optimizer is another add-on you can install in Local. Simply go to the Add-ons menu, find and click it, hit the Install button, then Enable & relaunch.

Once finished, you find its menu in the Tools tab of your websites.

When you hit the Scan for images button, it will look for media files on your local site. Once done, click on View images to see the entire list.

It shows both originals and the different size versions that WordPress automatically creates upon upload. Use the tick marks on the left to choose which images to compress, then use the Optimize images button to start the process. Local will optimize the images in bulk so that they take up less space and load faster.
When done, it shows how much it reduced them in size and if there were any errors. After that, they are ready to go to the live site.

11. Find Broken Links Before Going Live
A next lesser known feature of Local that we want to look at is the Link Checker add-on. You can add it in the usual way. Once active, the function also shows up in the Tools section.

When logged in to your Local account, simply hit the Scan for links button to have the program look for broken links on your website project. If it finds something, it will tell you where the problem lies and give you a link to the piece of content where you need to fix it.

12. Enable Instant Reload to See Changes Immediately
The final Local feature we want to talk about is Instant Reload, which is available through an add-on of the same name. Once installed and enabled, you find the option to switch on Instant Reload for your websites in the Tools tab.

When you do that and open the website in your browser, any time you save changes in a CSS file located in that site’s plugin or theme directory, it will automatically refresh your browser so you can see them. Your F5 key will thank you!
Final Thoughts: Hidden Local Features
Local is a powerful piece of software with a lot of features. That also makes it easy to overlook a few.
To make sure you don’t miss out, above, we have gone over a dozen of them. From cloud backups over blueprints, Live Links, and direct server uploads, there is a lot of good stuff to take advantage of. Plus, there are many small details that seem insignificant but eliminate a lot of friction. Simple things such as the one-click copy of the Live-Links login information or one-click admin access. Finally, there are a number of very useful add-ons.
Hopefully you have learned something that will help you with your development workflow. Let us know if you know anything else!
Do you have any other less well-known Local features that you deem worth mentioning? If so, please do it in the comments below!
The post 12 Local Features You Have to Know (For Faster Development) appeared first on Torque.


