
Why attempt speed optimization of your WordPress website without plugins? A sluggish website is more than just a minor inconvenience—it’s a significant roadblock when you’re trying to build online success. In fact, according to a 2022 study by Portent, in the first five seconds of loading a page, every additional second reduces website conversion rates by an average of 4.5%.
While WordPress performance plugins might seem like the go-to solution to address this problem, they’re not always your best bet. Sure, they offer quick fixes, but they can also introduce a host of additional issues, from security vulnerabilities to code bloat.
If that sounds unpleasant, no need to fret, you can absolutely rev up your WordPress site’s speed without installing a single plugin. That’s exactly what we’ll discuss here today by showing you a multitude of ways to boost WordPress site speed without plugins.
Why Consider Plugin-Free Optimization?

Let’s get one thing straight: plugins, including performance plugins, aren’t inherently bad. They can add valuable functionality to your website and make your life as a site owner a whole lot easier. However, the more you lean on them for every little thing, the more you expose yourself to a range of potential problems, like:
- Excessive code — Each plugin you add to your website introduces additional code to it. Over time, this can accumulate and make your site sluggish. Plus, oftentimes plugins include functionality you don’t really need, adding features and code to your site you are not even using.
- Security Risks — Not all plugins are of the same quality. Some come with poorly written markup or outdated security measures, making them a ripe target for hackers. The more plugins you have, the more potential entry points for cybercriminals.
- Incompatibility Issues — Plugins can clash with each other or with your WordPress theme, causing functionality to break. This can lead to a troubleshooting nightmare, as you try to figure out which plugin is the culprit.
- Maintenance Overhead — Each plugin requires regular updates to stay secure and functional. The more plugins you have, the more time you’ll spend on maintenance, taking you away from other important tasks.
So, that’s a fair amount of pitfalls to using plugins, and they hopefully make it clear why opting for a plugin-free approach to improving site speed can be a a smart move.
Making a Diagnosis: What’s Slowing Down Your Site?
Jumping straight into solutions without analyzing the problem first isn’t the best approach. You might get lucky and figure it out right away, but in most cases, it’ll be a lot of trial and error.
That’s why it’s crucial to first identify what’s causing your WordPress site to slow down. By pinpointing the issues, you can apply targeted solutions that will have the most impact on your site’s performance.
How to Run a Speed Audit

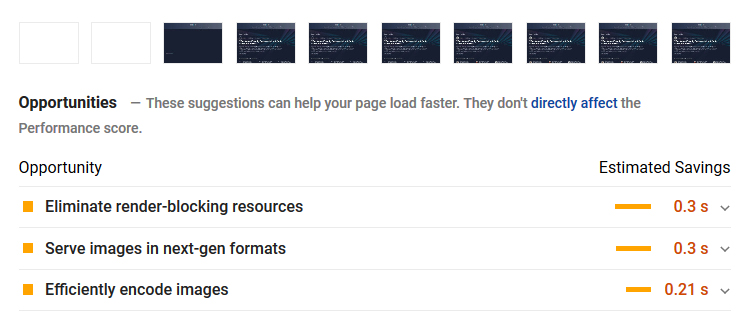
Running a speed audit is your first step in the diagnostic process. This will give you a snapshot of your site’s current efficiency and highlight areas that need improvement. Here’s how to go about it:
- Choose a Speed Testing Tool — There are several reliable tools available for this purpose. GTmetrix, Pingdom, and Google PageSpeed Insights are among the most popular ones.
- Run the Test — Input your website URL and start the test. Wait for the results to populate.
- Analyze the Results — Look for key metrics like load time, the number of requests, and page size. Pay attention to any warnings or suggestions the tool provides.
- Identify Bottlenecks — Common issues could range from server response time, non-optimized images, too many external HTTP requests, or even a lack of caching facilities.
- Document Findings — Keep a record of your initial test results. This will serve as a benchmark to measure the effectiveness of the optimizations you’ll later apply.
Conducting a thorough speed audit helps you set the stage for effective optimization. You’ll know exactly what issues to tackle, saving you time and effort in the long run.
How to Optimize Your WordPress Site’s Performance Without Plugins
Once you have analyzed the problem, it’s time to tackle it. Let’s look at some of the steps you can take to speed up your WordPress site without resorting to performance plugins.
1. Choose Hosting Wisely
Web hosting plays a pivotal role in your website’s speed and overall performance. Think of it as the foundation of your digital house. If the basis is shaky, the entire structure is at risk. Your hosting provider’s server speed, the type of storage they offer, and their data center locations can all impact how quickly your website loads.

When it comes to storage types, you’ll often encounter two options: Solid State Drives (SSD) and Hard Disk Drives (HDD). Here’s a quick comparison:
- SSD — Faster read/write speeds, less prone to mechanical failure, and generally more reliable. Ideal for websites that require quick data access.
- HDD — Slower compared to SSD, more prone to mechanical failure, but usually cheaper. Not recommended for performance-critical websites.
Choosing SSD over HDD can significantly improve your website’s speed, as SSDs can handle more data requests per second and offer faster data transfer rates. So, when you’re shopping for web hosting services, look for information on the type of storage they offer. Many modern hosting services have moved to SSDs, but it’s always good to double-check.
2. Opt for HTTPS vs HTTP
HTTPS (HyperText Transfer Protocol Secure) is essentially HTTP with an added layer of security, thanks to SSL/TLS encryption. Not only does this make your website more secure, but it also instills trust among visitors. Google even considers HTTPS as a ranking factor, so it’s a win-win situation.
However, in addition to security improvements, using HTTPS is also good for site performance. That’s because it uses HTTP/2, which includes several speed improvements compared to its predecessor. You can even try it out for yourself here.

For that reason, switching to HTTP2 can significantly speed up your website loading times, making for a smoother user experience.
3. Consider Core Web Vitals
Core Web Vitals serve as a collection of metrics designed to gauge the user experience on your website. These metrics have risen to prominence due to Google’s emphasis on this area, and they’re now central factors in search engine rankings.
A satisfying user experience on your website isn’t a one-off event, it’s an ongoing process. Core Web Vitals act as your guide through this process, spotlighting key moments in a user’s engagement with your site. They also point out real-world performance bottlenecks, which you can use to fine-tune your website accordingly.
To gauge these performance indicators, you generally have two methods to pursue:
- Lab Data — This is data gathered in a controlled setting, which is great for troubleshooting and yields consistent results.
- Field Data — Information collected from actual user interactions, offering a genuine snapshot of your user experience, albeit with less capacity for debugging.
For measuring these vitals, tools like PageSpeed Insights and Chrome Dev Tools are indispensable resources. They can provide insights on all Core Web Vitals metrics, namely Largest Contentful Paint, First Input Delay, and Cumulative Layout Shift.
4. Update to the Latest PHP Version
PHP is the scripting language that powers WordPress, but different versions of PHP can have a significant impact on your WordPress site’s performance.
For instance, a report put together by Cloudways showed that PHP 8 loaded three times faster than PHP 5.6.

The latest PHP versions also come with improved security features and are more likely to be supported by plugin and theme developers. So, if your site is running on an outdated PHP version, upgrading to the latest version can bring about a noticeable improvement.
5. Use a CDN
A Content Delivery Network (CDN) is a global network of servers designed to distribute your WordPress site’s static content—like images, CSS, and JavaScript—and sometimes even dynamic content. The goal is to minimize latency by delivering this content from servers geographically closer to the person visiting your website.

For instance, a user in Europe will access your content from a European server, while a US visitor will be served from a server within the United States.
But CDNs bring more to the table than just speed enhancements. They also come equipped with a suite of security features. Many CDN services include advanced firewall configurations, protection against DDoS attacks, and even complimentary SSL certificates.
These added layers of security are especially valuable for WordPress sites, which are frequent targets for a variety of cyber threats.
6. Carefully Consider WordPress Themes

Though there are thousands of WordPress themes available, they’re not all the same in terms of quality. Some themes come with built-in speed optimization features that can significantly improve your site’s performance or simply use speed-optimized code. Some well-known examples are:
- Astra — Known for its lightweight design and SEO-friendly structure.
- GeneratePress — Intuitive design and performance-oriented features make it a perfect choice for users with minimal coding experience.
- Neve — Its fast loading times and SEO optimization work well for those looking to increase their visibility.
No matter what theme you choose, be sure to check its ratings and read user reviews before committing. This is a good way to make sure you’re picking up the best option for your website’s needs.
7. Optimize Images

Images can really make or break a website by adding visual appeal and context to your content. However, they can also drag down your site’s performance if not optimized properly. Large, unoptimized images can slow down your site, eat up bandwidth, and even affect your SEO rankings.
Image compression is a way to reduce the size of your images and make them load faster. Here, you generally have two options:
- Lossless — This method compresses the image without losing any quality. It’s ideal for images that require high detail.
- Lossy — This method reduces the file size by removing some data from the image. It’s more effective in reducing file size but can result in a slight loss of image quality.
There are several external tools available for image optimization and while some have plugin versions available, too, you can just as easily use them on their own. A few popular options include:
- TinyPNG — This tool uses smart lossy compression techniques to reduce the file size of your PNG and JPEG images.
- Squoosh — An open-source tool that allows you to compress and resize images using various formats and settings.
8. Enable Gzip Compression
You can not only use compression for your images but also for your site as a whole. That way, the files that make up your website are shrunk, which makes them faster to download and display.
Pretty much every WordPress performance plugin includes the option to switch on compression. However, if you want to avoid using plugins (as we are doing here), you can also switch it on manually by adding the following markup to your website’s .htaccess file.
# Compress HTML, CSS, JavaScript, Text, XML and fonts AddOutputFilterByType DEFLATE application/javascript AddOutputFilterByType DEFLATE application/rss+xml AddOutputFilterByType DEFLATE application/vnd.ms-fontobject AddOutputFilterByType DEFLATE application/x-font AddOutputFilterByType DEFLATE application/x-font-opentype AddOutputFilterByType DEFLATE application/x-font-otf AddOutputFilterByType DEFLATE application/x-font-truetype AddOutputFilterByType DEFLATE application/x-font-ttf AddOutputFilterByType DEFLATE application/x-javascript AddOutputFilterByType DEFLATE application/xhtml+xml AddOutputFilterByType DEFLATE application/xml AddOutputFilterByType DEFLATE font/opentype AddOutputFilterByType DEFLATE font/otf AddOutputFilterByType DEFLATE font/ttf AddOutputFilterByType DEFLATE image/svg+xml AddOutputFilterByType DEFLATE image/x-icon AddOutputFilterByType DEFLATE text/css AddOutputFilterByType DEFLATE text/html AddOutputFilterByType DEFLATE text/javascript AddOutputFilterByType DEFLATE text/plain AddOutputFilterByType DEFLATE text/xml # Remove browser bugs (only needed for really old browsers) BrowserMatch ^Mozilla/4 gzip-only-text/html BrowserMatch ^Mozilla/4.0[678] no-gzip BrowserMatch bMSIE !no-gzip !gzip-only-text/html Header append Vary User-Agent For detailed instructions on how to do this this, check our Gzip compression tutorial.
9. Activate Browser Caching
While you are inside .htaccess, you might as well switch on browser caching. Browser caching is like a memory bank for your website. It stores static files like images, CSS, and JavaScript on the visitor’s device. That way, the next time they come to your site, these files load from their hard drive instead of being downloaded again from the server. As you can imagine, that is a much faster.
Below is the code you can use to make that happen. Place it inside .htaccess before the # END WordPress line (code source: GTMetrix).
ExpiresActive On # Images ExpiresByType image/jpeg "access plus 1 year" ExpiresByType image/gif "access plus 1 year" ExpiresByType image/png "access plus 1 year" ExpiresByType image/webp "access plus 1 year" ExpiresByType image/svg+xml "access plus 1 year" ExpiresByType image/x-icon "access plus 1 year" # Video ExpiresByType video/webm "access plus 1 year" ExpiresByType video/mp4 "access plus 1 year" ExpiresByType video/mpeg "access plus 1 year" # Fonts ExpiresByType font/ttf "access plus 1 year" ExpiresByType font/otf "access plus 1 year" ExpiresByType font/woff "access plus 1 year" ExpiresByType font/woff2 "access plus 1 year" ExpiresByType application/font-woff "access plus 1 year" # CSS, JavaScript ExpiresByType text/css "access plus 1 year" ExpiresByType text/javascript "access plus 1 year" ExpiresByType application/javascript "access plus 1 year" # Others ExpiresByType application/pdf "access plus 1 year" ExpiresByType image/vnd.microsoft.icon "access plus 1 year" 10. Remove Unused Plugins
Unused plugins aren’t just taking up space on your web host’s server—they’re also potential liabilities. The truth is, every plugin you install adds code to your WordPress installation. Even if you’re not actively using a plugin, its code can still load and affect your site’s performance.
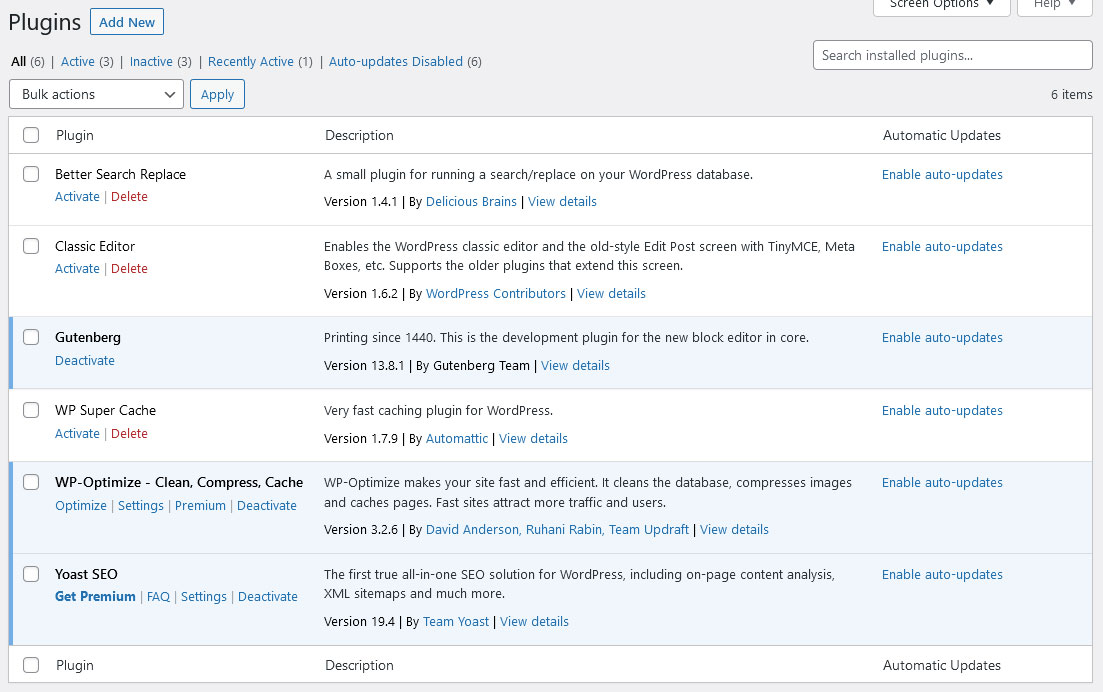
Unused plugins also create security vulnerabilities. Hackers often exploit vulnerabilities in poorly maintained plugins to gain unauthorized access to websites.
And they can even cause conflicts with other plugins or themes you’re actively using. The more plugins you have, the higher the likelihood of them conflicting with each other or with your active theme. This can lead to all sorts of issues, from broken features to complete site crashes.
That’s why removing unused plugins is a smart idea. Regularly audit your plugin collection to see if you actually need everything active on your site or if you can remove or replace plugins with leaner solutions.
11. Move JavaScript to the Footer
JavaScript files can be resource-heavy and slow down your website if they’re not managed properly. By moving JavaScript files to the footer, you allow the browser to render the page without waiting for these scripts to load.
This also improves the user experience, as site visitors can start interacting with the page sooner, which can lead to better engagement and lower bounce rates. Learn more about this in our article about render-blocking resources.
12. Use Google Tag Manager
Google Tag Manager is a game-changer when it comes to managing multiple tracking codes on your website. Instead of manually adding tracking codes for Google Analytics, Google Ads, and other third-party services separately, you can manage them all in one place.
The tag manager is also asynchronous, meaning it doesn’t block the rendering of other elements on your page. This ensures that your site loads quickly, even when you’re using multiple tracking tags. Plus, Google Tag Manager allows you to deploy tags based on triggers, giving you more control over when and how they fire.
Final Thoughts: Optimizing WordPress Speed Without Plugins
As we’ve established here, a slow website is more than just a nuisance—it’s a business liability that can cost you visitors, conversions, and revenue. While plugins may seem like a quick fix, they often bring their own set of problems. That’s why it’s crucial to take a more holistic approach to WordPress optimization.
From conducting an initial speed audit and making informed choices on hosting and themes, to fine-tuning images and taking advantage of compression and caching, every detail matters. So don’t wait—take control of your WordPress site’s performance now.
And remember, optimization is not a one-time setup but an ongoing process. Keep monitoring, keep tweaking, and most importantly, keep optimizing for a faster, more efficient website.
How do you optimize your WordPress site’s performance without plugins? Any additional tips and measures? Feel free to share your thoughts in the comments below!


