Every WordPress update brings a host of helpful new features to the platform, but the sheer volume of them can make them easy to overlook. Gutenberg especially is jam-packed with a variety of hacks and shortcuts, many of them hidden under the hood and inside menus you may not have even noticed before.
If you’re not taking advantage of these, you’re definitely missing out, as they can save you a ton of time and unnecessary frustration. From ways to save seconds when writing and page building to little tips that can revolutionize how you use WordPress, here are 17 little-known WordPress features you need to know about.
1. Distraction Free Writing
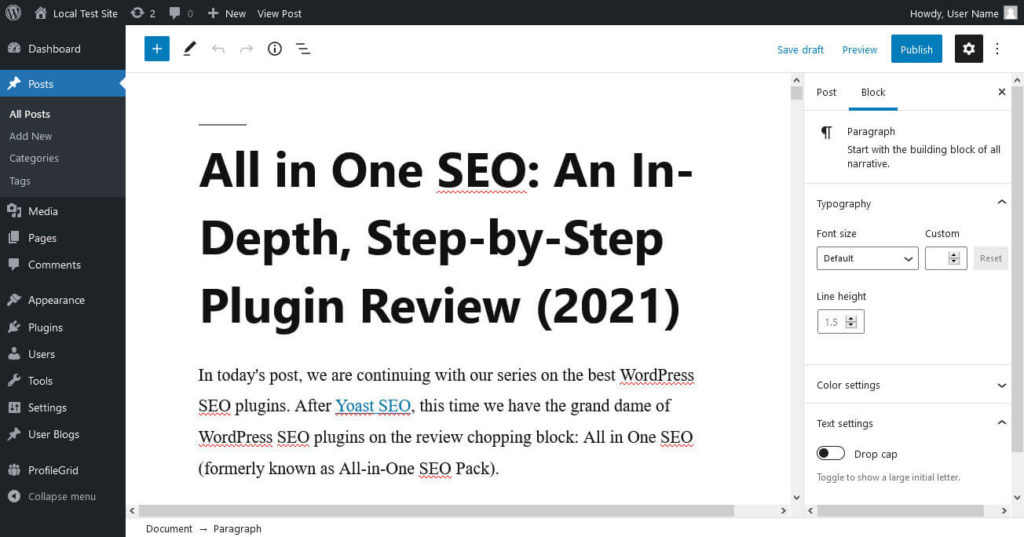
One of the hardest parts of writing within WordPress is trying to focus with all the distracting UI. You have the sidebar taking up a fifth of the screen alongside all sorts of icon-filled toolbars.

Luckily, distraction-free writing mode exists to disable much of it. It’s as simple as opening up Gutenberg and finding the fullscreen button in your toolbar (click on the three dots in the upper right corner to access it).

Click it, and all that visual noise is instantly gone from your screen. It’s a lot easier to stay focused on what you’re doing in fullscreen mode (especially if you switch off the sidebar as well).

2. Hide Items and Customize Menus With Screen Options
One of the best things about WordPress is that it provides you with so many ways to customize your website. On the other hand, the sheer overabundance of such options can be overwhelming. There are probably plenty of features cluttering up your WordPress back end that you don’t even use.
With Screen Options, getting rid of all this is as easy as ticking a checkbox. Look in the top right corner of various pages in your back end, including your dashboard, the navigation menu options, and other areas with lots of UI elements.

You should see a Screen Options dropdown. Click it, and you can easily disable the items you want to hide. This is most notably useful for customizing the welcome page that greets you when you log in, but it works to declutter all sorts of areas in the back end.
3. Sticky Posts
There’s one big issue that comes with sorting your blog chronologically: once a post falls off the front page, it’s going to lose a ton of traffic. Luckily, you can stick posts to the top of your blog and keep visitors flowing steadily to them forever.
To pin a post, open it in the editor. In the right sidebar, under Status & visibility, you should find a Stick to the top of the blog tickbox.

Check it, save, and the post should be back in the pole position.
You can also access this option from your Posts list by clicking Quick Edit and picking Make this post sticky. Don’t forget to save here, either!

4. Page Break and Read More Blocks
No one likes to read a huge block of text. When your articles get long, it can be good to break them up. These two Gutenberg blocks can help.
The first is the Page Break block, which will insert a pause where you specify. It’s a great way to add pagination to your blog posts. You can add it by clicking the Add Block button and searching for Page Break, or typing in /pagebreak.

Then there’s the More block, which adds in a Continue reading prompt in situations where only part of your article appears, such as on the homepage. It gives you control over where the article cuts off.

The More block can be added like any other block, or you can type /more.

5. Change the Autosave Interval
By default, WordPress autosaves every 60 seconds. For most people, this isn’t an issue. For others, it can cause your entire browser to lock up, which makes writing in the editor extremely annoying.
If this common issue is plaguing you, you can fix it with a simple function. (Note: Always back up your website before changing core files!) Just add the following snippet at the bottom of your site’s wp-config.php file:
define('AUTOSAVE_INTERVAL', 600);This will set the autosave interval to every 600 seconds, or 10 minutes. Change it to whatever value you like.
6. Limit Post Revisions
WordPress post revisions can quickly get out of control, especially when you and your editors are prone to making dozens of tiny changes. That content can end up taking a lot of space in your database. That’s why you may want to limit post revisions with a function.
Just like with changing the autosave interval, log into your site with FTP and access wp-config.php. At the bottom, paste in the following function:
define( 'WP_POST_REVISIONS', 5 );Change the number to whatever you like, and old revisions will be deleted from then on. You can also set it to 0 to turn off revisions entirely.
7. Automatically Close Comments
Old blog posts can be a huge source of spam or unwanted comments. That’s why many blogs choose to close comments on older posts automatically. Good thing this function is built right into WordPress!
In your back end, go to Settings > Discussion and look for Other comment settings. From there, you can choose to disable comments on articles after a certain amount of days. It’s much better than remembering to do it manually and one of those WordPress features that’s easy to overlook.

8. Better Embeds
Embedding external content into WordPress used to be a source of annoyance, but thanks to a new Gutenberg block, it’s a much more pleasant process.
Find the Embed block in the normal Add Block dialogue, then paste in the URL of the link you want to embed. Here’s a list of all websites that work by default. When embedding content from one of these sources, it’s even enough to simply post the URL and WordPress will automatically insert it. That’s what I did right here:
This is far easier than having to manually insert a video player or take screenshots of social media posts.
9. Change or Disable Media Resizing
You may have noticed that WordPress automatically resizes all your uploaded images into three different sizes. While this is useful for thumbnail images, it also takes up way more space on your site. If it bothers you, you can always turn it off in Media settings.
Open Settings > Media in your back end and find Image sizes. Here you’ll see the thumbnail, medium, and large sizes. You can change these to whatever you want, but if you want to stop generation completely, simply enter a 0 as one or all of the values.

10. Responsive Page Previews
This one can be hard to notice as the icons are fairly small and out of the way, but it’s a major help when you’re designing your site.
In Appearance > Customize, look for the three icons that resemble a computer monitor, tablet, and phone. Click them and you can automatically see how your site will look on different devices!

This allows you to work out any kinks before your changes reach the public.
11. Keyboard Shortcuts and Slash Commands
WordPress comes with a plethora of keyboard shortcuts that can help you work faster in the editor. While they take a bit to master, once you have them memorized, you’ll spend so much less time on little actions.
First of all, the platform supports all standard Ctrl/Cmd commands (such as Ctrl/Cmd+C to copy highlighted text) which should work across your browser and operating system. There’s also Ctrl/Cmd+B, Ctrl/Cmd+I, and Ctrl/Cmd+U to make text bold, italic, or underline it respectively.
Gutenberg also comes with slash commands. Instead of clicking Add Block and then searching for the one you want, you can simply type a slash followed by its name. For instance, /video will insert a video block.
Classic editor users can also try the following commands. There are more to be found under the link above.
- Alt+Shift+C – Align center
- Alt+Shift+D – Strikethrough text
- Alt+Shift+M – Insert image
- Alt+Shift+O – Ordered list
- Alt+Shift+U – Unordered list
- Alt+Shift+W – Distraction-free writing mode
- Alt+Shift+1 to Alt+Shift+6 – Heading 1-6
These timesavers may seem small, but the seconds add up.
12. Hide Gutenberg Blocks
Gutenberg shipped with dozens of new blocks, and more are being added with every update (or by Gutenberg plugins). But quite a few of them are only suitable in niche situations that may not fit your blog.
If you’re seeing a bunch of blocks you’ll definitely never have interest in, you can hide them to reduce clutter.
While in the Gutenberg editor, look for the three dots in the top right corner of the screen and click Block Manager.

From here, you can deselect any blocks you don’t want and they will no longer get in the way while searching for blocks.
13. Drag and Drop Photo Uploads
Here’s another one of these small but extremely helpful WordPress features. Normally when uploading images you would click the Upload button, then slowly navigate through your computer to find where the file you want to upload is stored.
But for those who keep their images stored in an easy-to-access place, here’s a better way: just visit the Media Library and drag the file off your computer and into your browser. This works just as well and may even be faster in some cases.
Even better, while writing in the WordPress editor, simply drag and drop the image where you want it to appear. WordPress will automatically upload and insert it directly.

14. Widget Accessibility Mode
Drag and drop functionality is often touted as the simplest and most intuitive way to navigate a UI. But for some people, the drag and drop motion can be difficult or even painful to pull off. WordPress fortunately has a plethora of accessibility options built in.
Navigate to Appearance > Widgets, look for Enable accessibility mode in the top right corner, and click it. Instead of dragging and dropping, you can now click the new Add button that’s appeared next to each available widget.

You can then add and position the widgets where you want them by simply selecting from the dropdown menus.

15. Quick Add Links
Manually hyperlinking text is a small but tedious effort, but WordPress has added a way to speed it up. Try it yourself: Copy a link into your clipboard, highlight the text you want to link from, then simply paste in the URL.

Instead of replacing the text with your link, the highlighted words should automatically become your anchor text. It’s a tiny change, but a good way to save a few seconds. Remember to configure your options such as opening the link in a new window though!
16. Favorite Themes and Plugins
While browsing WordPress themes and plugins, you may not have noticed the button located beneath or near the download button: a heart icon. (Note: You have to be logged in to WordPress.org to see this.)

Click it, and you can favorite plugins and themes you want to find again later. Afterwards, when you go to your WordPress account page, you’ll see the list of them there.

17. Reusable Gutenberg Blocks and the Group Block
Find yourself using certain Gutenberg blocks over and over in the exact same configuration? Maybe a certain gallery or a message at the end of your blog posts that’s always identical? Reusable Gutenberg blocks mean you don’t have to recreate it every time!
To save a Gutenberg block for use again later, select it, click the row of three dots in the bar that appears, then select Add to Reusable Blocks.

To load a block you’ve saved, click the Add Block button as usual, then select the Reusable option. Your saved block will be there, ready to be dropped in with a click.

This option has been around for a while, but in addition, you now have the option to save a Group Block! As the name implies, you can reload an entire set of Gutenberg blocks, not just one.
Add in the new group block either by searching for it normally or typing /group. You can add blocks within the group much the same as adding them anywhere else. When you’re finished, select the entire group block and save it as outlined above.
Mastering WordPress
There are plenty of extremely helpful and yet easily missable features in WordPress. If you want to master WordPress and make using it a much more pleasant process, you should learn how to access all of these features.
Some of them, like keyboard shortcuts, distraction-free writing mode, and reusable Gutenberg blogs, can completely change the way you work. Others, like decluttering your back end or customizing your dashboard, can just make WordPress a bit nicer to use.
How many of the entries on the list above surprised you? Do you have any other useful, lesser known WordPress features to share? Let us know in the comments!


