We recently went in depth on how to customize the WordPress navigation. This time, in order to provide a more complete picture, we thought it only good and proper that we now deal with the other end of a website and learn how to customize the footer of a WordPress site.
The footer is an often neglected part of a website. After all, lots of visitors will never actually scroll down that far. However, this kind of attitude could leave you behind.
First of all, the footer usually appears on every page of a website (unless you are using a separate landing page). Secondly, it can contain very important information. From contact details over menus and links to the privacy policy and terms of service over legal disclaimers to social icons, lots of stuff can find their place there.
To make sure any information in this part of your site looks good, we will now go over many ways to customize the WordPress footer so you can make the most of it.
Footer Customization in WordPress: Native Options
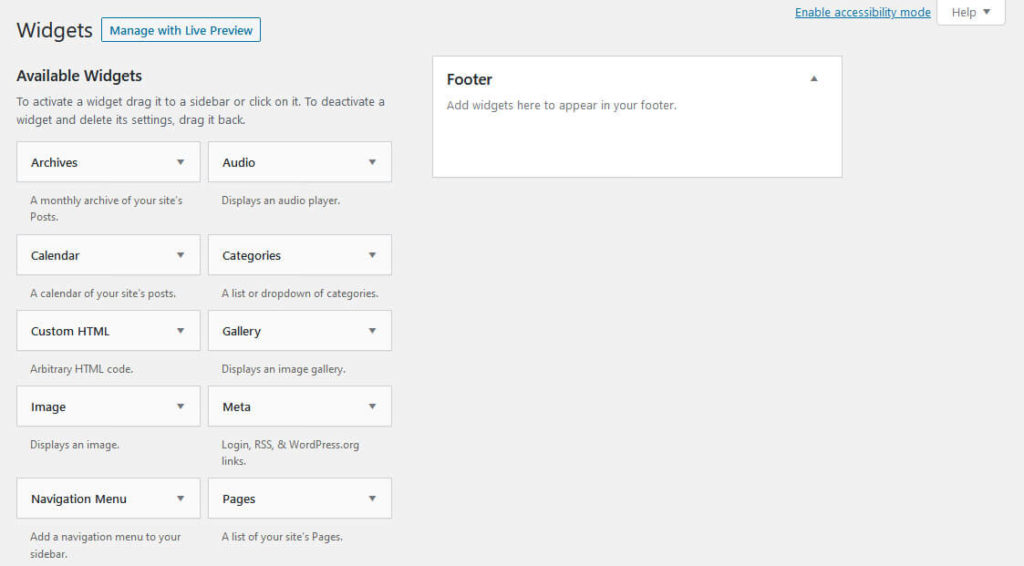
When looking to make changes to your footer, the first place you can usually turn to is the Appearance > Widgets menu in WordPress.

Most WordPress themes include at least one widget area in the footer, however, it’s also common to have two or three so you can add content in columns if needed.
Adding information is quite straightforward. Simply drag and drop a widget of your choice to where you want it to appear, configure it, and save.

Widget Options
You can theoretically use all widgets you have at hand in your WordPress footer. However, some will make more sense than others. Here are some good widget options for the footer:
- Archives — Give your visitors access to your monthly content archives by adding this widget.
- Categories — Allows your audience to access your blog categories from the footer.
- Gallery — Show off a gallery of relevant images. Just drag to the widget area, than add images as you would usually do in a post or page.
- Image — Same as the gallery but for a singular image. Adding your logo is a good idea here.
- Navigation Menu — Add links to other pages on your site. Just be sure to first create a menu under Appearance > Menus and equip it with the pages you want to link to. Then move Navigation Menu to the footer widget, optionally give it a title (can be call to action), and pick your menu from the drop-down.
- Recent Posts — Helps readers who reach the end of the page discover more content on your blog or website.
- Search — It’s always a good idea to have a search form on your site. It helps visitors find what they are looking for and the WordPress footer is a good place to put it.
- Sign-up form — If you are collecting emails on your site, a sign-up form in the footer can function as the final push to get someone to jump on your newsletter.
- Text — Add any type of text to your footer with the help of the Classic WordPress editor. You can also use formatting like headings, etc. It’s great for disclaimers or any message you want to leave your audience with.
Always remember to save your widgets after making changes!
Remove “Proudly powered by WordPress” From the Footer
Removing the “Powered by WordPress” footer text is a common request in search engines. There are several ways to remove it, depending on what your theme offers.
Use the Customizer
Some themes allow you to customize this part of the WordPress footer in the WordPress Customizer. For that, go to Appearance > Customize, then look for footer-related options.

For example, in the OceanWP theme you find these options under Footer Bottom.

As you can see, it not only overwrites the usual “Proudly powered by WordPress” message by default but also gives you the option to customize it to whatever you want instead. The theme even lets you use shortcodes to dynamically input information like the current year and more.
Options like this are very common with a lot of themes. Just don’t forget to click Publish at the top to make your changes permanent.
Remove It via Plugin
Another option to customize the footer content in WordPress can be plugins. There are several out there that can help you remove the “powered by WordPress” message.
The first is Remove “Powered by WordPress”. When activated on your site, it gives you additional theme options inside the Customizer to switch off the footer credits.

However, this only works for default WordPress markup, not anything that might be present due to your theme or some other plugin,
If that’s the case on your site, you can try Remove Footer Credit. Here, under Tools > Remove Footer Credit you are able to insert any text or HTML code (find it with the browser developer tools) to have the plugin remove it or replace it with a defined alternative.

Edit the Template File
If the above fails, you still have the option to edit your template files. Most themes have a file called footer.php, which contains the entire markup for the WordPress footer. If you want to customize it, this is where to start (more on that below).
Quick note: Changes to template files and other theme files should always be done in form of a child theme.
To edit footer.php, log into your server with an FTP client and go to wp-content/themes/yourthemedirectory. Here, find the footer.php file and download it. Then, edit it with your favorite code editor.
Here’s what the part outputting “Powered by WordPress” looks like in the Twenty Twenty-One theme.
WordPress' ); ?> Simply delete the entire thing or change it to whatever you want. Save the file, re-upload it to your (child) theme, and it should be all done.
Change the Footer Design
Just like for the WordPress navigation, if you want to make more sweeping changes to how your website’s footer looks, you will have to apply some CSS or even PHP.
Here, the first step is also to find the correct CSS selectors for the element you want to modify. The easiest way to do that is to use the aforementioned browser developer tools. Basically, right-click any footer element you want to make changes to and then choose to inspect it.

This will show you both the HTML structure of your footer as well as each element’s CSS selectors and styling.

Knowing this allows you to overwrite and modify anything you want. It’s also especially important to check this since the latest WordPress default themes (Twenty Twenty and Twenty Twenty-One) both split the footer into a bottom widget area and then the actual footer.

Below, we will go over some examples using the aforementioned Twenty Twenty theme. While Twenty Twenty-One is the latest default theme, it uses a lot of CSS variables in its markup, which would maybe make this too difficult for beginners.
We will show you the principles for how to customize your WordPress footer, however, keep in mind that the markup might not be exactly the same in your theme. So be sure to adapt as necessary.
If you are just going to make a few changes, doing this in the custom CSS field of the Customizer is fine, for larger changes, it’s a good idea to, again, use a child theme.

Modify the Footer Background Color
The first thing we want to do is pretty simple: change the background color of the site footer. You can do this relatively easily with some CSS markup. The only thing we need to keep in mind is that Twenty Twenty has its footer part split in two, with one widget area and then the actual footer.
Looking at them with the developer tools, you see that the first has a class called .footer-nav-widgets-wrapper and the latter an id called #site-footer (to learn more about HTML classes vs ids, check this post). So, in order to change both of them, you can use markup like so:
.footer-nav-widgets-wrapper, #site-footer { background-color: #DFE5F5; } .footer-widgets-outer-wrapper, .footer-top { border-color: #000; }As you might be able to see, while at it, we also changed the color of the borders so that they harmonize with the rest and don’t just disappear into the background. Here is the result:

Make Changes to Fonts and Text
Next up, we want to make some changes to the widget fonts. Currently the widget titles are quite large and look a bit disconnected from their content. Also, we want to try out what it looks like when the text underneath is indented a bit.
After some examination, the browser developer tools reveal the following CSS selectors:
.widget .widget-title.footer-widgets a
We can now apply some new styling to them like so:
.widget .widget-title { margin-bottom: 1rem; } .footer-widgets a { padding-left: 5rem; }When I insert that into my custom CSS field or child theme style sheet, it looks like this:

Add Widgets to the WordPress Footer
As a final step to customize the design of our WordPress footer, we want to add a widget in the actual site footer in order to display some contact information.
The first step for that is to register a new widget area, which we can do with this code snippet inside functions.php:
function ns_register_footer_widget() { register_sidebar( array( 'before_title' => '', 'after_title' => '
', 'before_widget' => '', 'name' => __( 'Footer-Widget', 'twentytwenty' ), 'id' => 'bottom-footer-widget', 'description' => __( 'This is the widget area in the bottom footer.', 'twentytwenty' ), ) ); } add_action( 'widgets_init', 'ns_register_footer_widget' );When it’s present, you can already see it in the Widgets menu inside the WordPress back end.

However, we now need to make it show up on the page as well. For that, we need to edit footer.php of the theme. Again, this is something for a child theme, so be sure to copy over the theme file before making changes.
Here’s the code to make the new widget area show up in the footer:
We will add this now in the file here:

When we now reload the page, we can already see the contact information on there:

All that’s left is to apply some proper styling to it like so:
.bottom-footer-widget { text-align: center; } .bottom-footer-widget-title { font-size: 2.2rem; margin: 0 auto 0.5rem; }Then, it actually looks good:

Not so hard after all, was it?
Add Scripts to Footer
The final thing we want to talk about is how to add custom scripts to the footer. One of the easiest ways is to use a plugin like Insert Headers and Footers.
Just install it and you get the option to include footer scripts via the UI.

Simply copy, paste, save, and you are good. Some themes like Genesis also have stuff like this built in.

You can also do this manually with a function (place it into functions.php):
function ns_load_footer_scripts() { wp_enqueue_script('script-name', get_stylesheet_directory_uri() . '/scripts/myscript.js', false, '1.0', true ); } add_action( 'wp_enqueue_scripts', 'ns_load_footer_scripts' );One thing you need to keep in mind is to set the last parameter to true. That’s the part that moves the script to the footer instead of the header. More information in the WordPress documentation.
Customizing the WordPress Footer in a Nutshell
The footer is a central layout element of any WordPress website. To make sure you get the most out of it, you can use many different ways to make changes to it.
Above, we have gone over several options how to customize the WordPress footer. You now know how to use native functionality, CSS, PHP, and plugins to make different changes to the footer elements.
In short, you are now ready to make it your own.
How do you customize the footer on your WordPress site? Anything to add to the above? Let us know in the comments section below.


