
Not everyone is able or willing to build blocks in JavaScript just yet, and sometimes you have to install three or four block collections until you find the blocks you would like.
There is a third way: plugins that create the blocks for you from a set of specific custom fields, with a template to control the frontend display of the blocks. The three most popular options for doing this include: Block Lab, ACF (Advanced Custom Fields) and Lazy Blocks.
My use case for this test is a small task I set out to accomplish with each of the plugins – to create a block for team members of a company that includes the following fields: first name, last name, headshot, bio, phone number, and email address and use the block on a page in a two-column display with two team members.
For each plugin I will demonstrate
- how to create the Fieldgroup,
- how to create the template for the frontend and
- how to use the blocks to create a team page.
I used Local by Flywheel as my local development tool. The test site ran on WordPress 5.1.1, Gutenberg 5.4 and the Business Theme from WordPress.com
After reading this post you will be able to select the plugin that fits your needs.
Creating a Team Block with Block Lab
Members of the XWP team built Block Lab and it is available as a free plugin with a commercial version. I used Block Lab first, installed the plugin and then started a new block.
Here is the video on how to set-up the fields.

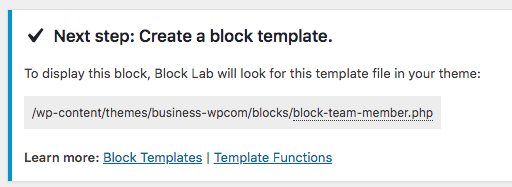
The next step is setting up the block template
When I looked at the expected location, the template will be made part of the theme directory in a subfolder called /blocks/ That’s something a developer needs to remember, as there is some content lock-in when switching themes.
To create the template, I opened my code editor, created the file block-team-member.php, and added the HTML and minimal PHP to reference the fields.
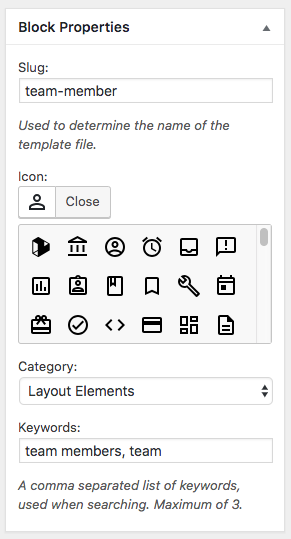
In the last step, I finished the configuration of this block with the Block Properties
- I set the icon to a person,
- selected the “Layout Elements” as Category and
- added “team member, team” as keywords
All this is necessary for the Block inserter in the editor.
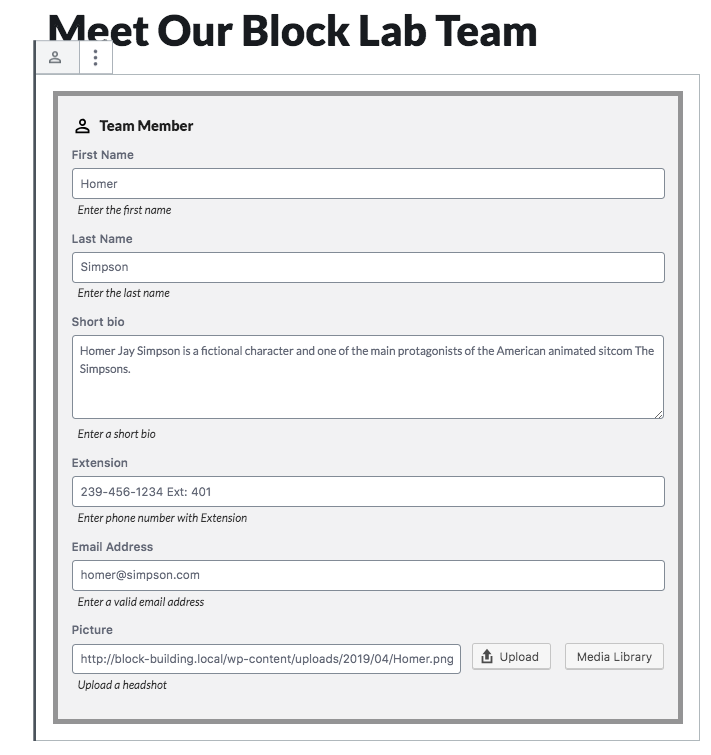
Let’s see how it works.
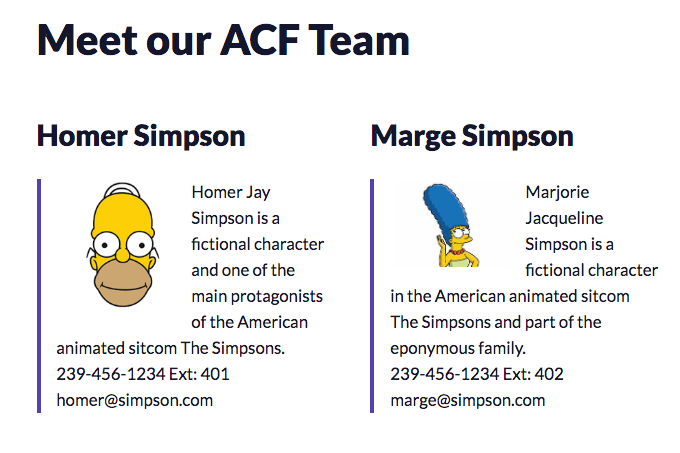
I added a new Page called Meet our Block Lab Team and added the team members, using the Block “Team Member”.
For now, I decided to have all the information filled within the block editor boundaries. During setup of the fieldgroup, I had also the choice to display form controls in the Block Options tab in the sidebar. For the moment, I have determined that’s it’s just personal preference. Once you click outside the block, the form disappears and the block is rendered similar to its frontend representation.
Now that I have the block finalized, I can add more team members to the page. I decided, I’d like them in a column block with two columns.

So far, so good. I was not thrilled that the location of the template points to the theme folder.
When I want to switch out the theme, I still would like to keep the block and the layout for the block with my site, so I would need to make sure to copy the blocks folder to the new theme’s directory. Another way is outlined in the documentation for Blocklab on Github. It offers two filters to change the default location of the template:
“To use a different template inside your theme, use the block_lab_override_theme_template( $theme_template ) filter. To use a different template outside your theme (for example, in a plugin), use the block_lab_template_path( $template_path ) filter.”
This was fairly easy to set up, even if you are not a PHP developer, you can probably use the one PHP function block-field() and make sure to reference the right field names.
Block Lab, in essence, provides you with a method to create the fields and configure the block properties in one screen, and then you need to add the corresponding block template to a folder /blocks/ in your theme’s directory. It’s fairly straight forward.
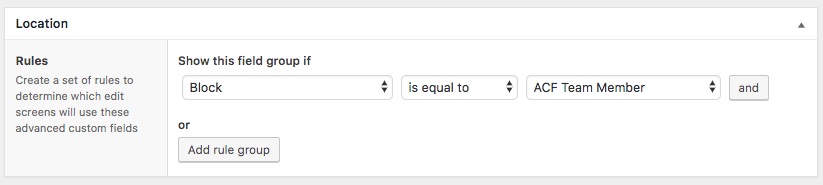
Creating a Team Block with ACF 5.8
ACF (Advanced Custom Fields) version 5.8 came out with a block builder (only available in the Pro version). For my test I used ACF 5.8 RC 1. The final release is available now. Elliot Condon is the plugin’s author and the first version was released in 2011. The plugin has grown into a hugely popular developer tool for freelancers and agencies alike and has over 1 million installs.
Its success and versatility make the creation of the field group a more involved process compared to the other two plugins. The Pro version 5.8 contains the first release of its block building tool.
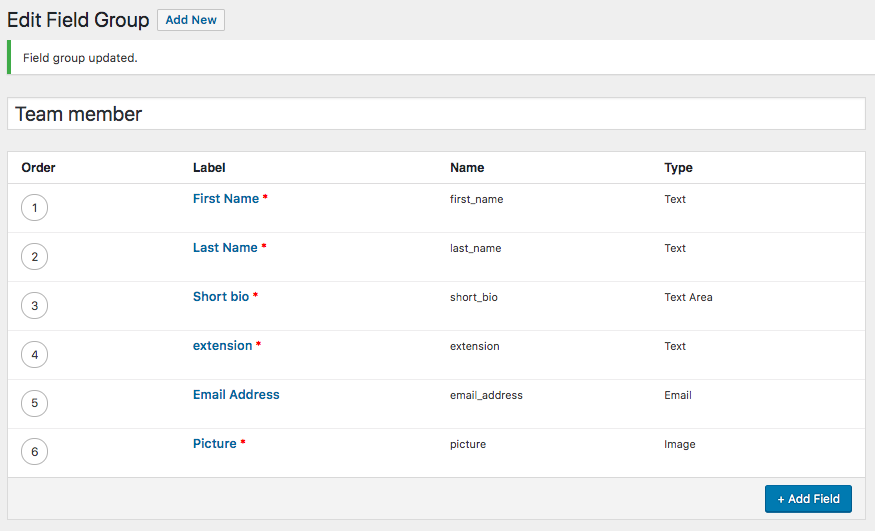
This is the admin view of the Field group “Team Member”.
Now how do I make this into a block? The documentation is comprehensive enough. Note: In this test I went in a slightly different order…
I started with the Field Group and I needed to get back to that admin screen after I registered the block (see below) .
I used two files. First, I needed to register the block in the functions.php of my theme. For the template/block rendering code I used content-block-team-member.php also to be stored in the active theme’s folder.
You will see how those two fit together in a second. The rest of the work is done by the plugin in the back end.
So let’s write the Block Code in PHP
The first snippet is the block registration. I gave it a name, title, a description, point to the render template, give it a category, an icon and some keywords, under which the content producer can find the block in the Block Inserter. I scrolled all the way to the end of my theme’s functions.php and added this snippet:
function register_acf_blocks() {
   // register a team member block.
   acf_register_block(array(
       'name'              => 'acf-team-member',
       'title'             => __('ACF Team Member'),
       'description'       => __('A custom team member block created via ACF 5.8'),
       'render_template'   => 'content-block-team-member.php',
       'category'          => 'formatting',
       'icon'              => 'admin-comments',
       'keywords'          => array( 'team member', 'team' ),
   ));
}
// Check if function exists and hook into setup.
if( function_exists('acf_register_block') ) {
   add_action('acf/init', 'register_acf_blocks');
}
This code is straight from the documentation and I just changed a few values.
In the next section I created the block rendering template. The file name needs to match the “render_template” attribute in the above text, which is “content-block-team-member.php”
I also just followed along ACF’s documentation and only changed a few values and updated the display code.
" class="team-member ">
![]() " alt="" alt=" " width="150" style="float:left;padding:4px;margin;2px;"/>
" alt="" alt=" " width="150" style="float:left;padding:4px;margin;2px;"/>


