Creating a unique WordPress-based website can be a time-consuming process. If you are a web developer with dozens of clients, you’ll repeatedly be undertaking the same tasks. As a freelancer, this precious time could be better used elsewhere.
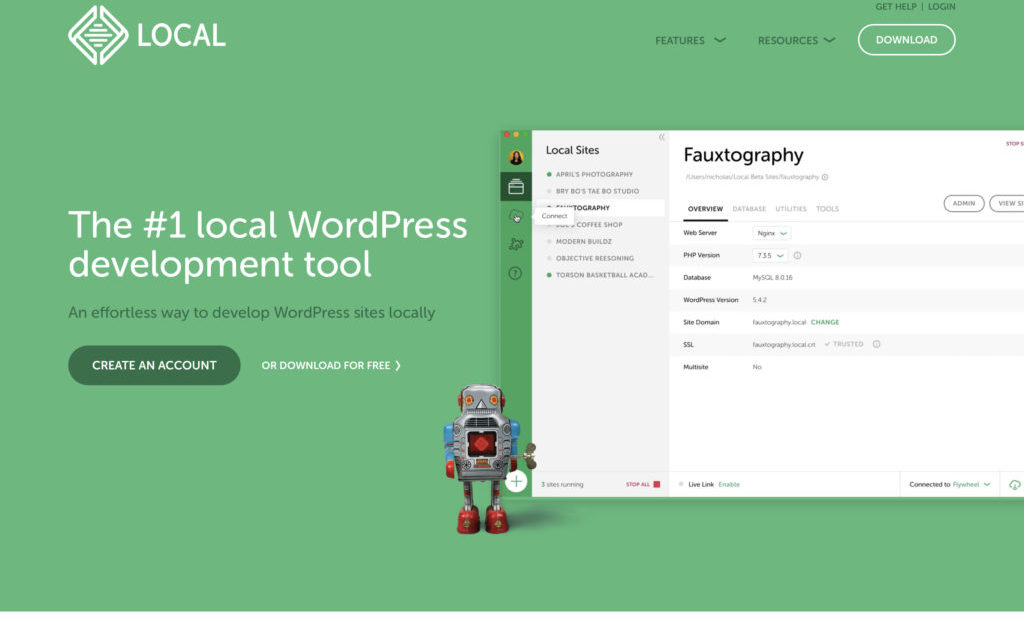
One solution to this problem is Local, formerly known as Local by Flywheel. This is a tool that streamlines your offline WordPress development workflows. While plenty of other solutions do this, Local is particularly easy to use, and offers many time-saving features. Best of all, it’s completely free.
In this post, we’ll explain what Local is and discuss its advantages for freelance web developers. We’ll then look at four of its key features and explain how they can save your valuable time. Let’s get started!
What Is Local?
Local, now owned by WP Engine, is a local development tool that simplifies and speeds up WordPress design and development. By using many of the application’s time-saving features, you can have a WordPress website set up in under a minute.

Unlike many competitor solutions, Local is user-friendly while still offering many powerful features. You can create as many staging and development sites as you need, and monitor the status of your existing sites in a central location. You can also access your sites’ dashboards, databases, and directories quickly.
This application is available for Windows and Mac, and is free to download. There is only one paid feature in Local: the ability to push your sites a live server. This requires a hosting account with either WP Engine or Flywheel, although it is free if you already have managed hosting with one of these providers.
The Advantages of Using Local for Your Development Projects
Having a local environment is essential for WordPress development. Editing your website live is risky, and can appear unprofessional to visitors if they’re faced with in-progress changes. Without a safe place to test changes and perform troubleshooting, you risk taking your website offline or making features inaccessible to those trying to use them.
A local tool also means you’re not not limited by your physical environment or internet quality. You can work on your sites offline, which is especially handy if you tend to travel a lot.
There are many tools for local website development, with XAMPP and WAMP perhaps being the most widely known. However, Local’s primary advantage is that it focuses exclusively on WordPress development. Its features are therefore uniquely tailored to what WordPress developers need, ensuring that WordPress deployment is both smooth and quick.
4 Key Features of Local That Can Free Up Your Time
Local provides a lot of features. On the most basic level, it will set up WordPress sites for you. All you have to do is enter a little basic information, and then opt for the default settings or customize the environment to your liking.
However, this tool can do more than simply create staging sites. Let’s take a closer look at four of its key features, focusing on the functionality that will save you the most time.
1. Blueprints
First up, Blueprints enable you to save an entire WordPress installation as a reusable foundation. A Blueprint contains all of a site’s data, including theme and plugin files. It allows you to build exact replicas of the site, acting as a foundation for future projects.
This feature can save you a lot of time, because you won’t have to install everything manually. For example, you could create a standard blog Blueprint if your clients request a lot of blogging websites. You might also create a membership site or eCommerce Blueprint. The possibilities are endless.
To use Blueprints, you’ll first need to create a site in Local and install whatever themes and plugins you wish to be part of your base blueprint. You can also add pages at this stage, such as a default home page, About section, or Contact page. In addition, you might want to delete the sample content and customize your WordPress settings.
When you’re satisfied, go to Local and right-click on the name of the site you just created:

You should now have an option to select Save as Blueprint, and then name and save your site.
The next time you wish to create a WordPress website using this foundation, open the Advanced Options on the site setup screen, and pick Create from a Blueprint:

Here you should see a list of any Blueprints you’ve created. Choose the one you want to use, and click on Continue. What you saved will now be imported into your new site, and you can proceed to customize it as needed.
2. Local Connect
The Local Connect feature allows you to move your site between Local and your web hosting provider. Creating a copy of your site with Local lets you quickly and easily create a sandbox environment. Once you’ve finished making changes to that sandbox, you can push it live, or move it to a work-in-progress staging area so you can receive feedback from colleagues and clients.
As we mentioned previously, this only works with Flywheel and WP Engine hosting accounts. To access the feature, click on the Connect Host button in the bottom-right corner of the Local dashboard. You will either need to log in to your Flywheel hosting account or input WP Engine’s API credentials:

After that, in place of the Connect Host button, you should now see that you are connected. Next to that information, you will see the push and pull icons.
Meanwhile, in the Connect menu in the sidebar, you will now be able to pull your sites into your Local environment. The option is located next to your site’s name, and Local will give you the option to either pull the data into an existing site or create a new one.
3. Site Defaults
Similar to Blueprints, Site Defaults enable you to install default WordPress installations quickly. You can set default settings for new sites you’ll create, including choosing your preferred PHP version, web server, and admin credentials.
Creating new site defaults is easy. Open up the Preferences section in Local, and you’ll see the option to create new site defaults. Here you will be able to set the default email, Local site path, and domain suffix:

You can also set environmental preferences such as the PHP and MySQL versions, and choose whether to use Nginx or Apache web servers.
4. Live Link
Last but not least, Live Link turns the site you’ve created locally into a working test environment with a direct connection to your machine. It can save you a lot of time by creating editable credentials and allowing you to send direct links to your clients or co-workers.
Live Link eliminates the need to create a secondary live staging area and deploy your files there. It will also allow you to test and debug your website on multiple devices, so you can ensure a positive user experience.
You’ll find the Live Link option in the bottom-left corner of the Local screen:

Clicking on Enable will create a new link for your current site. Once your client or colleagues have finished viewing, you can select Disable to make the link unavailable.
Conclusion
Local development is key to creating WordPress sites efficiently and effectively. You’ll just need the right tool, and for many developers Local is a solid solution. It makes creating and setting up new WordPress sites easier and quicker. That extra time saved can be of huge benefit to your freelance web development business.
To recap, here are the key features of Local that can save you time as a developer:
- Blueprints: Create basic sites that you can use as the foundations for future projects.
- Local Connect: Move your site quickly between Local and your hosting provider.
- Site Defaults: Set up the defaults that will be used for new sites.
- Live Link: Allow colleagues and clients to see your work in progress.
Do you have any questions about how to start using Local? Let us know in the comments section below!


