
Do you need to add nofollow links in your WordPress navigation menus?
Many website owners prefer to add a nofollow tag to external links, but beginners may find this tricky when adding a custom link to a menu.
In this article, we’ll show you how to add nofollow links in WordPress navigation menus.

Why Add Nofollow Links in WordPress Navigation Menus?
If you are running a WordPress website, then you may want to add a nofollow tag when creating external links. This lets search engines know not to pass any link authority from your page to the other website that you’re linking to.
When you link to an external website, search engines consider that as a ranking signal, and they will pass a small portion of your authority to the other website. As a general SEO best practice, you should add nofollow to all external websites that you don’t trust.
You do that by adding the rel="nofollow" attribute to the link like this:
You can learn more in our beginner’s guide on how to add nofollow links in WordPress. However, adding nofollow links to navigation menu items is a little different and can be confusing for beginners.
In this article, we will show you how to add nofollow links in WordPress navigation menus. We’ll cover two methods, and the second method is for those using WordPress 5.9 or higher and a theme that’s compatible with the new theme editor.
- Method 1: Adding Nofollow Links Using the WordPress Menu Editor
- Method 2: Adding Nofollow Links Using the WordPress Theme Editor
Method 1: Adding Nofollow Links Using the WordPress Menu Editor
To get started, simply visit Appearance » Menus in your WordPress admin area.
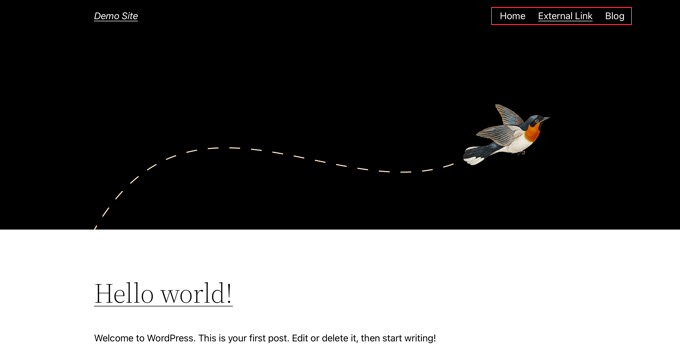
First, you need to add the external link to your WordPress navigation menu just like you would add any custom link.
To do that, you need to click on the ‘Custom Links’ tab so you can see the URL and Link Text options. Simply enter the URL and link text of the website you are linking to.
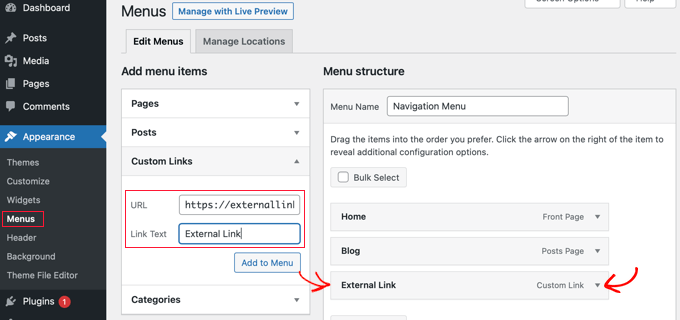
After that, you should click the ‘Add to Menu’ button and the link will be added to the ‘Menu structure’ column.
To add the nofollow attribute to the link, you need to click the downward arrow on the right of the menu entry, as pictured in the screenshot above. You can now see the details of the external link you just added, including the URL and navigation label.
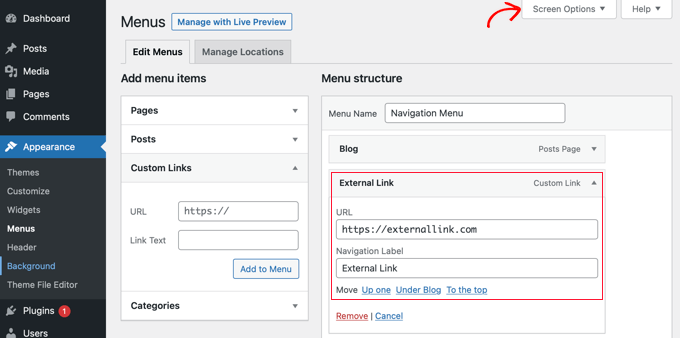
If you don’t see the Link Target and Link Relationship options, then you will have to add them.
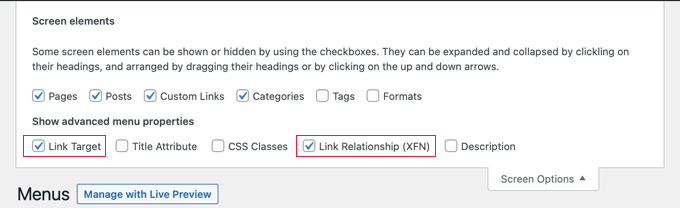
To show those options, you need to click the ‘Screen Options’ button at the top right corner of the screen. Then check the boxes next to the Link Target and Link Relationship (XFN) options.
Now you can scroll back down to your expanded menu item, and you will notice two new options. Next, simply enter nofollow in the link relationship field.
We recommend that you also click the ‘Open link in a new tab’ checkbox when adding an external link. This is a great way to improve engagement and keep your visitors from leaving your website.
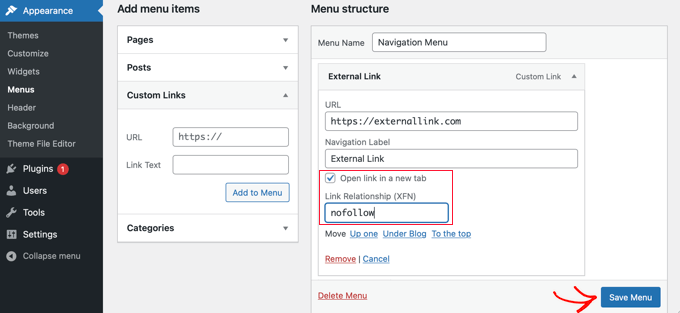
Lastly, click the ‘Save Menu’ button to store your changes.
You can now preview your site to see the new nofollow menu entry.
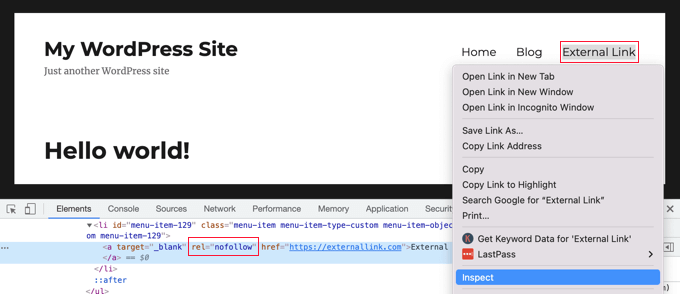
Let’s make sure that a nofollow attribute has been added to the link.
Simply right click the new link and select ‘Inspect’. Your browser window will split into two windows. In the bottom window, you will be able to see the HTML source for your link. It will display the nofollow attribute with your link.
Method 2: Adding Nofollow Links Using the WordPress Theme Editor
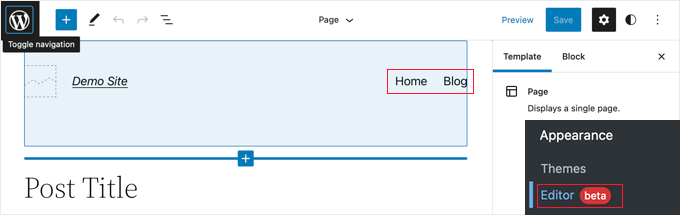
This method is for those who are using WordPress 5.9 or later and have a theme that supports the new WordPress theme editor. In that case, the Appearance » Menus page will not be available to you.
Instead, you should navigate to Appearance » Editor in your WordPress dashboard. This will open the WordPress theme editor.
Adding a New Link to the Navigation Menu
If you need to add a new menu item, then you’ll have to click the blue Block Inserter icon in the top left corner. Next, you should scroll down until you locate the Custom Link block and then drag it onto your navigation menu.
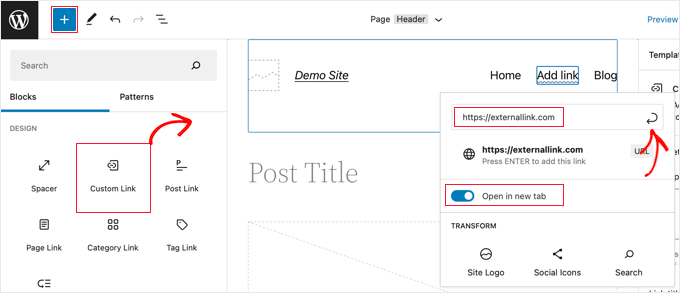
You can now type or paste the URL. If you want, you can also toggle the ‘Open in new tab’ option to the on position. After that, make sure you click the Submit icon at the top right of the popup so that the menu item’s settings are stored.
The link URL will be added to the menu, but you’ll normally want something more descriptive, such as the name of the website. Simply start typing to rename the menu item.
Adding the Nofollow Attribute to a Link
To add the nofollow attribute to a menu item, simply click it and a toolbar will appear.
Next you need to click the link icon on that toolbar. In the settings pane on the right, you need to enter nofollow in the link relationship (‘Link rel’) field.
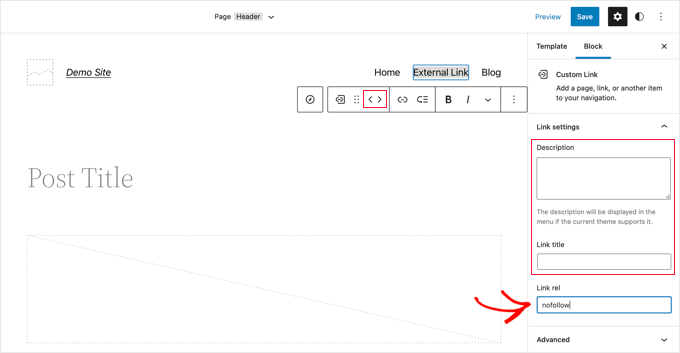
If you like, you can also add a description and title for the link, and reorder the menu items using the arrow icons on the toolbar.
When you’ve finished, click the ‘Save’ button at the top of the screen. The new custom link will be added and you can visit your website to see how your navigation menu looks now.
We hope this tutorial helped you learn how to add nofollow links in WordPress navigation menus. You may also want to learn how to create automated workflows in WordPress with Uncanny Automator, or check out our list of tips to speed up WordPress performance.
If you liked this article, then please subscribe to our YouTube Channel for WordPress video tutorials. You can also find us on Twitter and Facebook.
The post How to Add Nofollow Links in WordPress Navigation Menus first appeared on WPBeginner.


