In business, one of your responsibilities is answering questions from those who use or are interested in your products or services. Customers and prospects visit your website looking for (and expecting to find) information and solutions. However, keeping up with emails, phone calls, or other support requests can put a strain on your time.
By creating a digital resource center on your website, users can easily locate the answers they need on their own. This saves them from having to wait for your response and frees up your team to handle other tasks. An online resource center can also boost Search Engine Optimization (SEO) and generate leads.
In this article, we’ll walk you through the steps of how to build a resource center for your WordPress website, and include some additional tips along the way. Let’s get started!
The Benefits of Building a Resource Center for Your WordPress Website
A resource center is a library of materials on your website that your customers can quickly access to find answers. This self-serve support channel saves time for your team, and more importantly, for your customers. According to Forrester, two-thirds of customers feel that respect for their time is central to quality service.
The rich collection of content you create for this part of your site will serve to assist and educate your customers and potential buyers. It will help to establish your credibility as both a knowledgeable source and a business that takes care of its customers before, during, and after the buying process.
This content can also improve your SEO. Your resource center will house a large volume of articles targeting quality keywords, and providing answers to questions web searchers are asking. This makes it an effective part of your content marketing strategy.
You can incorporate internal and external links within your articles to further optimize your content. Adding video explainers and helpful images (especially screenshots) will add to the utility and value of your pages as well.
How to Build a Resource Center for Your WordPress Website (In 5 Steps)
Your resource center is a valuable asset that benefits your staff, your customers, and your business as a whole. In these following steps, we’ll show you how to create your own resource center leveraging the power and flexibility of WordPress.
Step 1: Set Up a Subdomain for Your Resource Center (Optional)
A subdomain is like a separate website attached to your primary domain, such as blog.yourdomain.com or resources.yourdomain.com. Using a subdomain, you can set up a completely separate area for your resource hub. This enables you to keep your resource center highly focused and formatted for easy navigation.
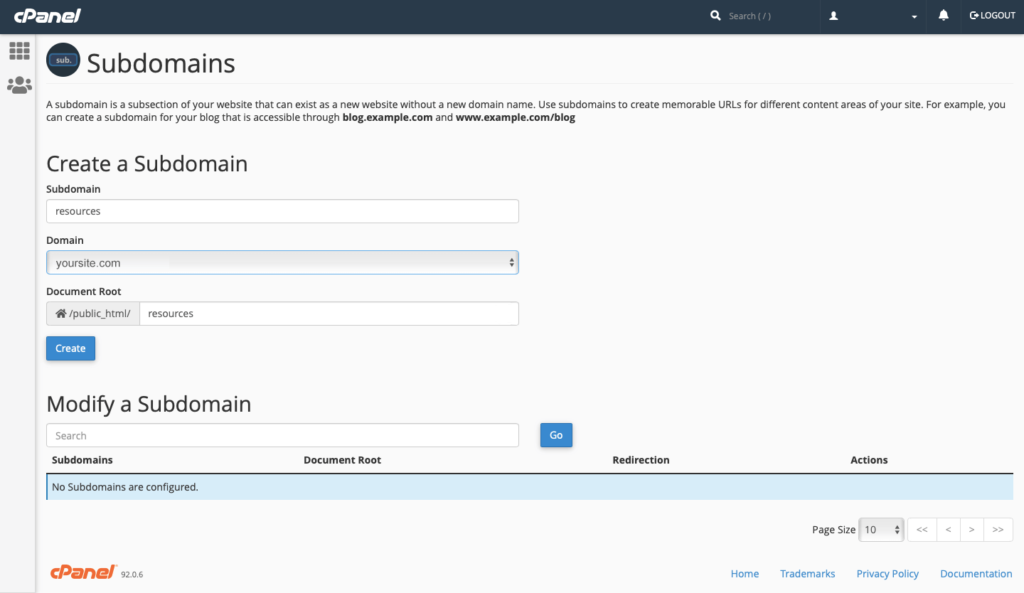
There are a couple of ways you can establish a subdomain for your resource center. One is to install WordPress on a subdomain via your hosting control panel, such as cPanel (or similar):

Alternatively, you may choose to use WordPress multisite to manage your resource center subdomain. This enables you to create a ‘subsite’ using your existing WordPress installation. You can then manage both your primary website and your resource center from a shared dashboard:

Enabling WordPress multisite for an existing installation is fairly simple, although you will need to know how to use File Transfer Protocol (FTP).
Step 2: Gather or Create Your Resources
Next you’ll need to populate your resource center with tutorials, troubleshooting guides, documentation, and any other content you want to make available to users.
Start with Frequently Asked Questions (FAQs) and common issues. Consult every relevant department within your company to create comprehensive resources that address actual needs your customers are facing.
You can also gather links to existing information and resources, such as relevant blog posts, ebooks, videos, or other content you may have already published as part of your content marketing strategy. While you’re reviewing this material, take the opportunity to do an SEO audit.
Keep this content tightly focused on specific topics. You can link to related resources where needed, rather than duplicating information. Remember that one of your goals is to save your customers time. Your resource articles should only be as long as required to sufficiently cover your topics.
Note that if you plan to use a subdomain for your resource center, each page should be contained within the subdomain so that it’s a complete body of information. You can use anchor text within the articles to link out to content on your primary website as appropriate.
Step 3: Plan Your Site Structure
A resource center may come to contain hundreds of articles over time, so it’s important to think through your site structure before you begin. You’ll want to present the information in a way that’s easy to understand and that requires minimal clicks.
A large volume of resources can become overwhelming for site visitors to navigate and complicated for you to maintain. Also, search engines favor simple navigation and clean structure, so avoid complexity where you can.
A wide and shallow site structure is preferred over one that is narrow and deep. Basically, this means visitors should be able to access the content they’re looking for with only a few clicks.
To create your site structure, divide your gathered resources into topics and subtopics. Use WordPress categories for main topics, and subcategories for content under those broader subjects. Use tags to help visitors search for content.
You’ll also want to plan your resource center navigation. How will your website visitors find the information they’re looking for? You can use menus, search functionality, and filters to help them quickly and easily navigate your library of content.
By giving site structure some thought before you begin building, you can ensure your resource center can scale alongside your business and provide an optimal customer experience.
Step 4: Publish Your Resources Page
For a simple presentation, create a Resources page in WordPress. Use headings to designate main topics, and list each resource under its appropriate heading, using anchor text for the individual articles:

Your content presentation is somewhat dependent on the amount of information you have. For a smaller body of content, you might create a table:

If your theme has the capability, an accordion display or other layout may work depending on how much information you have and how you’d like it to appear.
Having a solid plan for site structure is still essential at this stage. You may find it helpful to keep an eye toward managing scalability while prioritizing customer service as your body of content expands.
Step 5: Make Your Resources Searchable and Shareable
Your resource center is a valuable library of information, so you’ll want to make sure it’s easy to find and share. You can easily accomplish this with some helpful WordPress tools.
First, be sure to add a link to your resource center in your website menu(s). If you have a secondary menu in your footer and consider it worthwhile, you might also include links to specific categories.
To make your resource center searchable, you can rely on the native WordPress search functionality. You can add a search widget to your header, in a sidebar, or in your footer, depending on your theme.
You can enhance your search feature with a plugin such as Search & Filter. This will enable users to narrow down their results and find what they’re looking for more quickly.
Lastly, be sure to enable social sharing for your resources. You can activate Jetpack for access to sharing functionality or use a dedicated plugin such as Ultimately Social.
Conclusion
Building a resource center for your website is an excellent way to serve your customers, free up time, generate leads, and improve your SEO. Creating one does require an upfront investment, but once you’ve built it, it should require minimal effort to maintain.
In this article, we’ve discussed some benefits of building a digital resource center, and walked you through the steps to set one up. If you’d prefer to outsource this task, we at Pronto Marketing specialize in website design and build services for small businesses and can help you create a resource center to meet your unique needs.
Do you have any questions about building a resource center with WordPress? Let us know in the comments section below!


