The WordPress Block Editor (“Gutenberg”) provides a wide range of built-in blocks, but one size doesn’t always fit all. Out-of-the-box, Gutenberg may not have everything you need to build a beautiful block-based website.
Fortunately, there are ways to expand on Gutenberg’s built-in library. By using a plugin such as Genesis Custom Blocks, you can build your very own elements using the familiar WordPress editor. This might include a related products block that you can use outside of WooCommerce’s regular product pages, or a coupon block that only appears to logged-in customers.
In this article, we’ll discuss why so many website owners are developing custom Gutenberg blocks. We’ll then show you how to build your own in three easy steps. Let’s get started!
An Introduction to Custom Blocks (And Why You Might Want to Create Them)
The WordPress Gutenberg editor may have been controversial when it was first introduced. However, it’s now generally accepted that the block Editor gives website owners more flexibility.
Although there’s plenty to like, this editor does have some limitations, particularly when you’re using third party plugins. For example, the core WooCommerce plugin has a related products feature that you may want to use in multiple locations across your website. However, that feature isn’t available as a block.
Genesis Custom Blocks is a plugin that you can use to build your own blocks. Creating a custom element can be useful if you’re struggling to bring your creative vision to life using WordPress’ default selection. It can also be a great way to give your site a unique look and feel, or even new functionality.
Designing your own blocks also means you won’t have to install WordPress plugins simply to access their blocks. This can help minimize the number of plugins installed on your site, which is good news for security. It can also reduce how much time you’ll need to spend maintaining your plugins.
If you’ve extended your site with multiple third-party plugins, apps, systems, or other services, custom blocks can help with compatibility. You can design these elements to ensure that they integrate with all the additional software and services your website is using.
While it’s possible to create a custom block effect by adding code to your pages and posts, this can be time-consuming and frustrating. It also leaves lots of opportunities for human error, such as spelling mistakes and typos. It’s typically far easier to implement your design as a reusable content block. Then, every time you want to use this block you can simply select it from the familiar Gutenberg editor.
How to Create a Custom Gutenberg Block in WordPress (In 3 Steps)
In this article we’ll be using the Genesis Custom Blocks plugin to create a custom element. As an example, we’ll be creating an author bio block that you can add to the bottom of your blog posts.
This block will consist of an image field where the author can add their headshot or avatar, and an area for their bio. You can also add any extra fields that you want to use. After activating the Genesis Custom Blocks plugin, you’re ready to get started.
Step 1: Configure Your Block
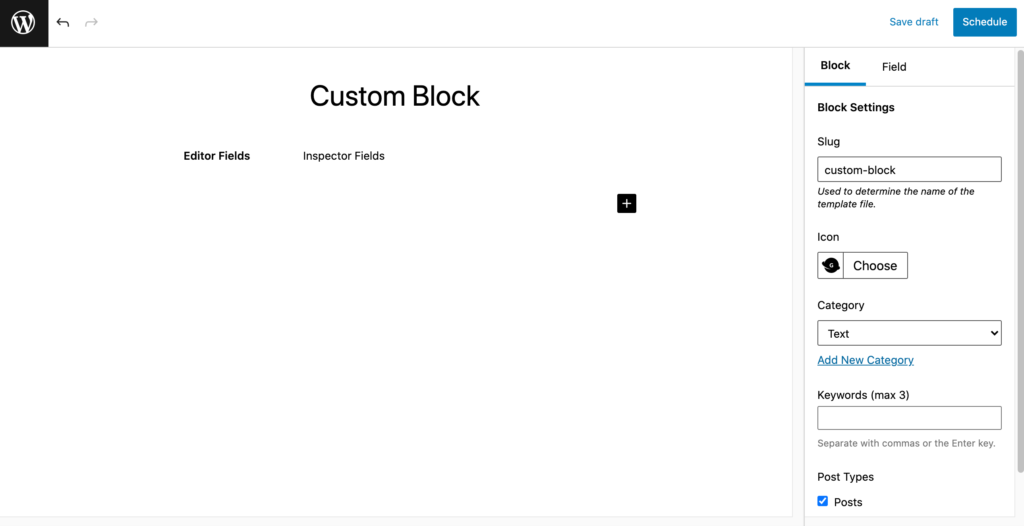
In the WordPress dashboard, navigate to Custom Blocks > Add New. You can then give your block a descriptive name:

Next, you’ll configure the block’s properties. This will help you find this block more easily in the Gutenberg block selector.
In this step, you can choose the icon that will represent this block in the editor, and the category where it will be stored. You can either choose from the default block categories, or create a new one by selecting Add New Category. If you plan to create multiple blocks, it may help to create a category where you’ll store all of your Genesis blocks:

You can also assign some keywords to this block. These keywords will make it easier to find this block in the selector. You can enter a maximum of three:

By default, you can use your custom blocks across both pages and posts. However, you can change this default behavior using the Post Types buttons. Since you’re creating an author bio block in this example, you may want to limit it to posts, as it’s unusual to assign an author to a website’s pages.
The block’s slug is generated automatically based on its name. However, you can edit this slug if required. We’ll be using the slug to create our block template in a later step, so it’s important to make a note of this information.
Step 2: Design Your Custom Gutenberg Block
Next, you’ll add some Editor Fields to your custom block. These fields are points of data that you can edit every time you use this block (for example, adding a photo to an ‘Image’ field). To add a field, select Editor Field and then give the plus icon a click:

Under Field Label, enter the text that will be displayed alongside the input field. This is your chance to give the author a hint about the content they should enter. Under Field Type, choose the type of input that this field should accept. This can help you ensure that all authors use the block consistently.
Genesis Custom Blocks supports a range of field types, including ‘Checkbox’, ‘Image’, and ‘Toggle’. For an author bio block, you’ll typically include an Image field where the author can display their headshot or avatar. You’ll also need a space for their bio.
To do the latter, you can create a simple text input option by adding a Text block. Alternatively, you can give the author more space to work with by adding a ‘Textarea’. This Textarea field creates a multi-line text input option, which is suitable for paragraphs.
As you add various fields, you’ll get access to different configuration options. In the following screenshots, we’re using Text as the field type.
For a Text field, you can provide some placeholder text and specify a character limit. You can also use Field Width to specify how it should be displayed on your website:

You can repeat these steps for each field in your custom block. When you’re happy with how your block is configured, click on Publish. This element will now be available in the WordPress block selector.
Step 3: Build a Block Template
In order to display your new block properly, you’ll need to create a block template for your chosen WordPress theme. This includes all of the field data that’s used within your custom block, such as your author headshot and bio text.
You’ll need to store your block templates inside your active theme’s directory. The way you access this directory will vary depending on your hosting environment. However most hosting providers will offer File Transfer Protocol (FTP) access.
You can then use an FTP client such as FileZilla to remotely connect to your hosting provider. If you’re unsure how to do this, it may help to refer to your provider’s documentation, or you can contact them directly for assistance.
Once you’re successfully connected to your website, you can open your active theme’s directory. Inside this directory, create a new folder named “blocks“.
Next, create a new PHP file inside the blocks directory. You can name this file in the following format:
block-{block-slug}.phpMake sure you replace “block-slug” with the slug for the block you created in the previous step. For example, this might look like “block-custom-block.php”.
At this point, Genesis can successfully recognize your block template. However, you’ll need to code your template using HTML and any necessary PHP functions.
How you complete this step will vary depending on your block. However, you’ll find lots of sample code over at the Genesis Custom Blocks website. After successfully completing these steps, you should be able to access your custom block inside the Gutenberg editor:

If your block doesn’t appear automatically, you can access Gutenberg’s editor library by clicking on Browse All. You can then select the category where you created your custom block – you should now be able to insert it into your page or post.
Conclusion
Gutenberg provides a decent selection of built-in blocks, but it’s far from an exhaustive list. By using a plugin such as Genesis Custom Blocks, you can move beyond the limitations of Gutenberg’s library.
In this article we showed you how to design and develop a custom Gutenberg block, in three stages:
- Configure your custom Gutenberg block.
- Design your block.
- Build a block template.
Do you have questions about creating a custom Gutenberg block in WordPress? Ask away in the comments section below!


