Creating a Facebook Business Page can be an effective way to promote your products. However, by default, your followers will need to navigate away from your page to purchase any items that catch their eyes. This extra step can significantly impact your conversion rates.
Fortunately, there is a way to sell your entire catalog directly from your page. With a little help from the Facebook for WooCommerce integration, you can transform your Facebook Page into an additional sales channel.
In this post, we’ll look at what Facebook Shops are and why you might want to create your own. Then we’ll show you how to sell your products through this popular social media platform in five steps using the WooCommerce integration. Let’s get started!
An Introduction to Facebook Shops
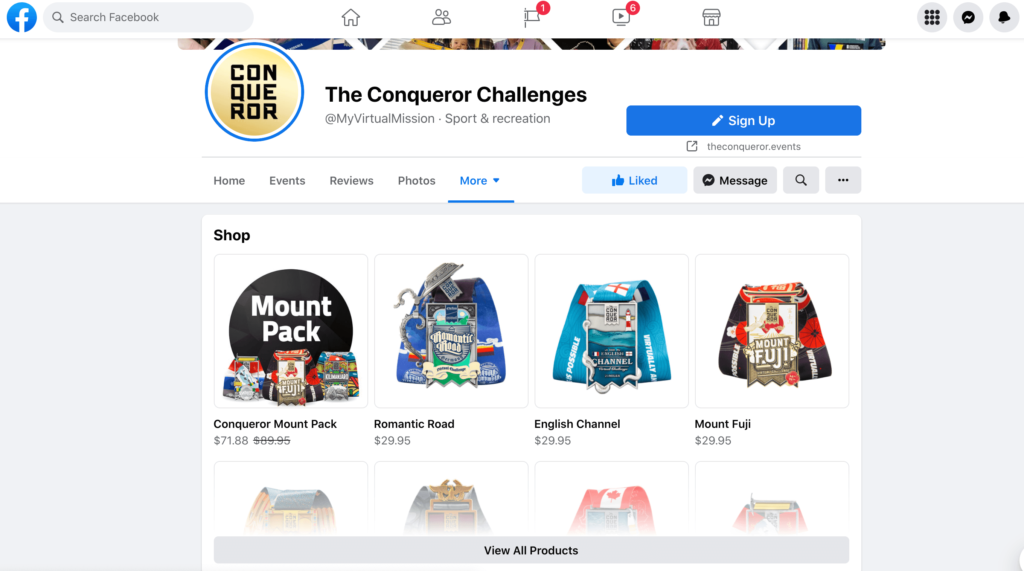
Facebook Shops are virtual storefronts that live natively on your Facebook Business Page. With this shop, your customers can discover, share, and even purchase your products without ever leaving the social media platform. This enables you to provide a native shopping experience:

With over 2.6 billion active monthly users, Facebook can be a powerful place to connect with a huge potential audience. It also presents a chance to generate revenue directly from one of the world’s largest social networks.
Once you’ve launched your shop, you can tag products that appear in your Facebook ads and posts. This can help drive conversions by making it easier for your followers to find items featured in your content:

After launching a shop, your products will also be discoverable under Facebook’s Shopping tab. Even better, you don’t need to do anything to connect with new potential customers. Facebook’s algorithm automatically surfaces products that users may be interested in based on their prior activity.
Since you’ve already built your eCommerce store using WooCommerce, you can easily sync your Facebook Shop with your online store. This means that you can run a successful Facebook Shop with potentially very little day-to-day maintenance.
How to Create a Facebook Shop With WooCommerce (In 5 Steps)
Facebook Shops is an excellent way to display and sell your products to your existing followers and Facebook’s wider user base. Below, we’ll walk you through how to turn this popular social networking site into your personal storefront in five easy steps.
Step 1: Create a Facebook Pixel
If you’re going to maximize your sales, it’s vital to gather as much information about your customers as possible. Therefore, we’ll start by creating a Facebook Pixel.
The Facebook Pixel is a piece of code that collects data. This code can help you track activity from your Facebook advertisements and optimize your conversion rates by running targeting advertising campaigns.
To get started, head over to Events Manager and log into your account. In the left-hand menu, select Connect Data Sources:

In the subsequent pop-up, click on Web, followed by Connect:
Next, select Facebook Pixel > Connect. You can now give your Pixel a name, enter your eCommerce store’s URL, and click on Continue:
Next, you can choose how to add the Pixel code to your website. If you opt to Install Code Manually, you can add the Pixel as a code snippet using the Insert Headers and Footers plugin. After installing and activating this tool, navigate to Settings > Insert Headers and Footers:

You can paste the Facebook Pixel tracking code into the Scripts in Header box. As soon as you click on Save, WordPress will add the Facebook Pixel to your online store.
Step 2: Set Up the Facebook Shop for WooCommerce Integration
You can connect your online store to Facebook using the Facebook for WooCommerce extension. After adding this plugin to your cart, follow the onscreen instructions to download it as a .zip file:

In your WordPress dashboard, navigate to Plugins > Add New. You can upload the .zip file and select Activate Plugin when prompted. Next, you’ll need to connect this plugin to your Facebook account by browsing to Marketing > Facebook > Get Started:

Your Facebook Page should open in a new tab. In the pop-up, make sure Facebook Shop is selected:

At this point, you can optionally create a Facebook Ad account and enable people to see your products on your Instagram profile and in tagged posts. Once you’ve made your selection, click on Get Started.
When prompted, you can choose the account where you want to manage your business assets, including your Facebook Page, ad accounts, and product catalog. Just be aware that this person will own all the assets that you manage via the Facebook for WooCommerce service:

After making your selection, click on Continue. You can now choose which Facebook Page to connect to your WooCommerce store, and then select Continue again.
Step 3: Configure your Facebook Shop
The next step is to specify a catalog. This is a container that helps manage your inventory, including adding titles, images, and product descriptions. You can either use a pre-existing catalog or create a new one.
Next, select the Facebook Pixel we created in the previous step and give your eCommerce account a name. When prompted, confirm that you want to associate your eCommerce store with your Facebook page, and then click on Continue:

Facebook will display an overview of your settings. If you’re happy with your choices, select Continue.
After you review the information and features that this WooCommerce integration will have access to, you can disable any items you wish. However, keep in mind that this may impact the way your store functions. Once you make your selection, click on Next:

The setup manager will now link your store to the Facebook platform. After this process is complete, the tab should reload and display your store’s address. Assuming that this URL is correct, select That’s My Site.
Congratulations, you’ve now successfully connected your WooCommerce store and your Facebook Page! However, Facebook still needs to make sure your store meets all of its requirements, so your Shop won’t be open for business quite yet.
While you’re waiting, it’s a smart idea to put the finishing touches on your store. This ensures that you can hit the ground running as soon as Facebook approves it. This can also help boost your conversions.
Step 4: Manage Your WooCommerce Catalog
To start, it’s recommended that you map each WooCommerce category to a Facebook category using the Google Product Category (GPC) Taxonomy. This helps Facebook apply the correct tax to your products when they’re displayed in your shop.
To assign a default GPC to all your items, navigate to the Marketing > Facebook > Product Sync tab. There, you can enter a primary and secondary GPC in the Default Google Product Category section.
The Facebook integration will apply these default values to any product within that category. However, you can override the settings for individual products by navigating to Products > All Products. Next, hover over the product in question and click on the Edit link:

On the next screen, select the Facebook tab and use the Google product category fields to override the default settings. You can also customize how the product appears in your Facebook Shop. For example, you might provide a unique image and a description.
Step 5: Create a Facebook Shop Product Set
Product Sets are a way to group the items within your Facebook Shop. This can encourage conversions by helping customers explore similar and related products. For example, you might curate items based on the new season trends.
To create a collection, navigate to Products > FB Product Sets:

Next, you can enter a name and description for the Product Set, and then assign it a category. Any subsequent products you assign to this category will be added to the Product Set.
In most cases, these changes will be synced to your Facebook Shop automatically. However, you can perform a manual sync at any time by navigating to Marketing > Facebook > Product Sync, and then clicking on the Sync products button.
Conclusion
Facebook is an excellent platform for promoting your products. Unfortunately, customers having to leave your page to complete their purchases can affect your conversion rates. By linking your page to your WooCommerce store, you can maximize your chances of turning your Facebook followers into paying customers.
Let’s quickly recap how you can create your own Facebook Shop in five steps:
- Create a Facebook Pixel.
- Set up the Facebook for WooCommerce integration.
- Configure your Facebook Shop.
- Manage your WooCommerce catalog.
- Create a Facebook product set.
Do you still have questions about how to create a Facebook Shop? Ask us in the comments section below!


