Email marketing can be a powerful way to keep your customers engaged and drive conversions. However, building an eCommerce mailing list and then sending out regular content can seem daunting.
Fortunately, there are WordPress plugins that can do much of the hard work for you. By creating a signup form, visitors will be able to join your mailing list and receive a warm, automated welcome at any time of the day or night.
In this article, we’ll show you how to grow your eCommerce mailing list using the free MailPoet plugin. We’ll then cover how to make impersonal, one-size-fits-all email blasts a thing of the past with email segmentation and automated campaigns. Let’s get started!
Why Email Marketing Is Important for Your eCommerce Store
Email marketing can be a powerful way to promote your eCommerce site. By sending a few well-timed and persuasive emails, you can ensure your store remains at the forefront of customers’ minds. This means the next time they need to make a purchase, they’ll be more inclined to opt for your store over the competition.
You can even use email marketing to encourage repeat purchases of specific products. For example, you might offer customers coupons for items they’ve bought in the past.
An eCommerce mailing list can also help you convert casual visitors into paying customers. Once someone joins your mailing list, you can send them news about your upcoming sales, discount codes, and other marketing content that are all designed to help drive conversions.
There are lots of different ways to promote your eCommerce store. However, unlike channels such as social media, your emails won’t automatically disappear after a set amount of time. Instead, they’ll remain in recipients’ inboxes until they perform some action. This makes email a particularly effective marketing channel.
There’s also evidence to suggest that your customers are spending a considerable amount of time in their inboxes. According to the 2019 Adobe Email Usage Study, Americans spend over five hours every day checking their work and personal emails. That’s a huge window of time where you could be promoting your products to your ideal target audience.
It’s also possible to run targeted email campaigns. For example, you might email your customers based on their geographical location or purchase history. If you choose a tool such as the MailPoet plugin, you can even market your products while minimizing your workload by automating much of the process.
How to Grow Your eCommerce Mailing List With MailPoet (In 5 Steps)
There are various email platforms available for marketers. However, MailPoet lets you build your mailing lists, design engaging marketing emails, and even create targeted campaigns directly from your WordPress dashboard. Here’s how you can get started.
Step 1: Install the MailPoet Plugin
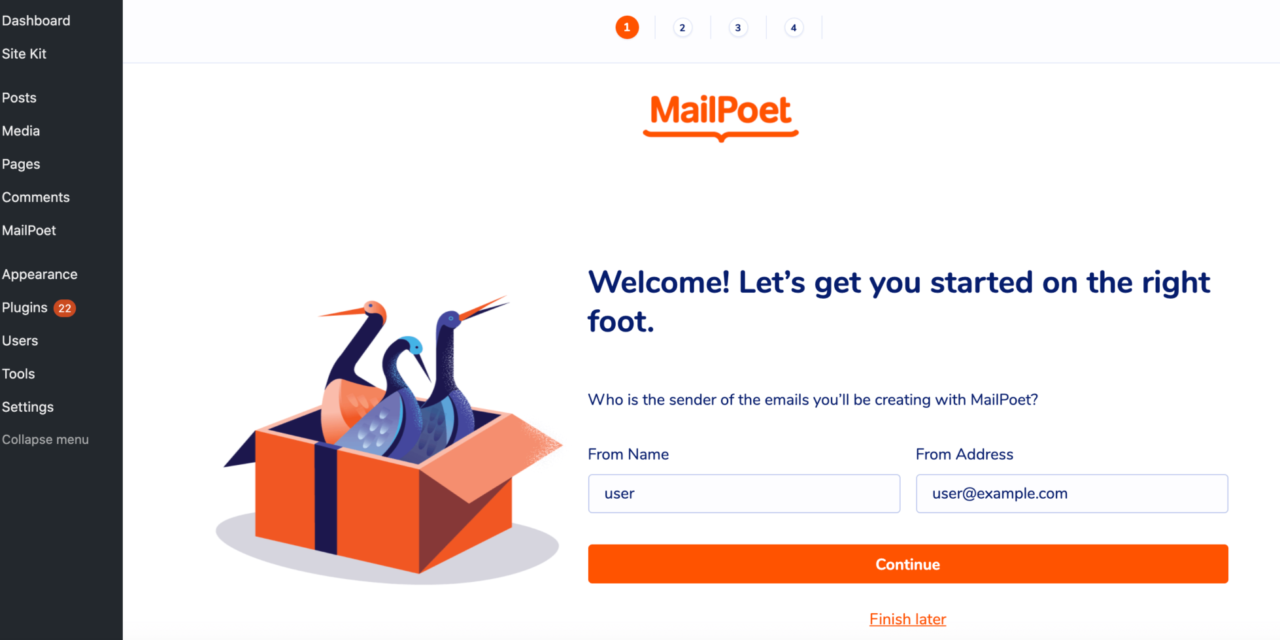
After installing and activating the plugin, select MailPoet from the menu on the left side of your WordPress dashboard. Here you can configure options such as specifying a sender, which is the name and email address that MailPoet will use for all of your email blasts.
Your sender can be a generic email address, such as a [email protected], or an individual person. Regardless, it’s important that you closely monitor the sender’s inbox, as any replies will be directed to it:

After entering this information, click on Continue. On the subsequent pages, you can specify whether you want to enroll in MailPoet’s starter course, and whether MailPoet is allowed to collect anonymous usage data.
Step 2: Create an eCommerce Mailing List
When you install MailPoet, it automatically generates a newsletter mailing list. However, you may want to create multiple mailing lists. For example, you might create a general newsletter that anyone can subscribe to, and a members-only list that’s strictly for paying customers:

It’s often smart to create multiple eCommerce mailing lists if your site covers more than one niche. This ensures you’re not spamming subscribers with content they have zero interest in. By creating a list for each individual category of products, you can hopefully minimize the number of people who hit the unsubscribe button. It can also boost your email engagement levels, as customers are more likely to open emails that closely align with their interests.
You may also want to consider creating multiple mailing lists if you regularly update your site with new content. By keeping each mailing list tightly focused on a single subject, you can minimize the number of emails each individual subscriber receives. This should reduce the number of people who decide to unsubscribe, and boost your engagement levels. After all, customers are unlikely to interact with your emails if you’re sending them multiple messages per day.
To create a mailing list, navigate to MailPoet > Lists. Then, select New List:

You can now give this list a name and a description. This description is purely for your own reference and won’t be visible to your subscribers.
Step 3: Build a Signup Form
After completing this setup, you’ll typically want to add a signup form to your website. This makes it easy for visitors to subscribe to your mailing list(s). To create a signup form, navigate to MailPoet > Forms:

You can now select New Form and choose your template. MailPoet has a range of ready-made options, including layouts for newsletters, priority lists, and Black Friday sales:

You can also choose from a range of form types. This includes popups, slide-in, and fixed bar forms:

Alternatively, you can create your sigup form from scratch. After making your selection, you’ll be taken to the MailPoet editor:

Here, you can link this signup form to a specific mailing list. This enables you to create separate signup forms for each of your MailPoet mailing lists:

You can now add text and images to your form. You can also change where the form appears on your website using the Form Placement section.
Based on your selection, MailPoet will display some additional settings that you can use to control when and where this form is visible. For example, if you select Pop-up, then you can specify the pages and posts where it should appear:

Once you’re happy with how your form is configured, click on Save. Visitors can now subscribe to your mailing list directly from your WordPress website.
Step 4: Create a Welcome Email
Now that visitors can subscribe to your mailing list, you’ll want to create some content to send to them. To write your first email blast, navigate to MailPoet > Emails:

MailPoet supports a range of email types. However, it often makes sense to start with a welcome email. This is the message that MailPoet will automatically sends to new subscribers.
A welcome email can be useful for confirming that you’ve successfully received the subscriber’s contact information. It also gives the subscriber a chance to verify that your messages aren’t being sent to their spam folder. After selecting the Welcome Email template, specify the mailing list for which you want to use this email:

You can also specify whether new subscribers should receive this welcome email immediately, or after a delay. Then, you can choose from a range of welcome templates:

MailPoet will open your chosen template in its editor. You can now create your welcome message by adding a subject line, preview text, and your body text:

When you’re happy with your welcome email, click on Save. On the subsequent page, review the information you’ve entered, and then click on Activate. This email is now live and will be sent to everyone who subscribes to your mailing list.
Step 5: Target Your Audience With Segmented Emails
After completing this setup, you may want to consider segmenting your mailing lists. This is where you send targeted messages to your subscribers based on their characteristics or actions, such as their purchase history.
Segmented email campaigns experience 74.53 percent higher click rates compared to non-segmented campaigns. There’s also evidence to suggest that companies experience a 760 percent increase in email revenue from segmented campaigns. That’s an advantage well worth pursuing.
To start, navigate to MailPoet > Lists > New Segment. You can then choose your segment and the action that the subscriber will need to perform in order to be added to this segment. For example, if a recipient failed to open your last email, you might add them to a segment that sends them a special discount code to help you re-engage customers who seem to be losing interest:

Alternatively, if a subscriber interacted with your last email, you might add them to a segment that sends them follow-up emails about similar topics. This can increase subscriber engagement.
Conclusion
Ecommerce is a highly competitive industry, but email marketing can give you an edge. Whether it’s sharing exclusive discount codes, notifying customers about an upcoming sale, or re-engaging disconnected subscribers, WordPress and email marketing is a powerful combination.
In this article, we showed you how to create a mailing list for your e-commerce store in five steps:
- Install the MailPoet plugin.
- Create a mailing list.
- Build a signup form.
- Create a welcome email.
- Target your audience with segmented emails.
Do you have any questions about growing your e-commerce mailing list with MailPoet? Let us know in the comments section below!


