There are many tasks you have to carry out when running a WordPress website, and not all of them are soul-nourishing. Having to locate and block IP addresses is one such job you’ll likely have to do, even if you wish you didn’t.
However, if you can push through the icky feeling of restricting a user from accessing all or part of your site, you’ll find the process fairly straightforward. This means you can get back to work on tasks with real importance, rather than policing your visitors.
In this post, we’ll look at a few different ways to locate and block an IP address. First, let’s quickly dive into why this is sometimes a necessary evil!
Why You’d Want to Find and Block a User’s IP Address
Having to find IP addresses in order to carry out some administration on them is usually something that happens under the hood. The inherent nature of the internet relies on users’ IP addresses to even connect to the web in the first place.
However, you’ll sometimes be tasked with banning users yourself, for a variety of reasons, such as:
- The IP address is being used to post spam comments.
- A recent or ongoing Direct Denial of Service (DDoS) attack necessitates blocking some users.
- You have ex-employees who have to be restricted from parts of your site (usually the back end).
The common thread here is security. Blocking, banning, restricting – whatever you want to call it, the goal of this process is to make your site safer and ultimately easier to manage.
How to Locate and Block IP Addresses Using Your Hosting Administration Tools
While this article is primarily about how to locate and block IP addresses within WordPress, let’s briefly look outside of the platform. Some hosts provide tools that can help, and in some cases, you may find them easier or more convenient to use.
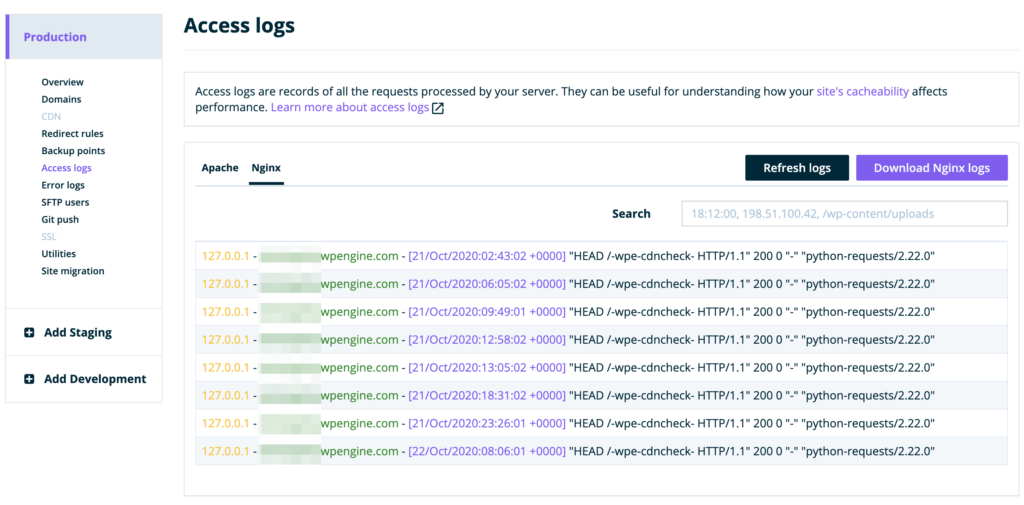
Regardless of whether you’re using cPanel, Plesk, or even a custom admin interface you’ll want to initially look for your Access Logs. For example, within WP Engine, you’ll click on your desired site, then into the Production > Access Logs screen.
From there, choose the relevant server, and it should display a list of recent visitor IP addresses:

From here, you’ll have to see what functionality your host offers on the back end to restrict access to your site. For example, cPanel will use IP Blocker or IP Address Deny Manager:

Using this tool, you simply enter the IP address you want to ban, and click on Add:

While this functionality is extremely useful in many circumstances, it’s also handy to have a WordPress-based method. Let’s look at not just one, but three ways to block IPs within the Content Management System (CMS).
How to Locate and Block IP Addresses in WordPress (3 Methods)
As we mentioned, there are three broad approaches to finding and blocking IP addresses within WordPress. The good news is that they’re flexible depending on your requirements. As such, you can use different methods within your workflow, and tailor your approach accordingly.
1. Use a Plugin
As you might expect, there are several plugins for dealing with the IP addresses of your WordPress site’s visitors. When it comes to finding them, WP Activity Log can’t be beaten:

It works much like your host’s access logs, although this plugin records all of the activity that happens on your site. As such, if you have to find a specific IP address, you’ll do so within one of the plugin’s many log viewers:

We’ve discussed the ins and outs of this plugin previously, under its former guise as WP Security Audit Log. Suffice it to say, it’s not a one-trick pony.
For blocking IP addresses, there also are many plugin solutions available. However, the nod here goes to All in One WP Security and Firewall for its simplicity and ease-of-use:

You’ll find the relevant option within the WP Security > Blacklist Manager screen. It’s as simple as adding IP addresses to the relevant field and saving your changes:

You may also want to consider the TraceMyIP Visitor IP Stats Tracker plugin. It can carry out some of the same tasks as the plugins mentioned above, but is dedicated to handling and helping you administrate IP addresses.
2. Manually Find and Block IPs Through WordPress’ Built-In Functionality
If your IP-blocking needs are relatively simple, you may be able to avoid installing multiple plugins and trawling through reports for the relevant information. As such, you’ll be pleased to know there are built-in features within WordPress that can help with this task, too.
It’s worth noting that this method only affords limited functionality, and is restricted to moderating blog comments. However, if this is your primary concern when it comes to blocking IP addresses, this feature should be enough for you to work with.
First off, access the Comments panel within WordPress, and look down the list of comments until you find an offending one. From here, look to the author name – you’ll see an IP address below it in most cases:

Make a note of this, then head to the Settings > Discussion screen within your back end. You’re specifically looking for the Comment Moderation option. Here, add the IP address to the text box, and save your changes:
 A recent (as in right now) backup in case the worst happens and you have to reinstall.
First, use your chosen FTP client to access your server using the credentials listed within your hosting account. If you can’t find them, your host’s support team will be able to show you where they are.
Next, navigate to your site’s WordPress installation. If it’s the only one on your server, the files will be in the top-level public_html or www folder. However, if you host multiple installations, there may be more specific folders containing your various sites:

Once you’re in, hunt for a file called .htaccess and open it. Next, add the following code to the end of the file, on a new line:
Order Allow,Deny Allow from all Deny from XX.XX.XX.XXOf course, you’ll want to replace the placeholder IP with the one you’re blocking. Once you’ve saved your changes to the file, your job is almost complete! You may want to keep tabs on your activity logs over the next week or two and make sure the ban is working properly.
Conclusion
While running a site should be an exciting and rewarding venture, some tasks – such as banning IP addresses from accessing your site – are definitely not what most would call ‘fun’.
In this post, we’ve looked at a number of ways you can quickly get the job done and return to your primary concerns without shedding too many tears:
- Install a dedicated plugin to find and ban IPs.
- Use WordPress’ built-in comment moderation features to restrict spam posters.
- Manually search and block IP addresses within your .htaccess file.
Are you looking to implement a process to find and block IP addresses in WordPress? Let us know your thoughts in the comments section below!


