If your eCommerce store sells multiple versions of individual products (such as clothing, jewelry, or furniture), keeping your storefront organized can be challenging. Ensuring that your customers can find what they’re looking for should be a top priority.
Fortunately, WooCommerce makes it easy to sell different versions of the same item using the ‘variable products’ feature. Add-ons for WooCommerce can further extend this functionality, and make your storefront more engaging for customers and profitable for you.
In this article, we’ll introduce variable products in WooCommerce and explain how they work. Then we’ll show you how to take your WooCommerce product pages to the next level. Let’s dig in!
An Introduction to WooCommerce Variable Products
Variable products in WooCommerce are simply items that come in more than one variety or style. Examples include a coffee table that’s offered in several finishes, or a shirt that comes in multiple sizes and colors:

Each product variation can have its own price, stock level, image, and more. When browsing your store, customers can select and view each version from a single product page.
Variable products enable you to easily highlight different variations of an item without cluttering up your digital storefront. For example, instead of listing each shirt color separately, you can condense them so they all display on one page. This makes it easier for customers to locate and sort through the variations, which could make the difference in closing a sale.
However, while WooCommerce lets you create variable products by default, it doesn’t offer much in the way of customization. Below is an example of the simple drop-down box you would see on a product page with only the base plugin installed:

It’s not terribly exciting, and certainly doesn’t entice potential customers to buy. The good news is that you can fix this by using a WooCommerce add-on.
How to Optimize Your WooCommerce Variable Products and Improve Conversions (In 3 Steps)
WooCommerce is somewhat lacking in options for displaying variable products. However, the Woo Variation Swatches plugin can help:

This WooCommerce extension provides a fantastic way to spice up your product page and boost conversions. To follow along with the rest of the tutorial, you’ll need to purchase and install the plugin. Then you can get started by creating your first product swatches.
Step 1: Add or Edit Global Attributes for Your Products
By default, WooCommerce doesn’t give you a lot of options when it comes to adding and customizing your products’ attributes. By using Woo Variation Swatches, you get more control over the attributes you can add and how users interact with them.
To get started, go to Products > Attributes. You’ll notice that thanks to the plugin, attributes now include a lot more details:

If you want to include new global attributes, you can now select what type of swatch you want to use for them. There are options for colors, images, and labels:

Once you add an attribute, you can select the Configure terms option within its row to indicate the specific variations you want to include. For each type of swatch, you’ll get customized options for adding new terms:

Thanks to this plugin, you get more control over attributes on a global level. However, you can also override swatch settings for specific products if needed
Step 2: Configure Swatch Styles at the Product Level
When you edit a specific product, you’ll see a new tab under the Product data section that’s labeled Swatches. In this tab, you can customize the variable swatches for that specific item.
Let’s say, for example, that you have a gold ring with several possible variations in size and color:

By default, the plugin will create a swatch based on the attributes that you choose and the variations you set for each product. However, you have full control over that swatch.
If you select the Inherit Global list next to the Images attribute, for example, you get the option to customize its colors, images, and labels:

This is where you can change the images that appear on your swatch if you want to override the global settings. These options can be valuable for products with unique variations.
Step 3: Use the Customizer to Tweak Swatch and Display Settings
If you want to customize swatch styles, either globally or for individual product settings, you can also do so using the WordPress customizer. There, you can access settings for individual product pages and the entire shop page:

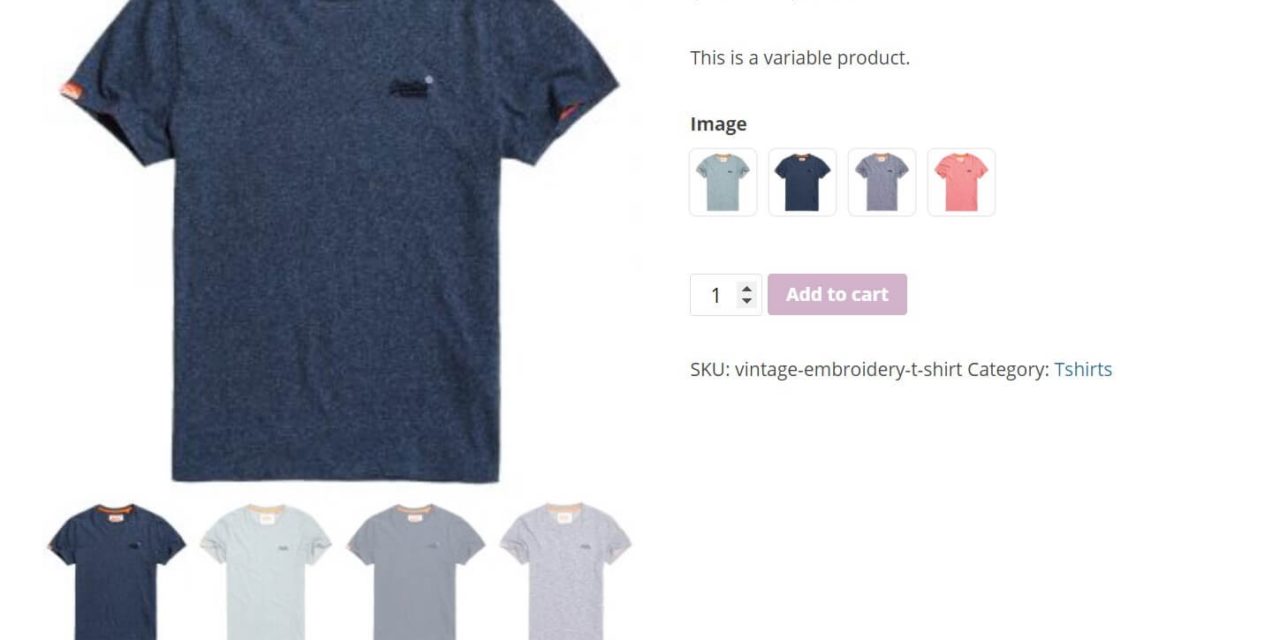
As you can see, this plugin replaces the standard WooCommerce drop-down menu with ‘swatches’ for each product variation:

By default, these swatches will import the product images for each variation. However, you can use the customizer to change the swatches display type that you use under General Swatch Settings:

The default swatch style will show you all available variations under each product. However, there are also options for swatches that only show up as modals, or upon hovering over a Select options button:

Regardless of what swatch display style you choose, product images will still update when users select the options they want.
Conclusion
No matter what type of online shop you run, chances are you have some products that can benefit from the ‘variable products’ features in WooCommerce. The next step is to maximize those product listings, in order to get more conversions and provide a better customer experience.
To make the most out of your variable product pages, you can pick up the Woo Variation Swatches plugin and follow these three steps:
- Add or edit global attributes for your products.
- Configure swatch styles at the product level.
- Use the customizer to tweak swatch and display settings.
Do you have any questions about WooCommerce variable products? Let us know in the comments section below!


