Are you looking to set up eCommerce tracking in WordPress?
Setting up eCommerce tracking for your online store will help you find your top-selling products, see which campaigns perform the best, understand how people find and use your website, and more. Then you can use those insights to get more traffic and boost sales.
In this article, we’ll show you how to properly set up eCommerce tracking in WordPress so you can grow your business and make more money.

Why Set Up WordPress eCommerce Tracking?
When starting a new online store, most store owners begin by making decisions based on gut feeling or best guesses.
That’s good for getting started, but to take your business to the next level of growth, you need to start making data-driven decisions.
But what data should you base your decisions on?
That’s where WordPress eCommerce tracking comes in. It helps you make decisions based on data from your actual visitors and customers. You’ll get tailored insights to boost your sales so you can make more money.
For instance, you can find out which products your customers like to buy the most on your WooCommerce store. This way, you can offer similar products to get more sales.
Plus, eCommerce tracking in WordPress can help you better understand your audience, where they’re from, and how they use your website, so you can invest more in the channels and strategies that are proven to work.
For example, if you find out that 80% of course sales on your membership site comes from Facebook, then you may decide to invest in ads on Facebook and stop spending time on other social media platforms that aren’t converting.
With that said, let’s take a look at how to track your eCommerce store’s performance in WordPress.
Setting Up eCommerce Tracking in WordPress
The easiest way to track the performance of your online store is by using MonsterInsights. It’s the best Analytics WordPress plugin and is used by over 3 million professionals.
MonsterInsights helps you set up eCommerce tracking in Google Analytics without editing code. The plugin works with some of the most popular eCommerce plugins, including WooCommerce, Easy Digital Downloads, MemberPress, LifterLMS, GiveWP, and more.
It also shows important stats inside your WordPress admin area, so you can quickly view how your website is performing and get insights to grow your business.

Note: You’ll need the MonsterInsights Pro version because it includes the eCommerce addon, dashboard reports, and other advanced tracking features. There is also a MonsterInsights Lite version you can use to get started.
First, you can install and activate the MonsterInsights Pro plugin on your website. If you need help, then please refer to our guide on how to install a WordPress plugin.
Upon activation, you’ll be taken to the MonsterInsights welcome screen in your WordPress dashboard. Go ahead and click the ‘Launch the Wizard’ button.

Next, follow the steps in the wizard to set up the plugin and connect your website with Google Analytics. For more details, you can go through our guide on how to install Google Analytics in WordPress.
After that, you’ll need to navigate to Insights » Addons from your WordPress dashboard. Then scroll down to the eCommerce addon and click the ‘Install’ button.
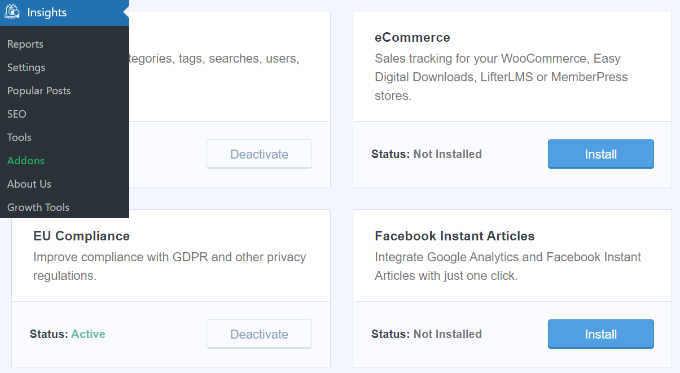
The addon will automatically activate, and you’ll see the status change to Active.
Enabling Enhanced Ecommerce Reporting
In the next step, you’ll need to enable Enhanced Ecommerce in Google Analytics. Enhanced Ecommerce allows you to track your customer’s shopping behavior, checkout behavior, top products, and sales performance in Google Analytics.
To start, you can visit the Google Analytics website and login to your Google account. Next, you’ll have to choose the property on which you’d like to enable Enhanced Ecommerce.
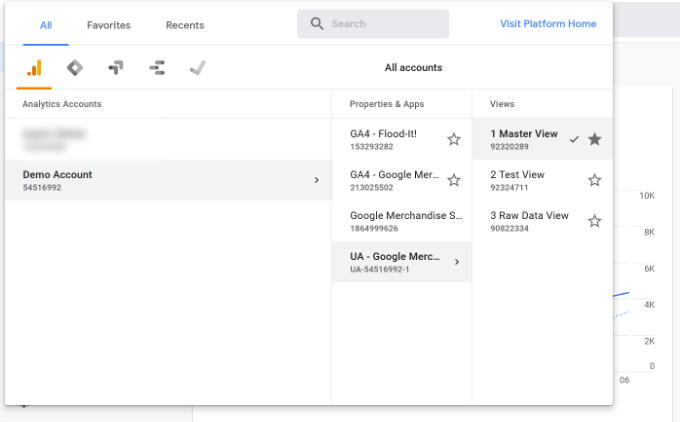
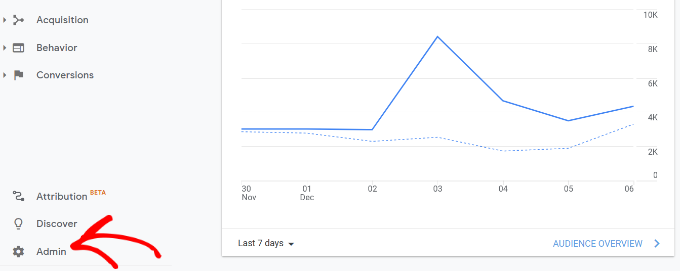
Now, go ahead and click the ‘Admin’ settings option from the menu on your left.
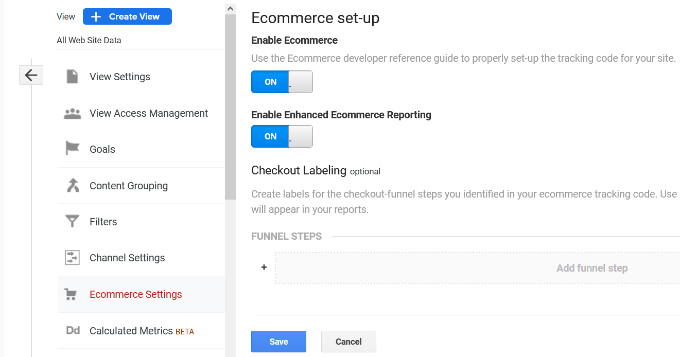
After that, you’ll need to click on ‘Ecommerce Settings’ under the View column.

On the next screen, you can click the toggles for ‘Enable Ecommerce’ and ‘Enable Enhanced Ecommerce Reporting’ to switch them to On.
There is also an option for creating ‘Checkout Labeling’ that you can use to label your checkout funnel steps. However, this is optional and you can simply go ahead and click the ‘Save’ button.
Once you’ve enabled Ecommerce settings in Google Analytics, you can head back to your WordPress website dashboard.
After that, simply navigate to Insights » Settings and then click the ‘eCommerce’ tab. Next, you’ll need to ensure that the ‘Use Enhanced eCommerce’ option is enabled under the eCommerce Tracking section.
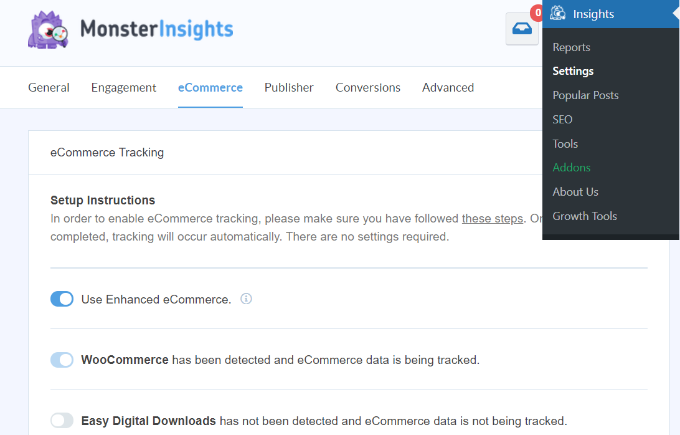
MonsterInsights will now automatically detect your WordPress eCommerce plugin and start recording analytics.
Next, let’s look at how you can use MonsterInsights’ reports to see your online store’s performance.
View eCommerce Reports in WordPress
When it comes to using Google Analytics and finding the data that you need, it can be overwhelming for beginners.
MonsterInsights makes it super easy to get the data that matters, as it brings all your important stats inside the WordPress dashboard. This way, you get to see how your eCommerce store is performing and then make decisions to grow your business.
To see eCommerce reports in WordPress, you can head over to Insights » Reports and then click the ‘eCommerce’ tab.
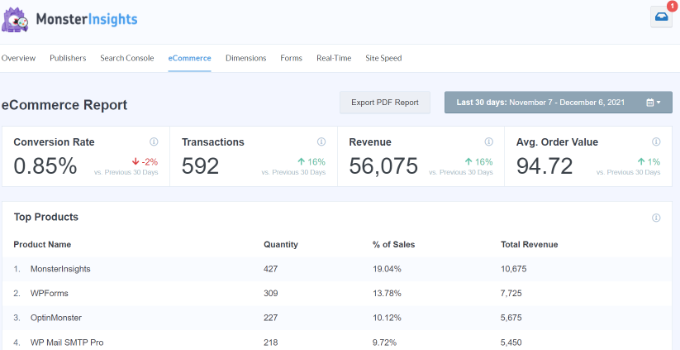
In the report, you can quickly glance at an overview of how your online store is doing by looking at the conversion rate, transactions, revenue, and average order value.
Besides that, MonsterInsights also shows your Top Products. It helps you spot your top selling items along with its quantity, percentage of sales, and total revenue. You can use this data to find out which products your customers like and then offer similar products to boost sales.
Next, you can scroll down and view the Top Conversion Sources.
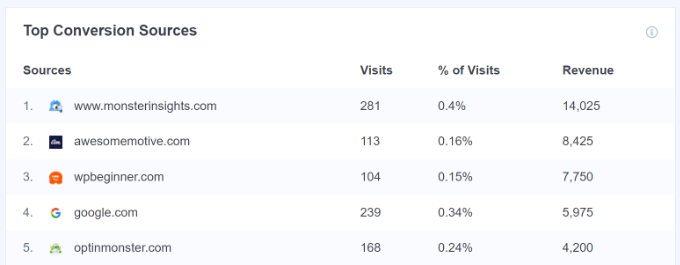
These are the websites that are sending the most sales to your store. You could invest in ads on those sites, create special discount offers or free shipping offers for people that arrive from these sources, or reach out to them to work out a cross-promotion or other partnership.
Other reports you can view in the eCommerce section in MonsterInsights includes the Total Add to Carts, Total Removed from Cart, Time to Purchase, and Sessions to Purchase.
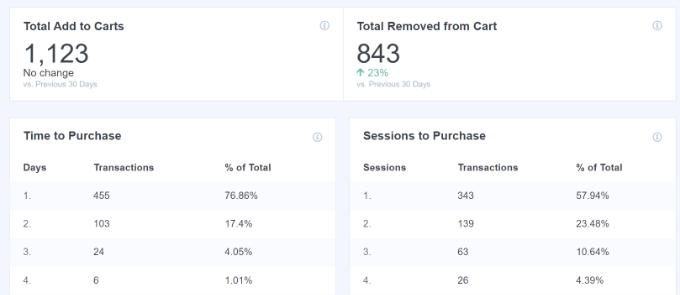
You can use these reports to better understand your customer’s behavior while shopping and during checkout.
For instance, MonsterInsights shows how long it takes for customers to purchase a product from their first visit. You can use the data to optimize your sales funnel and reduce shopping cart abandonment.
We hope this article helped you learn how to properly set up eCommerce tracking in WordPress. You may also want to see our expert pick of the best business phone services, and the best WordPress plugins for business sites.
If you liked this article, then please subscribe to our YouTube Channel for WordPress video tutorials. You can also find us on Twitter and Facebook.
The post How To Properly Set Up eCommerce Tracking In WordPress first appeared on WPBeginner.


