
Do you want to remove archive pages from your WordPress website?
Archive pages, like category or tag archives, automatically group your blog posts for visitors to browse. While they can be helpful for navigation and showcasing older content, there might be times when they’re not necessary.
In this article, we will show you how to remove archive pages in WordPress while keeping your website optimized and user-friendly.

What You Should Know About Removing Archive Pages
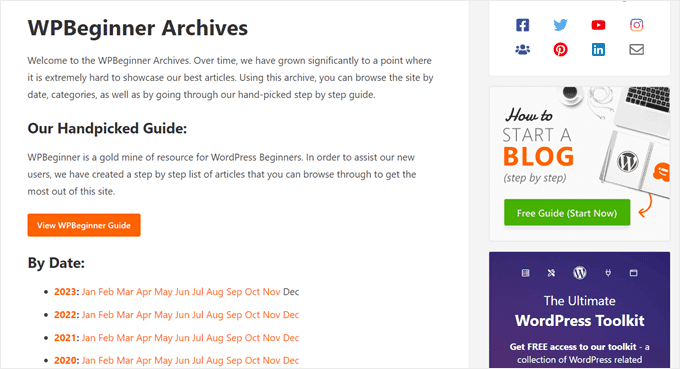
Have you ever noticed pages on your WordPress website listing older blog posts by month, category, or tag? These are called archive pages. They automatically group your WordPress posts, which can be helpful for navigation.
However, there may be cases where you may need to remove archive pages.
For example, maybe these pages are creating duplicate content issues. Archives often display excerpts of content already available on individual WordPress posts, which search engines can flag as duplicate content.
Each type of archive page also uses a different URL that may display similar content based on a specific filter. This can unintentionally create multiple URLs whose content overlaps.
Or, maybe you have a category that isn’t used much or doesn’t make sense anymore. Deleting that category archive page can clean up your website.
Before actually removing these pages, though, there are some things you must know. Some users may use these pages to discover and bookmark old blog posts they are interested in. If you delete them, these users might have trouble finding those posts again.
From an SEO (search engine optimization) standpoint, deleting archive pages improperly can create broken links. This can frustrate visitors who land on these broken pages and hurt your website’s ranking in search results.
While WordPress doesn’t allow you to directly delete archive pages, there are workarounds you can do to manage them. In this step-by-step guide, we will help you remove archive pages without harming your WordPress SEO.
You can use these quick links to skip to your preferred method:
Method 1: Noindex Archive Pages With AIOSEO (Recommended)
The first method is what we and many SEO experts recommend the most. Instead of removing the archive pages completely, it’s better to noindex them from search engines. This way, users can still find these pages on your website, but search engines won’t consider them.
John Mueller from Google was actually asked about this topic in a Q & A session one time. Here’s what he had to say:
You can remove the content of old things if you want to, [or] you can move them to an archive section. You can make those old pages noindex so that people can still go there when they’re visiting your website.
John Mueller, Search Advocate at Google
The easiest way to noindex archive pages is using a WordPress plugin like All in One SEO (AIOSEO). This method doesn’t require any code, making it beginner-friendly.
Plus, you get tons of other SEO features like an on-page content optimizer, an SEO audit checklist, schema markup support, and more.
First, you need to install the AIOSEO plugin. You can use the premium or free version, as both include the features needed to noindex archive pages.
For more information, you can check out our guide on how to install a WordPress plugin.
Option 1: Noindex Multiple Archive Pages
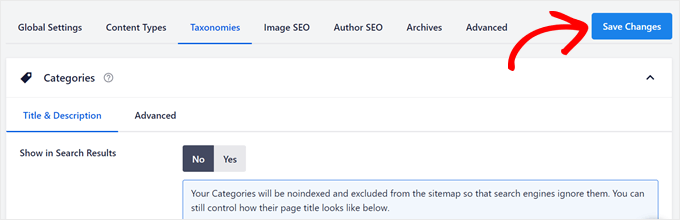
For this option, you can go to All in One SEO » Search Appearance. Then, navigate to the ‘Taxonomies’ tab.
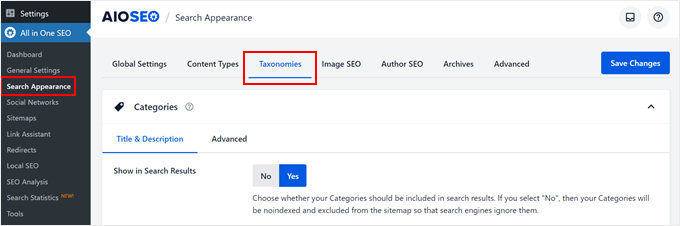
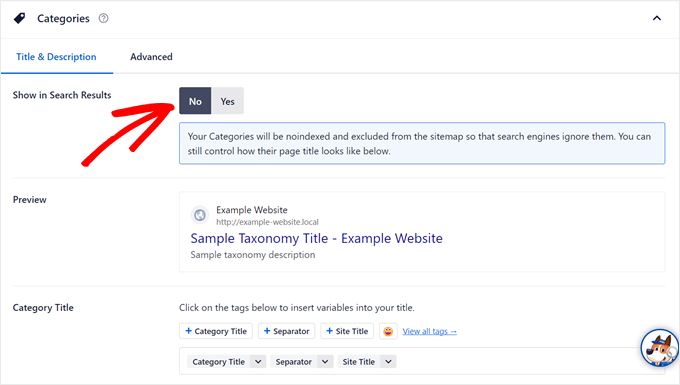
In the Categories section, go ahead and click ‘No’ in the ‘Show in Search Results’ setting.
You will then see this notification: “Your Categories will be noindexed and excluded from the sitemap so that search engines ignore them. You can still control how their page title looks like below.”
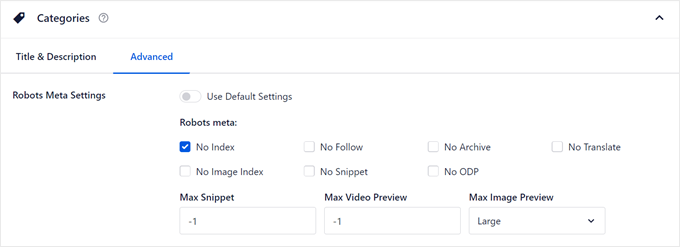
If you switch to the ‘Advanced’ tab, you will see that the default settings have been disabled.
The ‘No Index’ checkbox should have also been ticked in the Robots Meta Settings.
You can then scroll down to noindex your archive tag pages and other custom taxonomies you have.
Once done, just click ‘Save Changes’ at the top left corner.
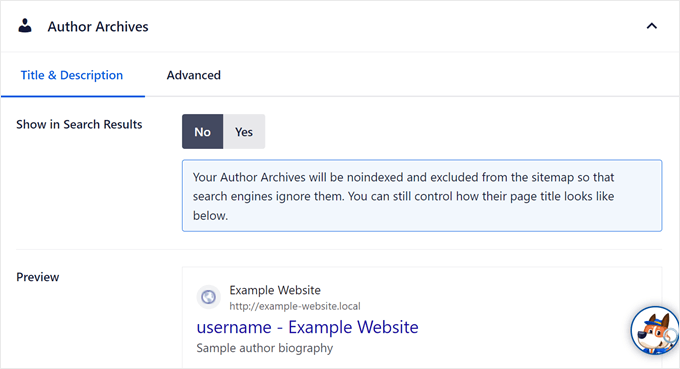
To noindex date and author archive pages, switch to the ‘Archives’ tab.
You will see options to noindex the author and date pages.
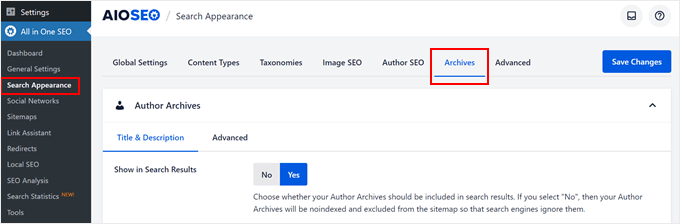
Like before, simply click ‘No’ in the ‘Show Search Results’ setting and repeat the same step for the date archives page below.
Then, hit the ‘Save Changes’ button at the top.
Option 2: Noindex Specific Archive Pages (Taxonomies Only)
This option is for noindexing only specific archive pages. For example, maybe you have only one outdated category page that you would like search engines to not include on results pages, but you want the rest of your category pages to still be indexed.
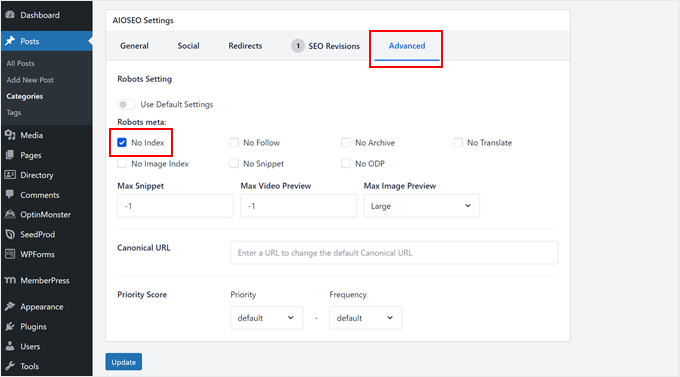
What you need to do is open the category, tag, or custom taxonomy page on the front end of your website. Then, click ‘Edit Category’ on the top admin bar, like in the screenshot below.
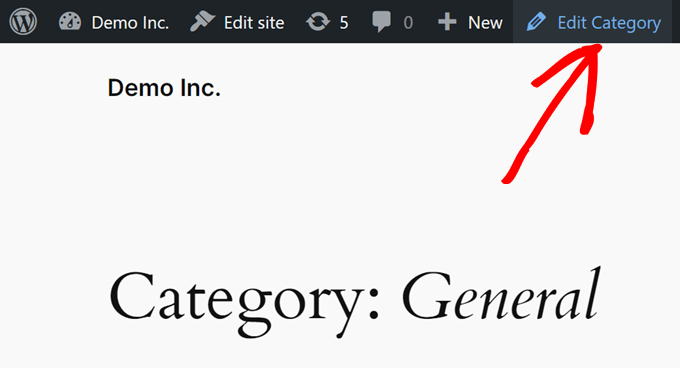
This will open the category or tag editor. Here, just scroll down to the ‘AIOSEO Settings’ section and switch to the ‘Advanced’ tab.
In Robots Settings, disable the ‘Use Default Settings’ option and tick the ‘No Index’ box.
After that, click ‘Update.’
Unfortunately, AIOSEO doesn’t have a feature to noindex specific, non-taxonomy archive pages yet. Thankfully there’s still an easy way to do that using the method below.
Method 2: Noindex Archive Pages With Code (For Specific Non-Taxonomy Pages)
If you want to noindex non-taxonomy archive pages, you will need to add a custom code snippet to your website, specifically your WordPress theme’s functions.php file.
If this process sounds intimidating, don’t worry. The safest way you can add code to WordPress is by using WPCode, the best code snippet plugin on the market.
This plugin makes it easy to insert custom code without directly dealing with your theme files, so you’re less likely to break your website. Plus, your custom code won’t get overwritten when you update your theme, so your noindex code will stay in place.
First, you need to install and activate WPCode. Both the free and premium versions will work fine for this tutorial, though the premium version comes with a special mode to safely test your code before it goes live.
For more information, you can check out our guide on how to install a WordPress plugin.
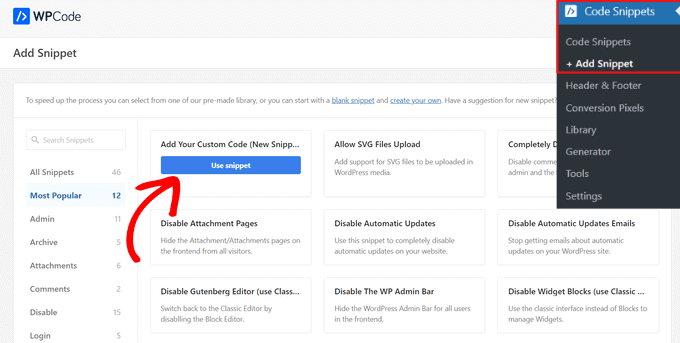
Next, go to Code Snippets » + Add Snippet. Then, select ‘Add Your Custom Code (New Snippet)’ and click ‘Use snippet.’
Now, go ahead and give your new snippet a name. It can be something as simple as ‘Noindex Archive Pages.’
Then, make sure the Code Type is ‘HTML Snippet.’
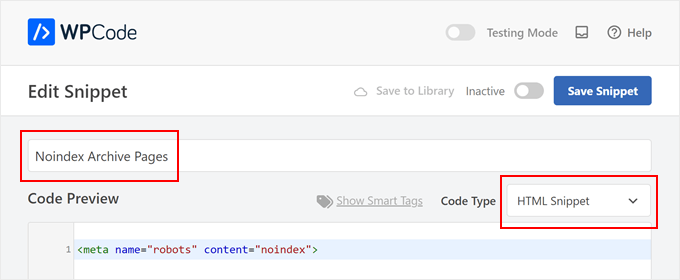
In the ‘Code Preview’ box, copy and paste the following code:
This code is a robots meta tag specifically designed to instruct search engines not to index a particular web page.
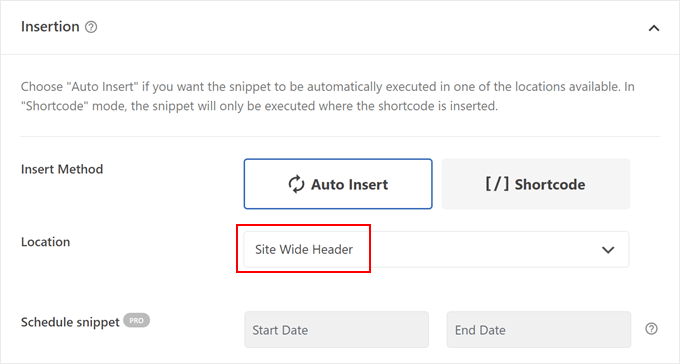
Once done, scroll down to the ‘Insertion’ section.
Make sure the Insert Method is ‘Auto Insert’ and the Location is ‘Site Wide Header.’
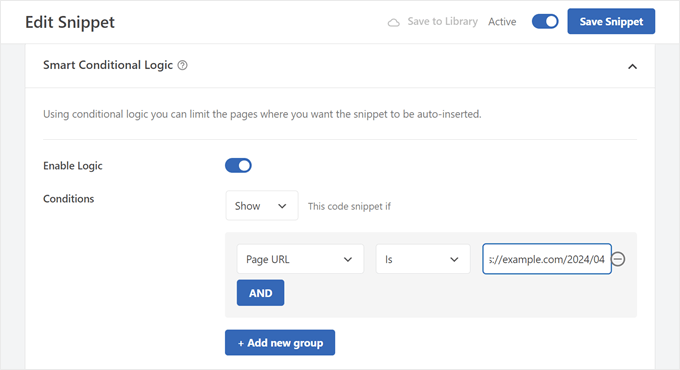
Let’s move down the page again to the ‘Smart Conditional Logic’ section.
What you want to do is activate the ‘Enable Logic’ setting.
As for the Conditions, select Show and choose ‘Page URL’ and ‘Is.’ You can then insert the URL of the specific archive page that you want to noindex in the last field.
Feel free to click ‘AND’ to add more pages to noindex.
Once done, make the code ‘Active’ and click ‘Save Snippet.’
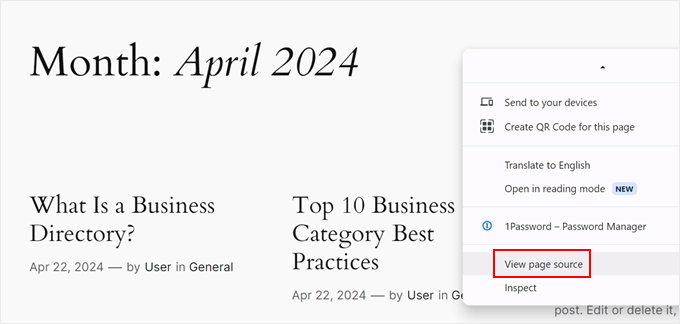
That’s it. To see if your page was successfully noindexed, you can open the archive page and view its page source.
If you use Chrome, then you will need to right-click anywhere on the page and click ‘View Page Source.’
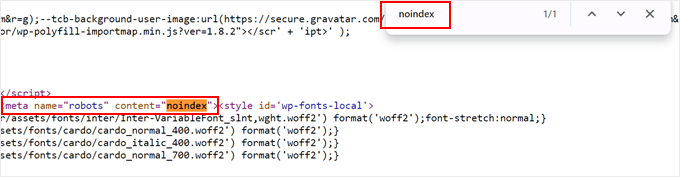
Now, press Control/Command + F on your keyboard to bring up a search bar and type in ‘noindex.’ It should highlight the noindex tag you added earlier.
If it exists in between the ... tags, then you have added the code properly.
Method 3: Redirect Archive Pages to Avoid Broken Links
Let’s say you’ve decided that removing certain archive pages from your WordPress blog is the best course of action. But you’re worried about broken links or frustrated visitors who might still try to access them. This can happen if someone has bookmarked an older archive page on your website.
What you can do is redirect the archive pages using a redirect plugin instead. This way, visitors who land on those old links won’t see an error message.
Note: This method will use AIOSEO Pro as it has the feature to easily redirect one page to another on your website.
First, install and activate AIOSEO on WordPress. You can read our guide on how to install a WordPress plugin for more instructions.
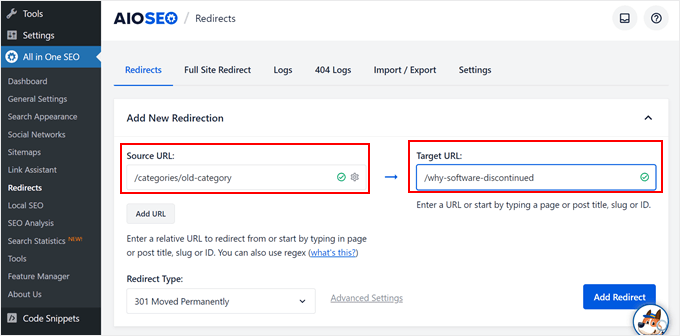
Then, go to All in One SEO » Redirects.
In the ‘Redirects’ tab, insert the Source URL (your archive page) and Target URL (the page you want to redirect users to).
We recommend picking a page that aligns with what visitors might be looking for when they land on the old archive page.
For instance, say you have a software review website and want to redirect a category archive for a discontinued platform. A good target URL could be a recent post you wrote explaining why the software is no longer available.
This way, visitors get helpful information even though the original archive page is gone.
Alternatively, you can redirect the user to the homepage.
Below, choose a ‘Redirect Type.’ You can use ‘301 Moved Permanently’ if you want the target page to be the new permanent home for visitors who used to access the archive page.
Then, click ‘Add Redirect.’
Now, go ahead and open your old archive page. If you land on the target page URL, that means the redirection is successful.
For more information, check out our beginner’s guide to creating 301 redirects in WordPress.
Method 4: Remove Archive Pages With a Plugin (For Non-Blog Sites)
Perhaps your WordPress website doesn’t have a blog and archive pages don’t bring any value to your site. If that’s the case, then this method is for you.
You will need to install the Smart Archive Page Remove plugin, which will make it easy to remove the archive pages from your WordPress site.
First, install and activate the WordPress plugin in your admin area. Then, go to Settings » Archive Pages.
Next, select which archive pages you’d like to delete and click on the toggle buttons. Once done, just click ‘Save Changes.’
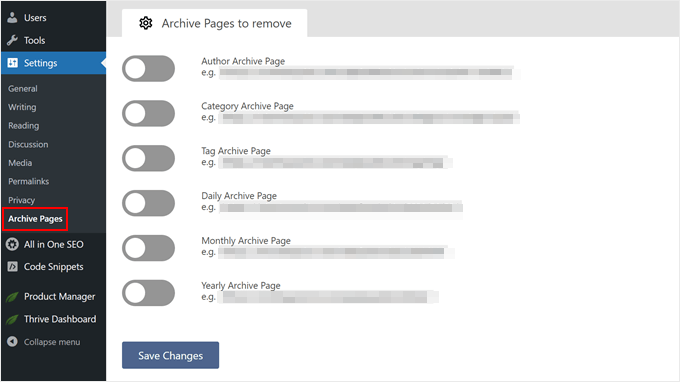
When you go to your archive page, you should see a 404 error that says the page is not found.
Alternative: Create Custom Archive Pages
Instead of removing archive pages entirely, consider creating custom archive pages. This gives you more control over how the pages look and function, offering a better user experience for visitors.
If your archive page is easy to navigate, users will find it useful and stay longer on your website. In turn, you can increase your pageviews and reduce your bounce rate, and search engines will see this as a sign that users are liking your website.
The easiest way to create a custom archives page is with SeedProd. This drag-and-drop page builder has tons of templates and building blocks to design a user-friendly archives page that people find helpful.
Here are some tips to improve your archive pages:
- Include a custom search form to help users filter through the content list.
- Showcase your most popular content from the archive to keep visitors engaged.
- If you have specific custom post types (like recipes), try creating and organizing archive pages for these posts for easier navigation.
- Display your archive pages in the sidebar or navigation menu so that users can easily access them when needed.
We hope this article helped you learn how to remove archive pages in WordPress. You may also want to check out our article on how to add and use widgets in WordPress and our list of must-have WordPress plugins to grow your website.
If you liked this article, then please subscribe to our YouTube Channel for WordPress video tutorials. You can also find us on Twitter and Facebook.
The post How to Remove Archive Pages in WordPress (4 Easy Methods) first appeared on WPBeginner.


