If your site loads quickly and promises a secure browsing experience, you’ll be less likely to face problems building an audience. However, there are lots of factors that go into creating a high-performing, secure WordPress site. As a busy website owner, continuously testing and improving your website’s speed and security can feel overwhelming.
Fortunately, WordPress comes with a built-in Site Health Check that can do some of the hard work for you. This tool will scan your site, identify issues, and provide a clear, actionable plan to achieve a high level of WordPress performance and security.
In this article, we’ll share everything you need to know about WordPress’ Site Health Check. We’ll show you how to use this tool, and share some tips for achieving a perfect score. Let’s get started!
Understanding the WordPress Site Health Check (And Why It’s Important)
Introduced in WordPress 5.1, Site Health Check scans users’ sites for common security and performance issues. It will then display an overall score based on its various tests:

Although the tool originally used a percentage-based grading system, it now only scores sites as Good or Should be improved. However, it’s best to try to resolve any flagged issues that appear on this screen.
While there are many factors that contribute to a successful WordPress website, security and performance are two of the most vital. It’s crucial that you address any vulnerabilities that may be putting your site or your visitors at risk.
When it comes to performance, research suggests that 75 percent of Internet users won’t return to a site that takes longer than four seconds to load. If you run an eCommerce site, these margins are even tighter, with 40 percent of shoppers unwilling to wait longer than three seconds before abandoning an online store.
Google has also indicated that speed is a major ranking factor. If your website is underperforming, it may fail to appear in those all-important search engine results. This will make it difficult to attract visitors and grow your website.
However, improving your site’s security and performance isn’t always easy. With so many best practices to consider, it can be difficult to know where to start. Busy website owners may also struggle to prioritize their time. This is where Site Health Check comes in.
This tool continuously monitors your website and provides a clear, actionable plan for how to enhance your site’s security and performance. While it’s not necessarily comprehensive, Site Health Check’s recommendations are a solid jumping off point for optimizing your site.
How to Use the WordPress Site Health Check Feature
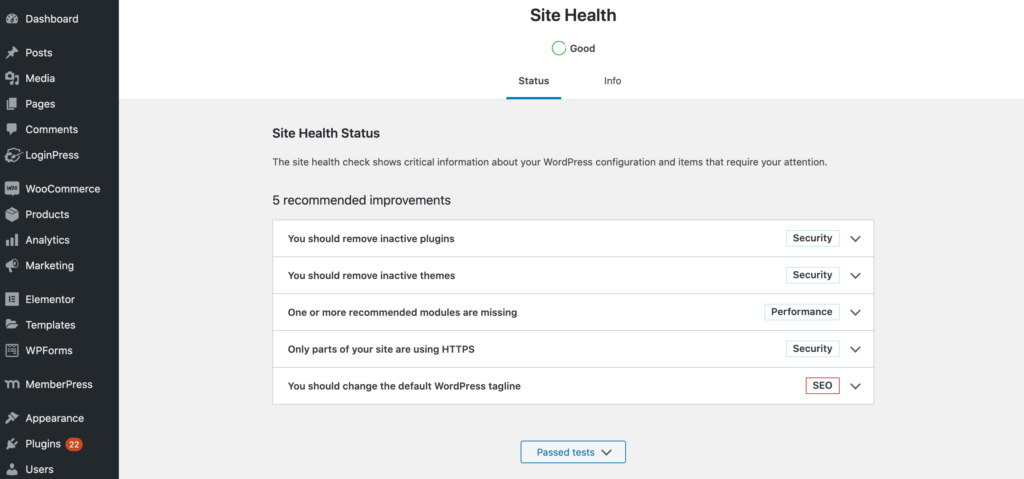
You can view your Site Health Check score by navigating to Tools > Site Health in your WordPress dashboard. The report is divided into two tabs. In the Status tab, you’ll find recommendations for improving your site’s performance and security. You can select each item in the list to learn more about it:

At the top of the Status tab, you’ll find an overview of your site’s health, displayed as a colored circle. As you make improvements based on Site Health’s recommendations, this circle should move closer to 100 percent.
After addressing all the items in the Status tab, it’s time to move on to Info. This tab displays detailed information about your site’s configuration. This includes whether your site is using Hypertext Transfer Protocol Secure (HTTPS) and whether your site is a part of a multisite setup:

This information can be useful if you’re collaborating with a third party. For example, your web host may require configuration information in order to upgrade your website.
You can quickly and easily share this configuration information by selecting Copy site info to clipboard. You can then paste this text into an email, instant message, or support ticket as needed.
In WordPress 5.4, the Make WordPress team expanded on Site Health Check by creating a dedicated dashboard widget. You can use this widget to monitor your site’s health directly from your main WordPress dashboard:

The Site Health Check widget displays your site’s overall health score, plus any issues that require your attention. By checking this widget every time you log in, you can maximize your chances of identifying and resolving security and performance issues as soon as they occur.
How to Score 100% on Your WordPress Site Health Check (3 Tips)
By following Site Health Check’s recommendations, you can create a safer, faster WordPress website. Let’s look at three ways that you can excel in these key areas and maximize your chances of achieving that perfect 100 percent Health Check.
1. Install a Secure Socket Layer (SSL) Certificate
A Secure Socket Layer (SSL) certificate can help protect your site and your visitors from malicious third parties. This certificate encrypts all sensitive data and configures your site to use HTTPS instead of HTTP.
Today, an SSL certificate is essential for providing a high level of security. Many modern browsers even indicate whether a site is using one by displaying a little padlock icon next to its address:

If you don’t install a valid SSL certificate, security-savvy visitors may be less likely to trust your site, particularly if you request sensitive data such as credit card details.
You can add a free SSL certificate to your WordPress website using a certificate authority such as Let’s Encrypt. There are also various WordPress plugins that can help install your chosen SSL certificate, including Really Simple SSL or WP Force SSL.
Alternatively, some web hosts provide SSL certificates, and may even install and maintain yours for you. If you’re unsure, you can always check your hosting provider’s admin panel for SSL-related options, or contact them directly.
2. Use WordPress Themes and Plugins Safely
WordPress has a huge repository of third-party themes and plugins. However, if used incorrectly, these extensions can make your site more vulnerable to attack. A study even found that 98 percent of WordPress vulnerabilities are related to plugins.
To ensure you’re using themes and plugins safely, it’s important to install updates as soon as they’re available. New versions often include bug fixes that can improve your site’s overall security. You can check whether any updates are available for your themes and plugins by navigating to Dashboard > Updates:

Alternatively, you can enable auto-updates. This ensures you’ll receive the latest updates as soon as they’re available.
To auto-update your plugins, navigate to Plugins > Installed Plugins. You can then select the Plugin checkbox directly above your plugin list:

Next, open the Bulk Actions dropdown and select Enable Auto-Updates > Apply. All your plugins will now update automatically.
To enable auto-updates for your WordPress theme, navigate to Appearance > Themes. Hover over your current theme, and then select Theme Details:

You can now select Enable auto-updates, and your WordPress theme will update automatically. We also recommend deleting any plugins or themes that you no longer require. Even if they’re deactivated, themes and plugins still add code to your site. This is a potential loophole that hackers can exploit.
3. Ensure You’re Running the Latest Version of PHP
WordPress is written in the PHP programming language, so it’s important to keep your version of PHP up to date. Outdated PHP can make your site slower. Some plugins may also require the latest release of PHP, so an outdated version can result in plugin conflicts.
You can find out which version of PHP your site uses under Server in the Info tab of the Site Health tool:

You may also be able to check your version of PHP by logging into your hosting account. The steps will vary depending on your hosting provider, but you can often find relevant information by looking for a section labeled PHP Settings, PHP Manager, or something similar. If you’re unsure, contact your provider for more information.
If your site is running an outdated release of PHP, upgrading to the latest version should deliver a performance and security boost. This will improve your overall Site Health Check score and your site’s User Experience (UX).
The process of upgrading your version of PHP can vary depending on your hosting provider. You can sometimes upgrade from your site’s control panel, or you may need to contact your hosting provider directly.
Conclusion
As a busy WordPress website owner, security and performance are often top priorities. The Site Health Check tool can help you ensure your site is protected against malicious third parties and running at optimal speed.
To help you achieve a 100 percent score on your Site Health Check, we recommend the following:
- Install a Secure Socket Layer (SSL) certificate.
- Use WordPress themes and plugins safely.
- Ensure you’re running the latest version of PHP.
Do you have any questions about the Site Health Check feature? Let us know in the comments section below!


