Although you may use WordPress for absolutely everything, there may be occasions where you break away from the CMS for one reason or another. And if Local is your tool of choice for offline development, you might think you have to switch to a different one because you can’t use it without WordPress.
Thankfully, that’s not the case.
Today, we’ll show you how to set up and use Local to without WordPress. We’ll discuss what other types of sites you can build with Local, how to access the files and database you need to do it, how to save this non-WordPress site as a blueprint for future use, and suggest some other tools to get the job done.
Enough introduction. Let’s get to it.
What Kind of (Non-WordPress) Websites Can You Set Up in Local?
Even though Local is primarily a tool for WordPress development, what you need to understand is that, in the end, it simply simulates a server on your computer. As a consequence, you can also use it to power other software that needs a server to run, such as:
- Other PHP-based CMS such as Joomla or Drupal. These are especially suitable because, like WordPress, they work with a database in the background.
- Ecommerce solutions. You also have a lot of shopping carts and shop systems that need a server and database to run.
- Forum software. This type often works similarly to CMS.
- Static HTML or PHP websites. Here, the page content is included within the files themselves instead of being pulled from a database. You also need to edit the files directly in order to make changes to it.
You can experiment with other web-based software, however, these are probably the main ways you would use Local without WordPress.
All good? Then let’s talk about the how-to part.
The Basic Setup for Using Local Without WordPress
To use Local with non-WordPress websites, the basic steps are relatively simple: Create a new site in Local, then delete all its WordPress-related files. You can keep the database, but you will need to delete the tables within it as well.
To make this process more then theoretical, as an example, below I will attempt to install and run a Joomla website inside Local. Let’s see how I fare.
1. How to Set up a New Site in Local
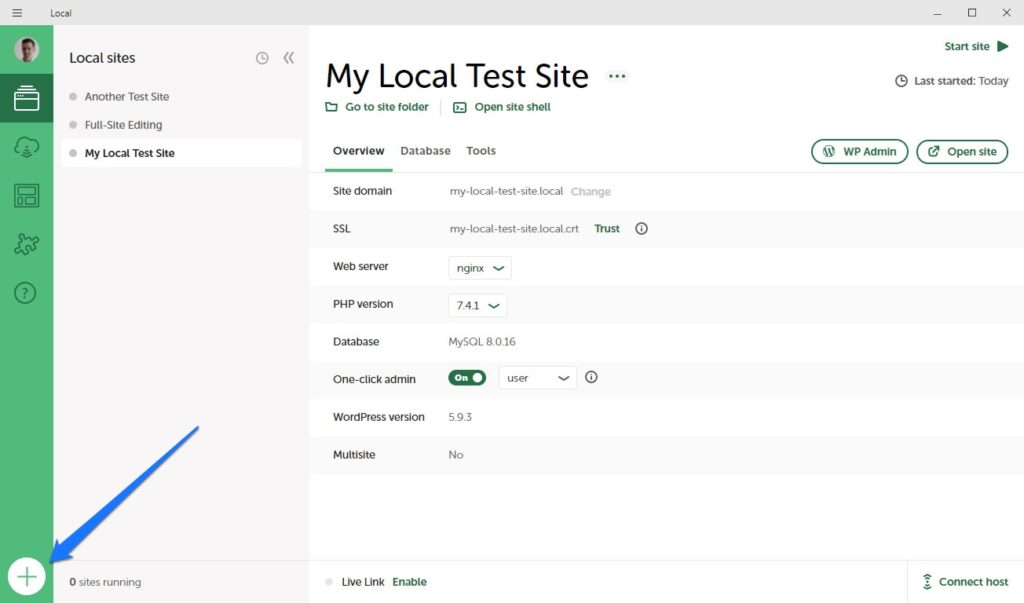
Setting up a new website to, ultimately, use without WordPress in Local is very easy. Simply click the big plus symbol in the lower left corner and follow the instructions.

Choose to create a new site and input a name. If you have specific reasons for doing so, you can also define a custom local domain and site path on the hard drive under Advanced options.

Then, set up your environment, meaning the PHP version, server type, and version of MySQL you are going to use.

Again, if you have specific needs here, make sure to adapt these settings to them. In my case, I make sure that the environment meets the technical requirements of Joomla.

One thing that’s important to note is that using the Preferred environment comes with the requirement to use index.php for your main file. Therefore, be careful if you are planning to use index.html or index.htm. In that case, make sure to set the environment to Custom and make your choices. You should also know that you can still change the server type and PHP version later.
In the last step, you have to define your WordPress username and password. Since you are not going to use WordPress, this doesn’t really matter. Input whatever you want and then click Add Site to finish.

2. Where (and How) to Store Files for Your Non-WordPress Site
Now that your soon-to-be-non-WordPress site exists, it’s time to get rid of all those things you don’t need, meaning the WordPress file system. You can most easily access it via the Go to site folder button under the site’s name.

Clicking it will automatically open the directory on your local machine.

The files you are looking for are located under app/public. If you open it, you can see that it contains all the usual WordPress files.

Since we are not going to be using WordPress, we can mark everything here and then delete it. After that, you can place whatever non-WordPress files in here. In the case of this example, that’s the files I downloaded from Joomla.org.

3. Where (and How) to Access the Database and How to Customize It
Next up is the database. Every site you set up in Local automatically comes with it’s own. The easiest way to access it is to go to the Database tab in your active site and click Open Adminer.

This will open up a database management tool where you can create databases, tables, and views, run SQL commands, analyze, optimize, and repair database tables, and more. If you have ever used phpMyAdmin, it should all be relatively straightforward.

In this case, we simply want to mark all the tables and then click Drop, since we want to use this Local site without anything WordPress-related.

One important note for when you use a CMS that needs a database connection like Joomla: In those cases you will usually need to provide a database name, username, password, and sometimes host name during installation. In Local, by default, these are local, root, root, and localhost respectively. However, you can also use the Adminer interface to create your own database and credentials.
Armed with this information, I can now start installing my non-WordPress website. I simply click Open site inside the site view in Local.

In my case, this automatically starts the Joomla setup process that I can simply follow and where I can fill in the database credentials as mentioned above.

One important note here, however, is that for Joomla to connect to the database in LocalWP, I also needed to include the server port. That means something like localhost:10016 as the hostname instead of just localhost. You can find the port number in the Database section as well.

Once that is done and the installation process has finished, I can access my Joomla website via the URL that Local provides.

How to Save Your Non-WordPress Site as a Blueprint
If you anticipate needing to use a non-WordPress site setup more than once within Local, it’s a really good idea to create a Blueprint out of it.
A Blueprint is essentially a template you can use to create a new site without having to adjust all your settings from scratch. So once you go through the process of deleting the WordPress files and such as described above, you won’t have to do it again because the Blueprint will contain these specifications for you already.
To create one for your non-WordPress site in Local, simply right-click it in the list and choose Save as blueprint (the site has to be started for that). Give it a name and save.

Next time you need similar site for a new project, when you create a new website in Local, pick the option Create from a Blueprint at the beginning.

In the next screen, simply choose your saved blueprint and continue the usual process.

Once it’s done, and you open the folder of the new site, you will see that it contains the same non-WordPress files as the original. That’s all there is to it. Remarkably easy, huh?
You can also rename your Blueprints and delete them at any time by going to the Blueprints menu.

Use the three-dot icons on the right change the name of your blueprints or get rid of them if you want.
Pros and Cons of Setting Up Local Without WordPress
Now that you know how to set up Local without WordPress, let’s review a few reasons why you might choose to do this or opt for another solution altogether. Let’s evaluate the pros and cons of this method.
Pros
- Convenience. If the majority of your website development takes place in WordPress and Local, it’s simply more convenient to perform this workaround once, save it as a Blueprint, and reuse it whenever the odd occasion strikes that you need a non-WordPress site.
- Fast. Site setup in Local is quick and easy. Creating a Blueprint for a non-WordPress site means that after the initial setup, you can perform this setup equally as fast.
- Centralized tools. Having all your web development tools in one place – Local – means learning just one platform instead of several.
- Get to use Local. Many people really enjoy the look and user-experience of Local, so it’s nice to keep your workflow streamlined in this way.
Cons
- Needs extra steps. Creating a non-WordPress site in Local does require more work, which can be off-putting.
- It’s a bit complicated. The additional steps are a little bit fiddly and require careful attention to detail. It’s not nearly as “open-and-go” as WordPress site creation is.
- Other tools can do the job quicker. Many other local development tools exist that work with non-WordPress sites straight out of the gate, with no extra steps required.
Alternative Tools to Consider for Non-WordPress Local Development
Should you decide to use a different tool other than Local for building non-WordPress sites, you’re in luck. There are several alternatives available that offer this ability as a default feature. Here are just a few.
XAMPP
First up, we have XAMPP, which is widely regarded as the most popular PHP development environment currently available. It’s totally free, easy to install and offers wide-ranging functionality. It includes PHP, Perl, and MariaDB. You can use it to set up non-WordPress and WordPress sites alike, with minimal fuss and effort.
EasyPHP
Another option comes from EasyPHP, specifically in the form of Devserver. Devsrever is another straightforward-to-use development environment that offers a convenient way to set up new websites on-the-go. You can use it to create a local server for any type of website you wish and take it with you anywhere via external hard drive. It features a tool range that’s suitable for beginners and experts. Plus, Devserver is modular, so you can add applications to it, access files and folders directly, and much more.
MAMP
Lastly, there’s MAMP, which is another local development environment that’s totally free to download and use. It’s available for both Windows and Mac and comes with all the tools you need to run a local server on your computer. It can also be used in conjunction with NAMO to test websites and apps on mobile devices. MAMP is compatible with MySQL, Apache, Nginx, PHP, Ruby, Perl, and Python, too.
Final Thoughts: Local and Non-WordPress Websites
Creating a new WordPress website with Local is an easy process – but you know that already. What you might not have known is that you can use Local to create non-WordPress websites, too. And that’s a real benefit if you wish to keep all your development projects contained within one environment.
Though not a solution for every developer, having this option on the table should bring peace of mind to some who wish to create a unified workflow.
Do you use Local to develop non-WordPress sites, too? What has you experience been like? We’d love to hear your thoughts below.
The post How to Use Local (By Flywheel) Without WordPress (3 Easy Steps) appeared first on Torque.


