Welcome to the beginner’s guide to CSS media queries. In this article, we will take a deep dive into what media queries are, how they work, and how to use them correctly.
Contrary to popular belief, they go beyond responsive design (even though this is what will focus on here). In the end, we want you to walk away with the knowledge of how to implement your own media queries to customize the way your site behaves.
What Are CSS Media Queries?
Media queries are basically a way to write conditional CSS. That means CSS markup that the browser will only render if certain conditions are met. Its most commonly use is in responsive design, where it’s a way to tell browsers to change the display of website elements when above or below a certain screen size. However, as we will see below, there are other ways you can use them.
How Do You Write a Media Query?
So, what is the correct way to use a media query? In CSS, they part of the at-rules, in this case @media. You then add the type of media you are trying to target and the feature/condition that needs to be met for the query to take effect.
@media [media-type] ([media-feature]) { // custom CSS }For example, the code snippet below targets devices with screens above 320 pixels. Everything that’s placed inside curly brackets of the media query will only be output in the browser on devices with screens that meet that condition. This is also called a break point, meaning a point at which the design changes notably to accommodate a different screen size.
@media screen and (min-width: 320px) { // custom CSS }Operators in Media Queries
In CSS media queries, you can also use operators like and, or, and not to combine conditions like so:
@media screen and (min-width: 320px) and (max-width: 786px) { // custom CSS }In the above example we have amended the original query to not only have a minimum screen size at which it will go into effect but also a maximum at which it will no longer apply.
There’s also only, which makes a style apply only if the entire query matches. It is also often used to improve compatibility of media queries with older browsers. For example, an older browser might interpret @media screen and (min-width: 320px) as only @media screen and apply it in a wrong way. Including only as in @media only screen and (min-width: 320px), fixes this behavior while it does not affect modern browsers negatively.
Available Media Types
While screen is the most common type of media to query, we have other options:
all— Targets all devicesprint— For documents that are viewed in print preview or media that displays content in a way that is intended for printspeech— Devices that read out content like screen readers
It’s also possible to target more than one media type by simply listing more than one.
@media screen, speech { // custom CSS }Examples for Media Features/Conditions
In the context of media queries for responsive design, the most common media feature is width, including min-width and max-width. However, you also have more choices here, such as:
height— Pretty much the same aswidthbut for device height. Also takesmin-heightandmax-heightto define ranges.aspect-ratio— Targets the width-to-height ration of the viewport.orientation— Lets you apply queries depending on whether a device is in portrait or landscape mode.hover— Introduce conditional CSS for devices that have different ways of hovering over elements, like a mouse vs a touchscreen.
There also features that are important for accessibility like:
prefers-reduced-motion— Allows you to, for example, disable animations on your site for people who have this set on their browser.prefers-contrast— With this media query you can define different color schemes for users who have either set their preference to low or high. However, currently no browser supports it.
There is a lot more, such as the ability to take into account the device resolution or color depth and more. You can find a full list here.
Important: The Viewport Meta Tag
No guide on CSS media queries would be complete without talking about the viewport meta tag. It resides inside a website’s section and looks like this:
What does this do? It resets the viewport size on mobile browsers. This is necessary because mobile browsers usually set a wider viewport than the actual device. That is so that they can fit non-responsive sites into it without looking awful. They basically simulate a wider viewport so that the design still fits.

Inputting the viewport meta tag makes sure that this doesn’t happen so that your media queries also work as intended.
Media Query Examples
Now that we have an idea of how media queries work in general, let’s go over some practical examples to drive the new knowledge home.
Define Breakpoints for Different Devices
We will start off with a classic example. Here, we will change the font size of a site depending whether it’s viewed on desktop, tablet, or phone.
body { font-size: 20px; } @media only screen and (max-width: 768px) { body { font-size: 18px; } } @media only screen and (max-width: 450px) { body { font-size: 16px; } }Doing so will make sure text remains both readable and not overwhelming on smaller screens.
Using orientation
Similarly, here’s an example for how you can change behavior depending on whether a site appears in portrait or landscape mode.
@media only screen and (orientation: portrait) { div { margin-left: 0px; margin-right: 0px; } } @media only screen and (orientation: landscape) { div { margin-left: 10px; margin-right: 10px; } }When in portrait, the div element will have no margin added to its sides. In landscape mode, on the other hand, where there is more space available, the media query will add 10px to each side.
Stringing Queries Together
You can also string together several queries by simply comma separating them. The comma works the same way as an or operator.
@media screen and (orientation: portrait), screen and (max-width: 320px) { div { margin-left: 0px; margin-right: 0px; } }In this case, the browser will apply no margin if the device is either in portrait mode or no wider than 320 pixels wide. Note that one condition being met is enough. You could also simplify the query to @media (orientation: portrait), (max-width: 320px) if you don’t care about specifically targeting devices with screens.
Media Queries in HTML and JavaScript
However, media queries are not only a CSS thing. While that is the most common application, it’s also possible to use them in HTML and JavaScript. For example, the HTML snippet below loads different style sheets on different-sized screens.
You might do this to make maintaining your different designs easier. Instead of having to edit the media queries in one big style sheet, you can edit a separate, smaller style sheet instead.
You can also use media queries in JavaScript, however, here you need to define the conditions to meet via window.matchMedia() first, which goes beyond this guide. You can find an example for that here.
Alternatives to Media Queries
It’s not always necessary to use media queries to make elements responsive. Some of them can be made that way out of the box. CSS technologies like flexbox and grid are exactly for this very purpose. They allow you to create HTML elements that automatically adapt to the viewport with many ways to control their behavior.

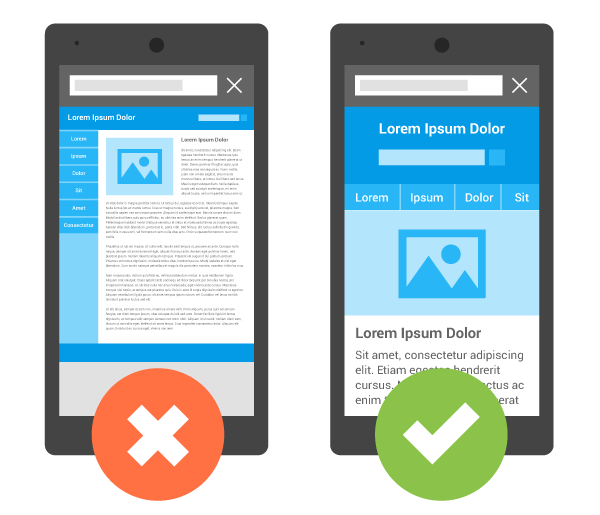
In addition, as mentioned in our primer on responsive design another important thing to make your theme or website responsive is to work with relative rather than absolute measurements. That means, instead of defining your sidebar as 320px wide, it’s a better to give it a relative size like 32.5%.
That way, no matter what screen type it appears on, it will fit itself into the available space instead of trying to force elements be a certain width on a screen that might not be able to accommodate it.
So, while learning about media queries is important, it’s just as important to be aware of other, modern ways to make websites adapt to smaller screen sizes. Use the beginner tutorials linked above to learn more.
Media Query Breakpoints 2021
Now that we know how to create breakpoints via media queries, leaves the question where you should place them. In the past, when we had fewer devices, you could optimize for different devices specifically.
However, today we have to deal with so many types of devices, screen sizes, resolutions, etc. that that is no longer possible. Therefore, questions like “what are the standard media queries?” no longer work.
There are some that are used frequently, such as those set by Bootstrap.

These work pretty well across many devices and can give you a good place to start from. There are also lists of media queries fitting common devices such as this one on CSS-Tricks. However, an overall better idea is to set break points specific to your design.
That means, start with the mobile design (because we are living in a mobile-first world) and increase the screen size further and further until it no longer looks good. That is exactly what the responsive design mode in browser developer tools is for.

Maybe the lines get too long, maybe some elements start to be too far apart. The bottom line is: the layout needs to change. This is your first break point and where you can put your first media query. Continue like this until you get to full screen display.
Working this way, you don’t have to look for exact device dimensions but instead can use your design as a guide for your media queries.
CSS Media Queries in a Nutshell
Having gone through our beginner’s guide to media queries, you should now have a good understanding of what media queries are, why they are useful, and how you can use them to make your website more appealing to visitors on mobile devices.
As you have also seen above, media queries go beyond responsive design, even though that is what they are most used for. You can also apply them to make your site more accessible, improve its look in print, and more.
Plus, CSS media queries are not the be-all-end-all of making your site responsive. There are also other ways to have your design adapt, such as the aforementioned flexbox and grid.
What’s your favorite way to use media queries? Anything to add to the above? Let us know in the comments!


