As a professional web developer, you probably manage a large portfolio of websites with different requirements. Therefore, you may be looking to switch to a more cost-efficient hosting solution without compromising the quality of your clients’ sites.
This is where cloud hosting comes in handy. This alternative to common hosting technologies has grown in popularity, primarily because it offers more flexibility and better site performance at affordable costs.
In this post, we’ll take a closer look at cloud hosting and why you may want to use this solution for your clients’ sites. Then we’ll show you how to get started in three simple steps. Let’s dive in!
What Cloud Hosting Is (And Why You May Want to Use It)
Most hosting solutions consist of several websites managed by a single server. This centralized approach has been the norm for decades. However, many providers are now offering a more flexible and efficient solution known as cloud hosting.
When you opt for cloud hosting, your data is distributed across a network of servers. There are a handful of benefits to using this system. For starters, it can help you improve your site’s loading speed and maximize uptime.
In shared hosting, multiple sites are hosted on the same server. This means you are sharing the same resources with other customers, which can put a heavy load on the server. This demand can slow down your pages. Moreover, if that server goes down, so will your site.
Similar problems can even appear in dedicated hosting, where your site has its own server. If something goes wrong with that server, it will impact the performance of your site.
With cloud hosting, you don’t need to worry about downtime or slow loading times. Since you’re not relying on a single source, if one server goes down, your site will automatically be powered by another one. Also, this multiple-server system is better equipped to handle high volumes of traffic than traditional hosting solutions.
Cloud hosting can also be more cost effective than traditional options. This is because it uses a pay-as-you-go model, meaning you only pay for the resources you use. Other hosting solutions are normally available at a flat-rate fee.
Thus, cloud hosting is an ideal solution for enterprises that operate large websites. However, even small businesses or professionals, such as bloggers, can benefit from it. Any business with a high number of site visitors or frequent spikes in traffic should consider cloud hosting:

As a web developer, cloud hosting can help you offer a more flexible and tailored service to your clients. For example, if a client’s website experiences a sudden growth in traffic, you can instantly increase their allocated resources to meet that demand.
How to Get Started With Cloud Hosting (In 3 Steps)
A client may specifically request cloud hosting for their online business. Alternatively, you may want to recommend this solution to business owners with popular websites. Either way, here’s what you need to do to get started with cloud hosting.
Step 1: Choose Your Cloud Hosting Provider
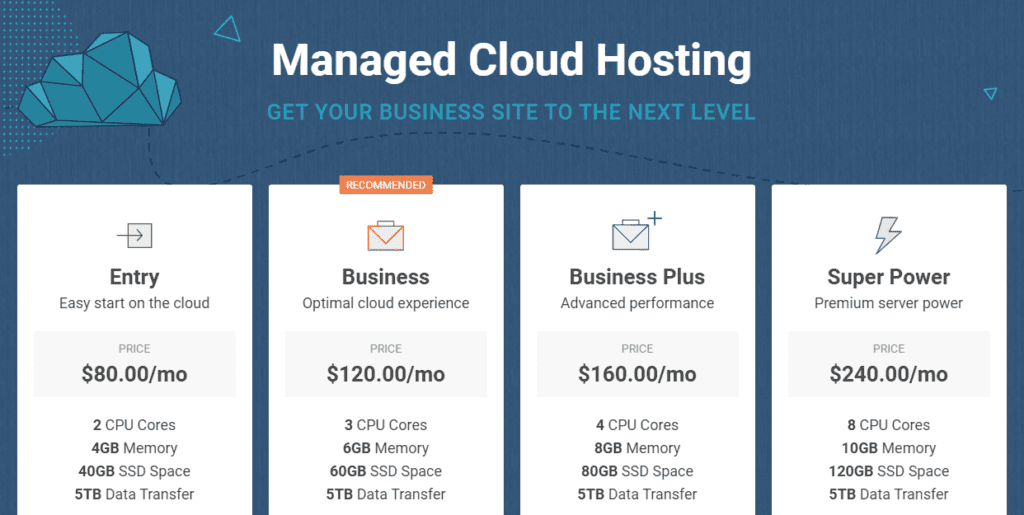
As with any hosting solution, the first step is to look for the right web host for your clients’ needs. Cloud hosting is offered by several major providers, so you have plenty of options to choose from.
There are a few things to consider before making your decision, including the reliability of the hosting provider. While downtime is less frequent with cloud hosting, you may still want to check the company’s track record in this area.
You’ll also want to consider the features offered, so you can choose a plan that best suits your clients’ requirements. For example, companies managed by remote teams may need a cloud hosting plan that comes with team collaboration features and user-friendly storage software.
Moreover, your client might one day decide to switch hosts or go back to traditional hosting. Therefore, you’ll need to ensure that the host provides migration support to make this transition as smooth as possible.
You’ll also need to choose between a public or private hosting plan. If you go for public cloud hosting, your client will be sharing the servers with other people. On the other hand, a private cloud consists of several dedicated servers. While this option may be pricier than public hosting, it gives you full control over your servers’ configuration.
Step 2: Set Up Your Server
Once you’ve signed up for a hosting account, you can set up your server. If you’ve opted for private cloud hosting, you’ll have more flexibility with your settings.
First, you may be asked to select the location of your server. It makes sense to choose a place that’s close to where your client’s audience is based.
You’ll also be able to set the size of your server. Depending on the plan you purchased, you may be able to scale up or down in the future. For instance, as your client’s site grows, you can simply expand your resources.
You can also choose your cloud storage software. A popular choice is Amazon Web Services (AWS):

AWS helps you build complex web applications, and enables you to scale and customize your content as needed. It was also designed to facilitate remote work and learning.
Another option that is commonly offered by hosting providers is Google Cloud:

Google Cloud comes with excellent security features. It also helps you to easily manage and migrate databases.
While private cloud hosting offers flexibility and scalability, it’s always best to confer with your client before applying any settings. This can help you ensure that the server is set up to meet your client’s specific needs.
Step 3: Pick a Cloud-Based Control Panel
Hosting providers typically offer their own control panels, but you might find the options somewhat restrictive. Plus, in order to obtain a control panel from a hosting provider, you may have to pay for managed support for the server – which can be costly.
Therefore, you might want to choose a more advanced tool to manage your servers with ease, and avoid purchasing a managed service. One option you may want to consider is CloudStick:

This is an all-in-one, cloud-based control panel that integrates with other tools, including WordPress, PHP, and Vultr. You can install it directly onto your server along with various extensions.
CloudStick helps you to easily manage your servers, thanks to its unique management features that were designed to improve User Experience (UX). These include real-time server monitoring, advanced security controls and settings, and an intuitive file manager. It also comes with powerful instant app installers that help you create web applications with just a few clicks.

Some of the other features that make CloudStick different from other SaaS platforms include:
- A free team feature
- Multiple PHP versions
- EasyPHP (via a one-click PHP extension installer)
- User quotas for web applications
- Centralized management and global search for database, web applications, and servers
- Free SSL, FTP, and SFTP
- Subdomains
- Easy Git deployment
- Unattended upgrades
- A server firewall with brute force protection
- Advanced MySQL management
- API compatibility
- 24/7 technical support with live chat available
Moreover, the CloudStick dashboard is very user-friendly, and enables you to access everything from one place. This can help you streamline your workflow and carry out maintenance tasks more efficiently.
Finally, CloudStick offers users peace of mind. To safeguard your data, you can schedule automatic backups for your web applications and databases.
Conclusion
Cloud hosting is a cost-efficient solution that can provide you with almost 100 percent uptime and faster load times. Therefore, it’s the perfect option for large-scale companies or websites that receive a lot of traffic.
As a web developer, you may want to consider cloud hosting to give your clients a tailored and enhanced service. You could also opt for an all-in-one control panel like CloudStick, which can help you manage your web applications and servers more efficiently.
Do you have any questions about using cloud hosting for your clients’ sites? Let us know in the comments section below!


