Local environments are a lifesaver for developers, and tools like Local make them easy to get up and running on your work machine. The only hitch comes when it’s time to deploy your local development site to your server. It can be a confusing process, especially if you’ve never worked with Local before. How does it work? Where to start?
Stuck on the final step? Thankfully, there are an abundance of options to push your local environment live. You can do it with the Local tool itself, with a managed hosting solution like Flywheel, or with a variety of WordPress plugins.
Once you get the hang of deploying a local site to a live server, you’ll find it’s a painless process that only takes a few steps. Let’s get your Local site online.
How to Export a WordPress Site from Local
If you’re not familiar with it already, Local is a free development application for WordPress that makes setting up a local environment on your computer a quick and easy process. You can import an existing site or start from a fresh WordPress installation, then export to a live server your visitors can access.
Importing Into Local
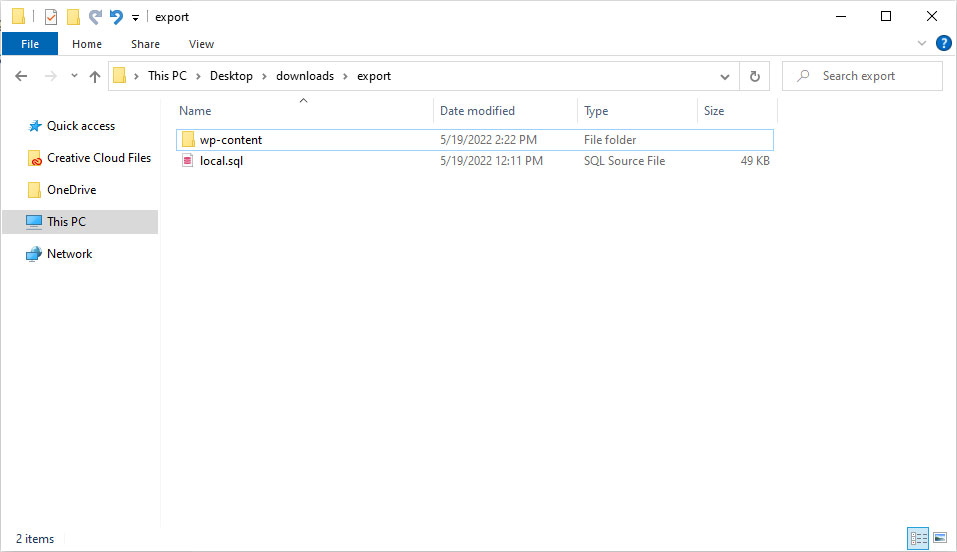
First, let’s briefly go over how to import a website into Local. You’ll of course need to download Local, and also export your existing WordPress site. If your web host doesn’t come with this feature, try a plugin like BackWPup. All Local needs is a zip file containing the wp-content folder and an SQL file with your database.

Once you have a zip of your website, you can import it into Local. Just open your file explorer, grab the zip file, and drop it directly into the Local window. Wait for the process to complete, and with that, you’re ready to go.

Once you’ve made your edits, you’re going to want to export your modified site and upload it to your server. Luckily, the process is just as if not more simple.
Exporting Your Local Site
When you open Local, you should see a menu titled Local Sites with a list of websites you’ve imported. Right click the one you want and click Export. If it doesn’t work, try right clicking and selecting Start to get it running, then export.

You can choose to exclude certain files or file types if needed, but you likely don’t need to change anything. Just click Export Site in the lower right corner to download a zip of your website.

For more details on this process and additional details, check our standalone article on the topic.
But once you have the zip file, what to do with it? Let’s get to that part now.
1. Manually Deploy Local Files to a Live Site
Unless you want to use one of the plugins below, you’ll need to upload the files to your server manually. You do that using tools like cPanel or an FTP client (for the wp-content folder) as well as phpMyAdmin (for the database).
If you’re not sure if your web host uses these or what your login credentials are, ask them for help. In addition, always make sure to back up your both your local and live site’s folders and database before making sensitive changes like this.
Upload Your Files
If you use cPanel, log in with the credential provided by your host and go to the File Manager. Use the Upload button to upload the WordPress folders Local exported into the root directory, overwriting the existing ones.

You can do the same with an FTP tool like FileZilla instead. Install the tool and use the FTP/SFTP credentials your host provides to connect to your site. Then, upload the WordPress folders to it and overwrite them.

Import and Update the Database
You’ll also need to replace the database with phpMyAdmin, which can be accessed through cPanel. First you should drop all the tables by opening your site’s database, clicking the Check all button, and selecting Drop from the drop-down next to it. This will empty your database.

Then click the Import tab at the top and upload the SQL file Local provided.

However, there is still a problem: The database is full of references to your local test URL. If you don’t replace it, your site will not function properly.
There are several ways of doing so. One is using SQL commands inside phpMyAdmin that you can find here. You can also use a plugin like Better Search Replace plugin to change the references before exporting the database. However, that leaves you with an unusable site in Local, so that’s not the best choice either. Finally, there is inter.connect’s search and replace script.

Note that not all web hosts allow access to these tools. If yours is more restrictive, try one of the methods below.
While this works, it can be a frustrating process, especially as you need to repeat it every time you deploy your site. It’s usually better to use a plugin or an integration.
2. Deploy Your Site Live with Local Connect
Local’s ability to export a website is very quick and convenient. However, dealing with manually uploading those files properly is not – especially once you start messing with the database. What if you could just push a button and have your staging site go instantly live?
This is completely possible, as Local integrates with two managed WordPress hosts: WP Engine and Flywheel. Local already makes setting up these environments as convenient as possible. In addition, these integrations take out any potential hassle when it comes to importing or exporting websites.
First, you’ll need to have a WP Engine hosting account. On the left side of the application, click the cloud-shaped Connect icon.

Then click Connect to a platform and pick your provider. Enter your credentials to establish the connection.

Your existing websites will appear in a list in the Connect menu. You can click Pull to Local to create a copy in your local development environment. At the same time, when you look at the list of websites back on Local’s main screen and click one, in the lower right corner, you find a menu to connect to the remote hosting provider.

Once you have done that, you can easily upload and download with the now active icons.

If you’re using Flywheel, this process works exactly the same; just connect your Flywheel account instead of your WP Engine one.
Compared to manually importing and exporting sites from Local, this is a totally painless process and can save a lot of time.
3. Move Your Site from Local to Live Using the WPvivid Backup Plugin
If you aren’t using one of Local’s integrated web hosts, but want to make the process of exporting and uploading your website a little more convenient, then your best alternative is a plugin. These plugins also provide a very easy way to export your live site for use in Local. Though not as automated of a solution as the one-click push and pull features, it’s a lot faster than doing it manually.
The first of these is the WPvivid Backup Plugin. It comes with backup, cloning, migration and staging services. You can also use it to easily export and import site snapshots from Local. While a pro version is available, the free version will work fine.
You’ll need to install WPvivid both on your Local environment and on your live site. You can do so by going to Plugins > Add New and searching for it or uploading the plugin files right there.

Once installed and activated, go to the new WPvivid Backup tab in your dashboard. In the Backup & Restore menu, make sure Database + Files (Entire website) is selected and click the Backup Now button.

Now just wait for the backup process to finish. There’s no need to do any extra setup except in unusual cases, but it never hurts to look through the settings and make sure everything is configured properly.
When the backup finishes, scroll down to the Backups tab where you’ll see a list of all backups stored on the server. Click Download on the one you just made to download a zip of your website and database to your computer.

Importing the Data
Now on the live version of your site, again make sure that WPvivid is installed. Go back to the WPvivid Backup menu and scroll down to the Backups tab, but click the Upload tab next to it this time. Put in the zip you exported from the local version of your site and click Upload.

When finished, back on the Backups tab, click Restore on the file you just uploaded.

You’ll need to log in again, but after that, your live website should be up to date!
This should work properly without any further input. If you have trouble with your URLs not migrating or pages not working, you can try the URL Replace function (Pro feature!) to tie up any loose ends.
4. Using the All-in-One WP Migration Plugin
WPvivid isn’t the only plugin you can use to deploy your site to Local; in fact, most backup or migration plugins will function very similarly.
If you prefer the very popular All-in-One WP Migration plugin, this will work perfectly as well. Just like with WPvivid, you’ll need to install All-in-One on both the Local and live versions of your site.
Once downloaded in Local, head over to the Export section of the new All-in-One WP Migration menu in your sidebar.

Before exporting, you’ll need to fill in the Find

This is necessary to make sure your database is using the URL of your live, not local, site when trying to access information. Don’t skip this step or else you’ll end up with a broken site!
Beyond that, there are several advanced options that you can check if needed, but it usually isn’t necessary. When you’re ready, click the Export To button and then click File. Wait for the export to finish, then click Download.

Now you need to upload the zip to your live website with All-in-One Migration installed. Instead of the Export tab, go to All-in-One WP Migration > Import. Drop in the zip or click Import From > File and choose it.

The plugin will give you some instructions to avoid any errors such as changing your permalink structure. But once this is finished, your site should be properly updated.
5. Moving Your Site With Duplicator
Another WordPress migration plugin that will do the trick is Duplicator. Like All-in-One Migration and WPvivid, it just as easily allows you to export a zip out of Local you can upload to your live site. Unlike the other plugins here, however, you don’t need an existing website to deploy your website from Local. An empty server is enough.
Start by installing Duplicator on your Local environment. Then, go to Duplicator > Packages and click Create New in the top right corner.

Run through the setup, you can leave most values on default.

When the build is finished, download both the installer and the archive file.

Next up, move both the Archive and Installer files to your server using cPanel or FTP. Then, run the installer by going to your-website.com/installer.php. This will automatically install a copy of your website on your live server. You will have to provide some information such as the database name, user, and password but it’s overall pretty hands off.

There is a Pro version of this plugin that also allows you to import your site data into an existing site. However, you might as well use one of the earlier free solutions for that.
Deploy From Local to Live in a Few Easy Steps
Using Local to set up a safe testing environment is an easy process, but you might find yourself lost when it’s time to upload the changes to your server. Yet, once you get the hang of it, deploying a Local website is a breeze.
The easiest way by far is to use Flywheel or WP Engine as your web host. This gives you access to one-click push and pull functionality. If you use a different host, try a backup and migration plugin instead. This isn’t quite as convenient, but the entire process should only take a few minutes.
If all else fails, you can always export from Local and upload the files to your server manually. It can be daunting at first, but once you’re familiar with tools like cPanel, FileZilla, and phpMyAdmin, you’ll quickly get used to them.
What’s your favorite way to deploy your website from Local to live server? Your recommendations are welcome in the comments!


