
Do you want to add one-click login with Google to your WordPress site?
When your users can sign in with their Google account, they won’t have to create, remember, or track another username and password just to access your website. This helps save them time and increase your conversion rates.
In this article, we will share how to easily add one-click Google login in WordPress.
Why Add One-Click Google Login in WordPress?
Many internet users stay logged in to their Google accounts. This lets them quickly access Google apps like Gmail, Drive, and Docs without signing in separately for each app.
Having one-click Google login activated on your WordPress login page allows your users to do the same on your website. They can save time by quickly signing in with their Google account. This saves them from having to enter their login credentials each time.
If you run a simple WordPress blog, then you might not find this feature useful.
But if your organization uses Google Workspace for professional business email addresses, then your team members can use your organization’s Google apps accounts for login.
Also, a single sign-on feature like one-click Google login is very helpful for any websites that require users to log in such as multi-author websites, membership websites, and websites selling online courses.
With that being said, let’s take a look at how to easily add one-click login with Google to your WordPress website.
Tip: To add one-click Google Login, your site needs to have secure SSL encryption. To learn how to set up a secure connection, see our beginner’s guide on how to switch from HTTP to HTTPS in WordPress.
How to Add One-Click Google Login in WordPress
First, you’ll need to install and activate the Nextend Social Login and Register plugin. For more details, please see our beginner’s guide on how to install a WordPress plugin.
For this tutorial, we’ll use the free plugin that supports Google, Twitter, and Facebook login. There is also a paid version of Nextend Social Login that adds social login for lots of different sites including PayPal, Slack, and TikTok.
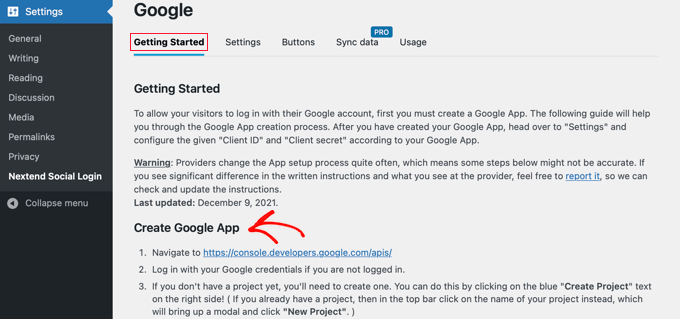
Upon activation, you need to go to Settings » Nextend Social Login in the WordPress admin area. On this screen, you see the different social login options that are available.

To add a Google login to your WordPress website, you need to click the ‘Getting Started’ button under the Google logo.
Here you will see that your first step will be to create a Google app.
Creating a Google app sounds technical, but don’t worry.
You don’t need to know any code, and we’ll walk you through all the steps.
Creating a Google App
To create this app, you’ll need to switch between your WordPress dashboard and the Google Developers Console. It’s a good idea to leave your WordPress dashboard open in the current tab and open a new browser tab.
Now you can visit the Google Developers Console website. If you are not already logged in, then you will be asked to log in with your Google account.
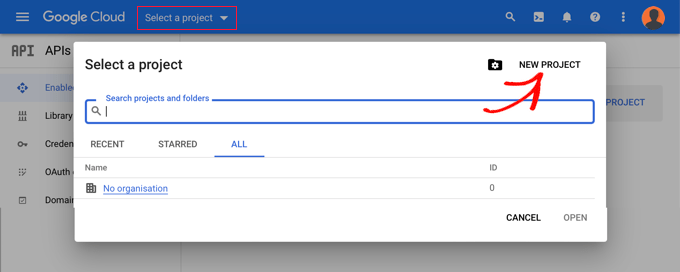
Next, you need to click on ‘Select a project’ from the top menu. It will open a popup where you would click the ‘New Project’ button to continue.
This will open the New Project page. You will need to add a project name and select the location. The project name can be anything you like, such as ‘Google Login.’
If you logged in using a Google Workspace account, then the location will be filled in with the name of your organization automatically. If not, then you should leave it as ‘No organization.’
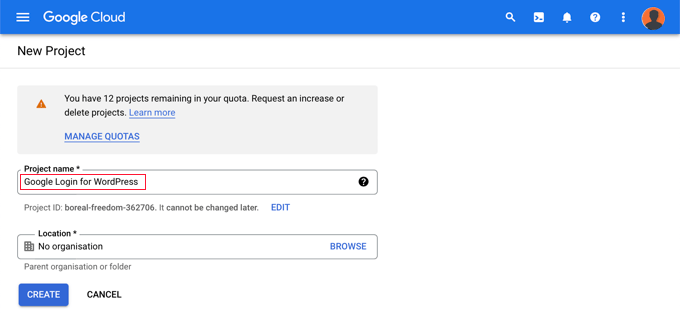
Next, click the ‘Create’ button to continue.
You’ll now be redirected to the ‘APIs & Services’ dashboard. On this page, you need to click on ‘OAuth consent screen’ in the left menu.
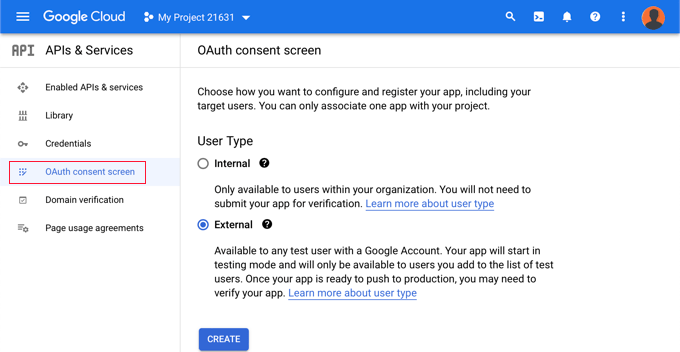
Here you choose the type of user you’re allowing to log in.
Select ‘Internal’ if only users with your organization’s Google account will be logging in. Alternatively, you should choose ‘External’ if your users have email addresses outside of your organization. For example, anyone with an @gmail.com account versus an @yourcompanyemail.com address.
When you’re ready to continue, click the ‘Create’ button. Now you can start to add information about your app.
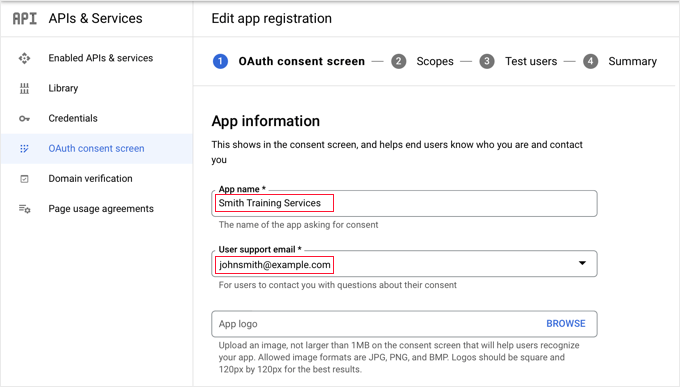
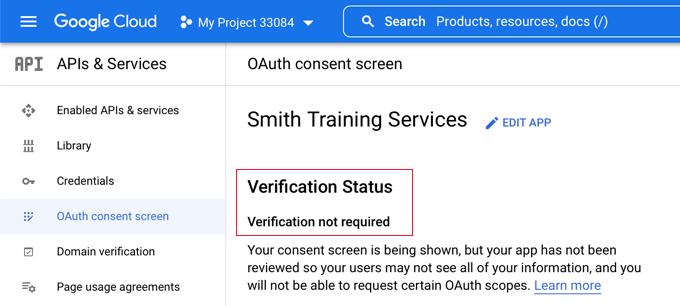
First, you should enter your business name in the app name field. This will be shown to the user when logging in, such as, ‘Smith Training Services wants access to your Google account.’
You also need to add the email address you logged into Google with. This will allow your users to ask questions about the Google login screen.
Tip: We recommend that you do not upload a logo for your app. If you do, then your app will need to go through a verification process with the Google Trust and Safety Team. This process is lengthy and can take 4-6 weeks.
Once you’ve done that, scroll down to the ‘App domain’ section. Here you need to add links to your website’s home page, privacy policy page, and terms of service page.
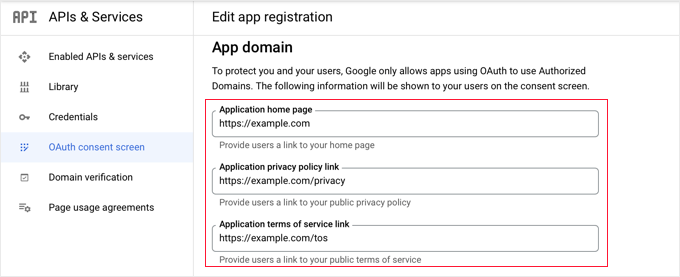
Then you need to click the ‘Add Domain’ button to add your website’s domain name, such as ‘example.com.’
If you want to add one-click Google login to more than one website, then you can click the ‘+ Add Domain’ button to add another domain.
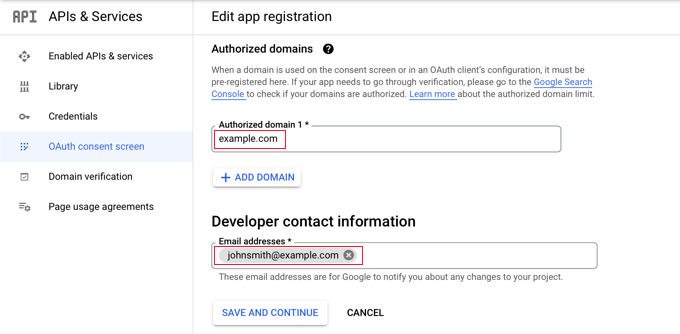
Finally, you need to add one or more email addresses so that Google can notify you about any changes to your project.
When you’re finished, make sure you click the ‘Save and Continue’ button.
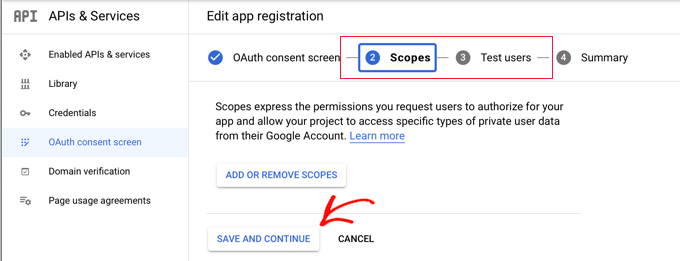
Next, you will come to the Scopes and Test Users pages. For both of these pages, simply scroll to the bottom and click the ‘Save and Continue’ button.
The final page for this step will show you a summary of your OAuth consent screen settings.
The next job is to create the keys your plugin will need to connect with Google Cloud.
You should click ‘Credentials’ from the left menu and then click the ‘+ Create Credientials’ button at the top of the screen. You need to select the ‘OAuth client ID’ option.
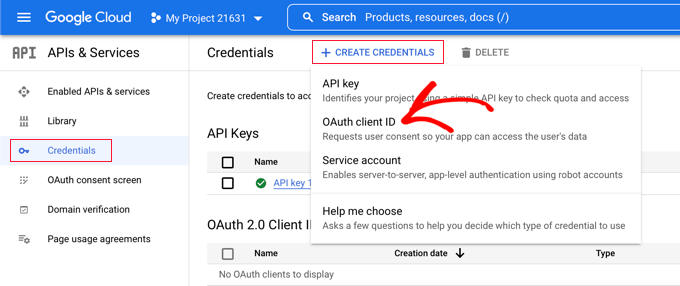
This will take you to the ‘Create OAuth client ID’ page.
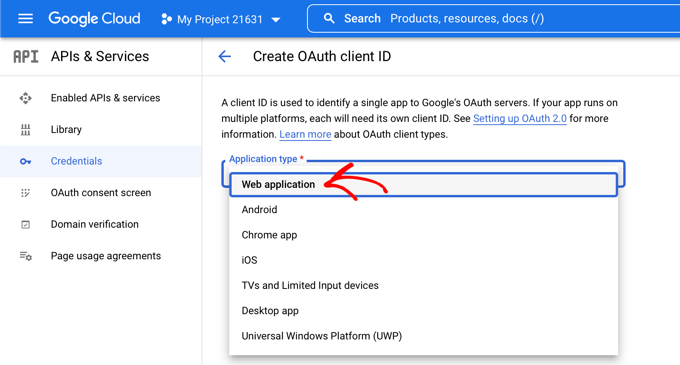
You should select ‘Web application’ from the ‘Application type’ dropdown.
Some settings will be added to the page. You need to scroll down to the ‘Authorized redirect URIs’ section and click the ‘+ Add URI’ button.
Now you should enter this URL:
http://example.com/wp-login.php?loginSocial=google
Make sure you replace example.com with your own website’s address.
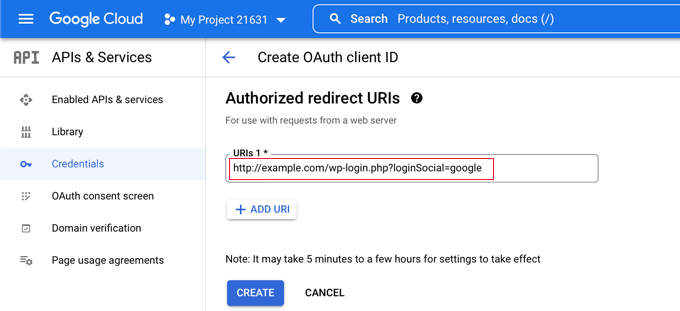
Once you’ve done that, you should click the ‘Create’ button to store the setting. It may take five minutes to a few hours for the setting to take effect.
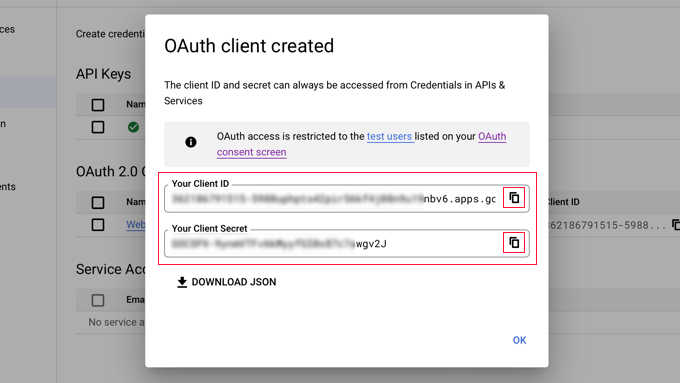
Your OAuth client has now been created!
You will see a popup containing ‘Your Client ID’ and Your Client Secret.’ You will need to paste these keys into the plugin’s settings page back in your WordPress admin area.
You can just click the ‘copy’ icon to the right to copy the keys one at a time.
Adding Your Google Keys to Your Plugin
Now, simply switch back to your website’s browser tab and click on the ‘Settings’ tab under Settings » Nextend Social Login. Here you will see fields for the Client ID and Client Secret.
You need to copy your keys from the Google Cloud Console and paste them into these fields.
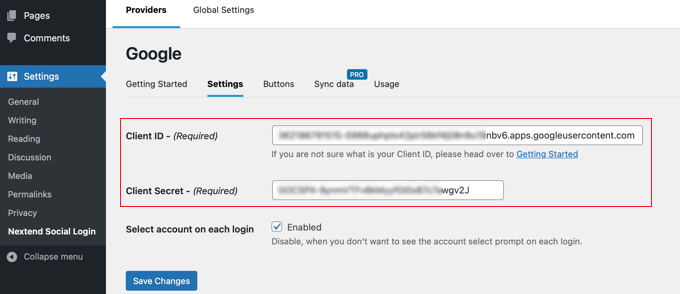
Once you’ve done that, make sure you click the ‘Save Changes’ button to store your settings.
Now you’ll need to test that the settings are working correctly. This is important because you don’t want real users to encounter errors when trying to log in to your website.
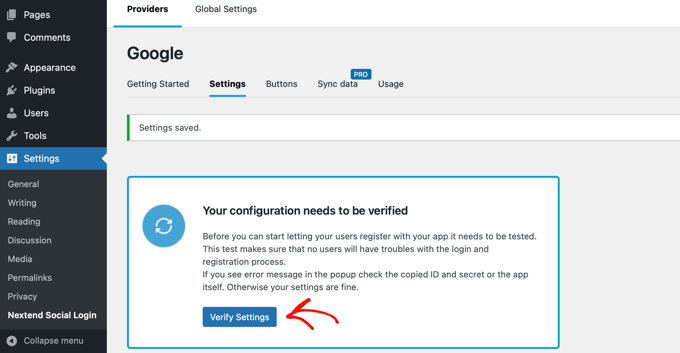
Simply click the ‘Verify Settings’ button and the plugin will make sure that the Google app you created is working correctly.
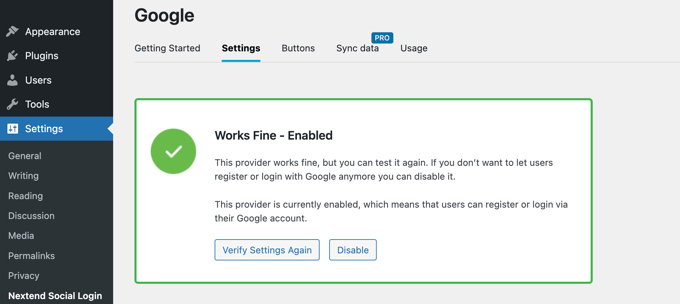
If you followed the steps above correctly, then you should see a notification saying ‘Works Fine – Disabled.’

You can now safely click the ‘Enable’ button to allow users to log in using their Google ID.
You will see a message confirming that Google login is now enabled.
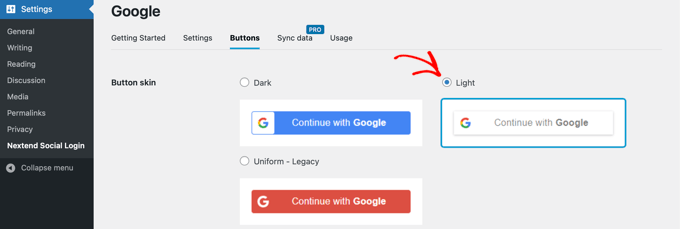
Selecting Your Button Style and Labels
Nextend’s default button style and label are pretty standard and will work for most websites. However, you can customize them by clicking on the ‘Buttons’ tab at the top of the screen.
You will now see all the different styles that you can use for the social login button. To use a different style, simply click to select its radio button.
Once you’ve done that, you can also change the button text by editing the text in the ‘Login label’ field.
If you like, you can apply some basic formatting to the login label using HTML. For example, you can make text bold using and tags.
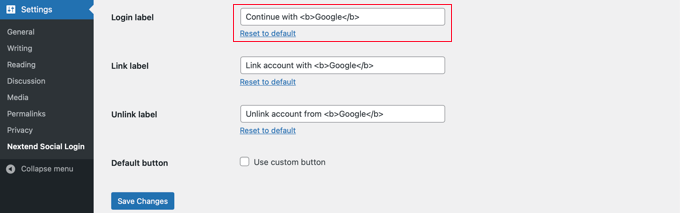
You can also edit the ‘Link label’ and ‘Unlink label’ fields that allow users to link and unlink your website with their Google accounts. Technical users can use HTML code for buttons to create their own Google login button.
Make sure you click the ‘Save Changes’ button to store your settings.
Taking Your Google App Out of Testing Mode
Now there is one last thing you need to do back on the Google Cloud browser tab. You should still see the popup with your client ID and client secret. You can dismiss the popup by clicking ‘OK’ at the bottom of the popup.
Now you need to click ‘OAuth consent screen’ from the left menu.
You can see that your Google app is in ‘Testing’ mode. This allows you to test your app with a limited number of users. Now that you have received a ‘Works Fine’ notification when verifying the settings with the plugin, you can move it to In ‘Production’ mode.
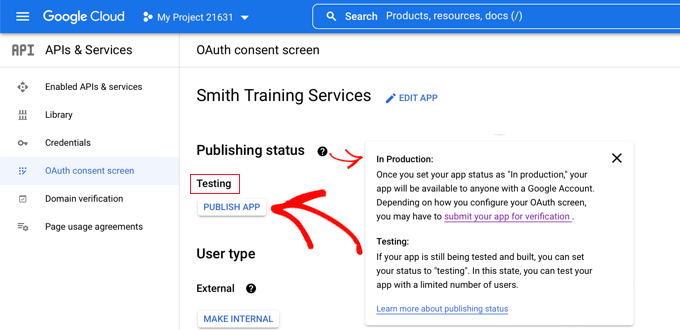
You do this by clicking the ‘Publish App’ button. Next, you will see a popup with the title ‘Push to production?’
Simply click ‘Confirm’ to allow everyone to use a one-step Google login on your site.
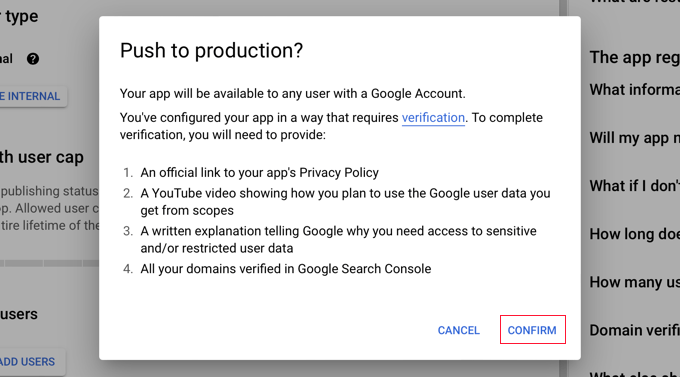
If you followed this tutorial carefully, then the Verification Status should now be ‘Verification not required.’
Your app will now work with all Google users.
Now when users are logging in to your website, they will have the option to log in with Google.
However, if they prefer, they can still log in using their standard WordPress username and password.

Keep in mind that users can only log in with the Google account address that they have used on your website. Also, if you have allowed user registration on your WordPress site, then users can quickly register on your site using one-click Google login.
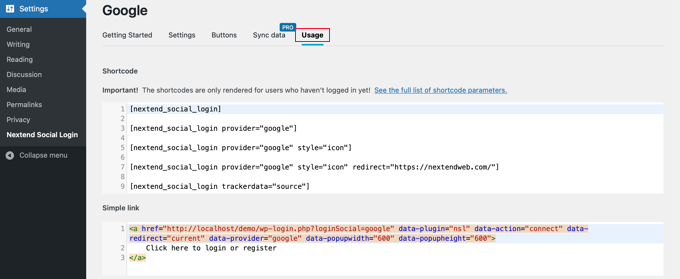
If you wish to add the Google login button anywhere else on your website, then you can do so using a shortcode. You can learn more by clicking on Nextend’s ‘Usage’ tab.
We hope this article helped you learn how to add one-click login with Google in WordPress. You may also want to learn how to create a WordPress membership site, and see our list of the best WordPress business directory plugins.
If you liked this article, then please subscribe to our YouTube Channel for WordPress video tutorials. You can also find us on Twitter and Facebook.
The post How to Add One-Click Login With Google in WordPress first appeared on WPBeginner.


