
Do you want to add a WordPress navigation menu to your posts or pages?
By default, you can only display menus in the locations set by your WordPress theme. However, sometimes you may need to add a menu to a specific post or page or even show the menu inside a page’s content.
In this article, we will show you how to add a WordPress navigation menu in posts and pages.
Why Add a WordPress Navigation Menu in Posts / Pages?
A navigation menu is a list of links pointing to important areas of a website. These links can help visitors find what they are looking for, improve the customer experience, and keep people on your WordPress website for longer.
The exact location of your menu depends on your WordPress theme. Most themes let you show menus in multiple areas, but sometimes you may need to add a navigation menu to a post or page.
For example, you may want to add a unique menu linking to all the products mentioned on a specific sales page.
You can also use menus to display related posts on your WordPress blog. By placing this navigation menu at the end of a blog post, you can encourage readers to check out more of your content.
With that being said, let’s see how you can add a WordPress navigation menu to any post or page. Simply use the quick links below to jump straight to the method you want to use:
Method 1: Using the WordPress Navigation Block (Best for Individual Pages and Posts)
The easiest way to add a WordPress navigation menu to posts and pages is by using the built-in Navigation block. This allows you to show a navigation menu anywhere in a page or post, but you must manually add each menu.
This is a great method if you need to control exactly where the menu appears on each page. However, it can be time-consuming and frustrating if you want to add the same navigation menu to lots of pages and posts.
To get started with this method, simply open the page or post where you want to add a WordPress navigation menu. Then, click on the ‘+’ button to add a new block to the page.
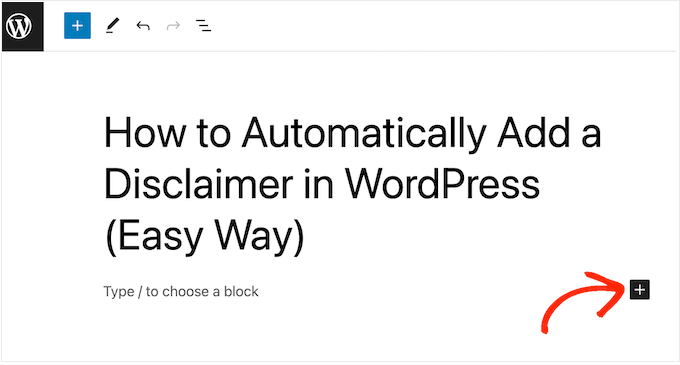
In the popup, type in ‘Navigation.’
When the right block appears, give it a click to add it to the page or post.

The Navigation block will show one of your menus by default.
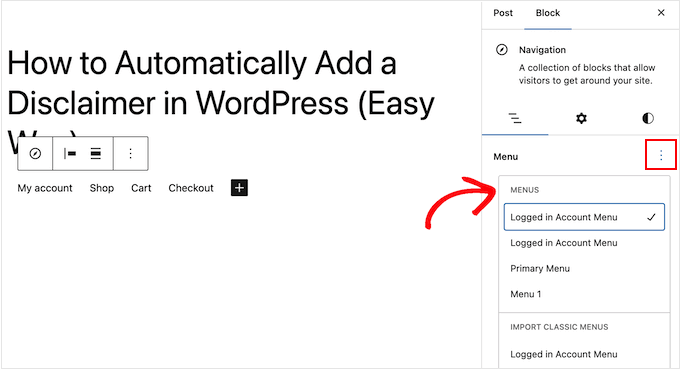
If you want to add a different menu instead, then open the ‘Block’ tab. Then, you need to select the ‘List View’ tab.
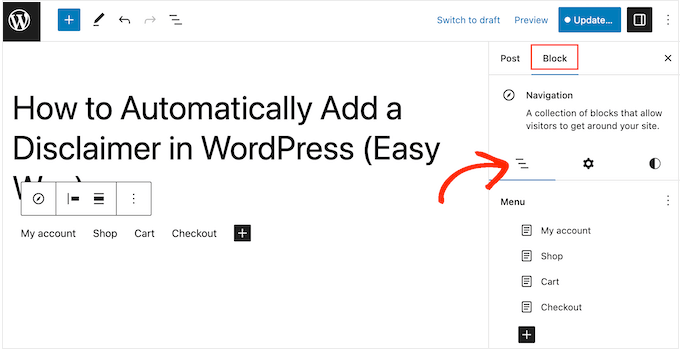
Here, you can click on the three dots next to ‘Menu.’
Then, simply choose the menu that you want to use instead.
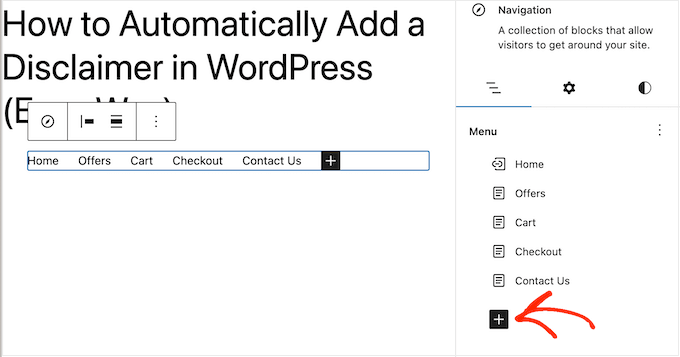
Sometimes, you may want to customize the menu by adding more links. For example, if you run an online store, then you might link to all the products mentioned on that page.
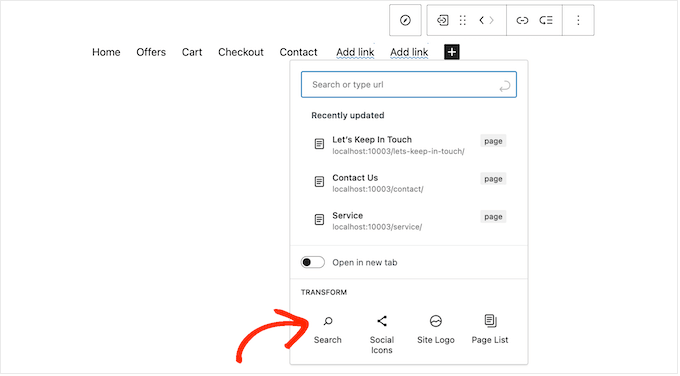
To go ahead and add links to the navigation menu, click on the ‘+’ icon in the ‘List View’ tab.
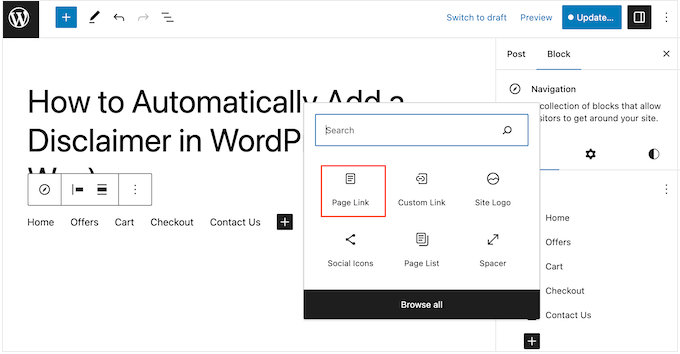
This opens a popup with different options.
To add a link to any page on your website, just click on ‘Page Link.’
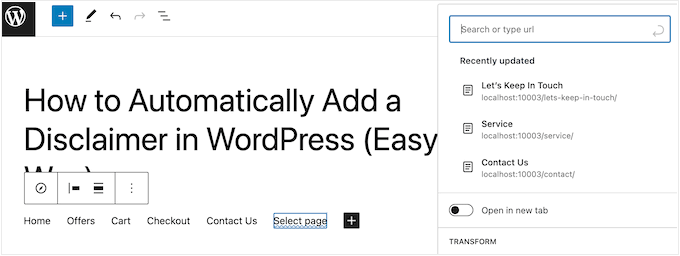
You can now either choose a page from the dropdown menu or start typing in the page title. When the right page shows up, click to add it to the menu.
To add more pages to the navigation menu, simply repeat the same process described above.
You can also add social icons to a WordPress menu, which will encourage people to follow you on Twitter, Facebook, YouTube, LinkedIn, and more.
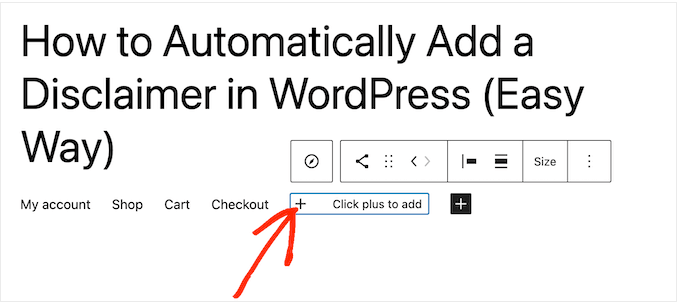
To get started, click on the ‘+’ icon in the ‘List View’ tab. This time, select ‘Social Icons.’
This adds a new area where you can add the social icons.
To get started, click on the new ‘+ Click plus to add’ section.
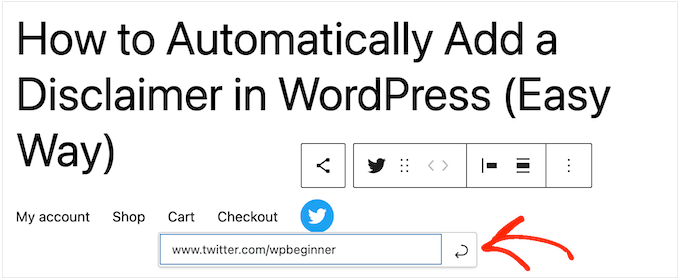
Now, select the social media network you want to link to.
For example, you can choose ‘Twitter’ to promote your Twitter page in WordPress.
After that, you will need to configure the social icon.
The exact steps will vary depending on the social network. However, you will typically need to click to select the icon and then type in the URL for your social media profile.
Simply repeat these steps to add more social icons to the navigation menu.
Finally, you may want to add a search bar to your WordPress menu to help people find interesting pages, posts, products, and more.
WordPress has a built-in search feature, but it is basic and doesn’t always provide accurate results. That’s why we recommend using a WordPress search plugin to improve your site search.
Even better, if you choose an advanced plugin like SearchWP, then it will replace the default WordPress search. After configuring the plugin, all the search boxes across your site will use SearchWP automatically, including any search boxes in your navigation menus.
No matter whether you are using the built-in WordPress feature or an advanced plugin like SearchWP, simply select ‘Search’ to add a search bar to the menu.
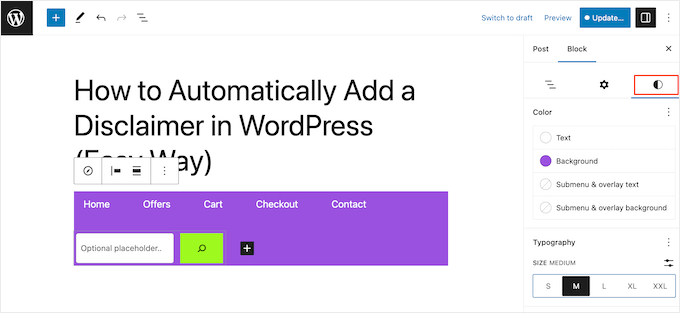
When you are happy with the menu’s content, you may want to change how it looks.
You can change the menu’s layout, including its alignment and orientation, by selecting the ‘Settings’ tab.
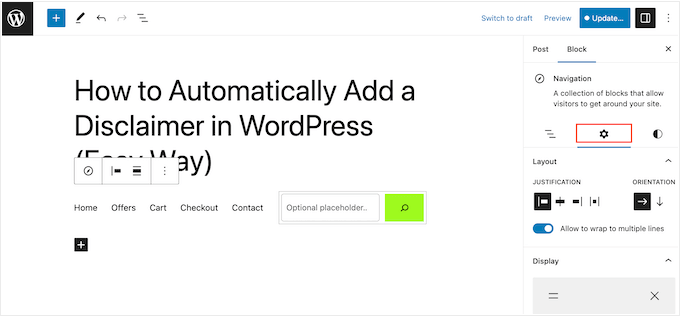
After that, you can change the background color, text color, typography, and more by selecting the ‘Styles’ tab.
As you make changes, the live preview will update automatically. This means you can try lots of different settings to see what works best for your WordPress blog.
There are lots more settings you can configure, but this is all you need to add a helpful WordPress navigation menu to a post or page.
Pro Tip: If you plan to use the same navigation menu across multiple pages and posts, then it’s smart to turn it into a reusable block in the WordPress block editor. This can save you a ton of time and effort.
When you are ready to make the navigation menu live, just click on either the ‘Update’ or ‘Publish’ button.

Now, if you visit this page or post, you will see the navigation menu in action.
Method 2: Using the Full Site Editor (Block Themes Only)
If you only want to add a navigation menu to a few posts and pages, then method 1 is a great choice. However, you will need to add each menu manually, so this isn’t the best option if you want to show the same menu across your entire website.
If you are using a block-based theme such as Hestia Pro, then you can add a WordPress navigation menu to the page or post template. This menu will then appear across all your pages or posts without you needing to add it manually. This is perfect if you always want to show the same navigation menu in exactly the same place.
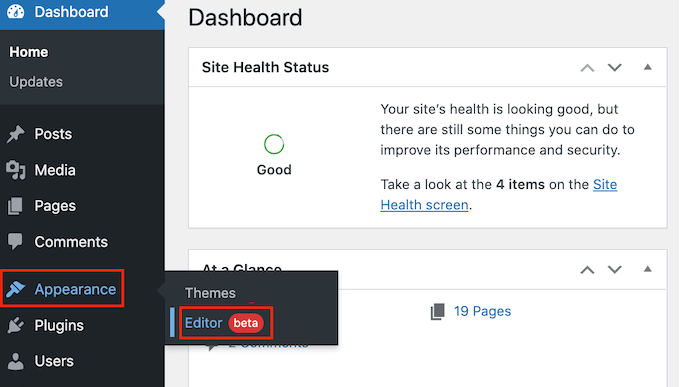
To get started, go to Themes » Editor in the WordPress dashboard.
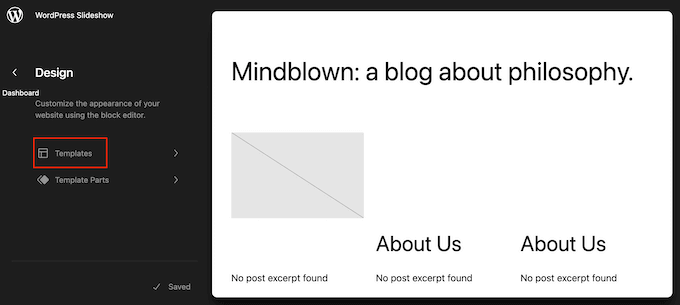
By default, the editor will show your theme’s home template.
To add a navigation menu to your WordPress pages or posts, click on ‘Templates’ in the left-hand menu.
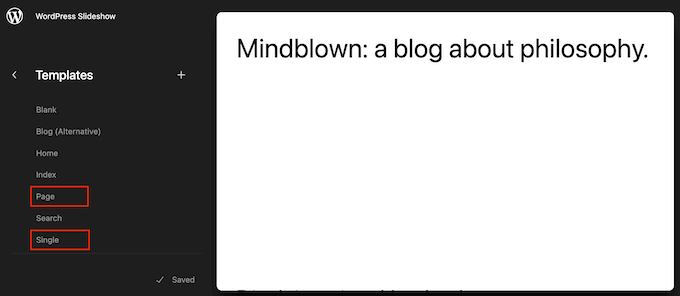
The editor will now show all the templates that make up your WordPress theme.
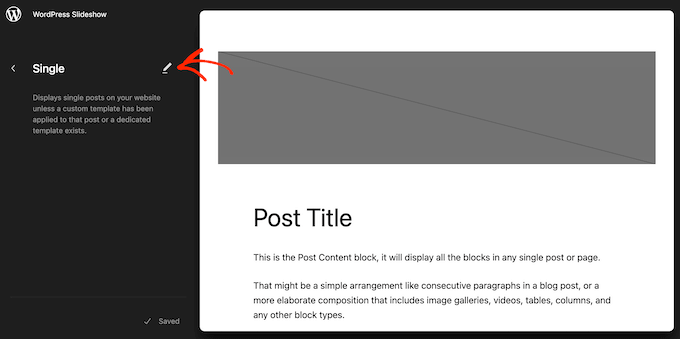
To add a navigation menu to your WordPress blog posts, select the ‘Single’ template. If you want to add a menu to your pages instead, then select the ‘Page’ template.
WordPress will now show a preview of your chosen template.
To edit this template, go ahead and click on the small pencil icon.
With that done, click on the blue ‘+’ icon in the top left corner.
In the search bar that appears, type in ‘Navigation.’
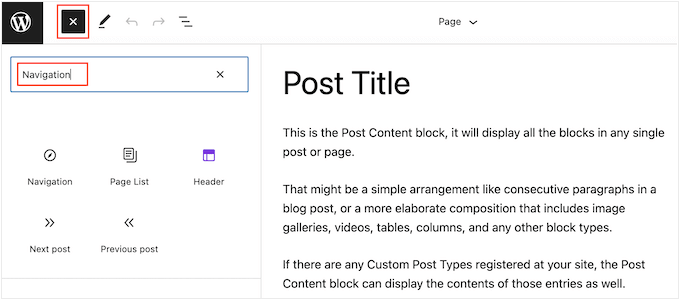
When the right block shows up, drag and drop it onto your template.
By default, the block will show one of your menus. If you want to add a different menu instead, then click on the ‘Block’ tab. After that, select ‘List View.’
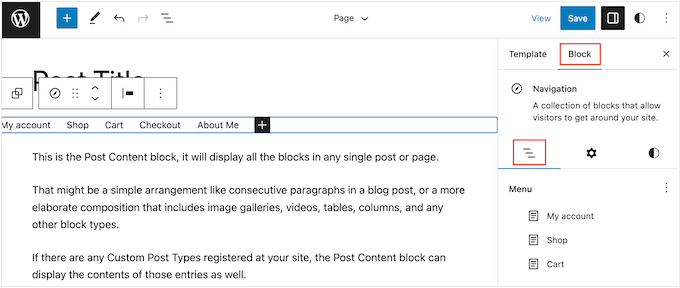
You can now click on the three dots next to ‘Menu’ to see all the menus you have created on your WordPress website.
Simply select any menu from the list.

With that done, you can add more pages to the menu, add a search bar, and more, by following the steps in method 1.
When you are happy with how the navigation menu looks, click on the ‘Save’ button to make it live. Now, if you visit your site, then you will see the same navigation menu across all your WordPress pages or posts.
Method 3: Creating a Custom WordPress Theme (More Customizable)
Another option is to create a custom WordPress theme. This is a more advanced method, but it gives you complete control over where the menu appears in your posts or pages.
In the past, you would need to follow complicated tutorials and write code to build a custom WordPress theme. However, it’s now possible to easily create your own themes using SeedProd.
SeedProd is the best drag and drop WordPress page builder, and Pro and Elite users also get an advanced theme builder. This allows you to design your own WordPress themes without writing any code.
For step-by-step instructions, please see our guide on how to create a custom WordPress theme (without any code).
After creating a theme, you can add a navigation menu to any part of your WordPress website.
Simply go to SeedProd » Theme Builder and find the template that controls the layout of your posts or pages. This will typically be ‘Single Post’ or ‘Single Page.’

This will open the template in SeedProd’s drag and drop page builder.
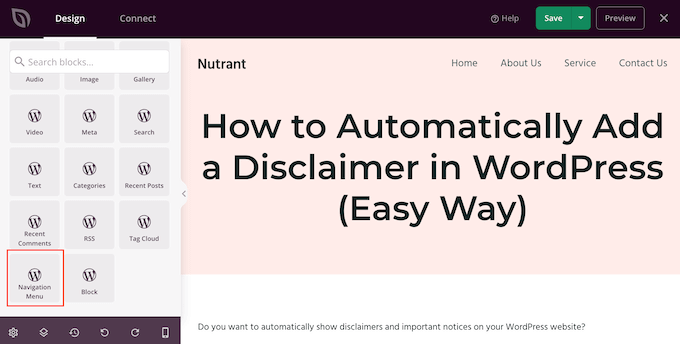
In the left-hand menu, scroll to the ‘Widgets’ section. Here, find the Navigation Menu block and drag it onto your layout.
After that, click to select the Navigation Menu block in the live preview.
Now, open the ‘Select Menu’ dropdown and choose the menu you want to show.
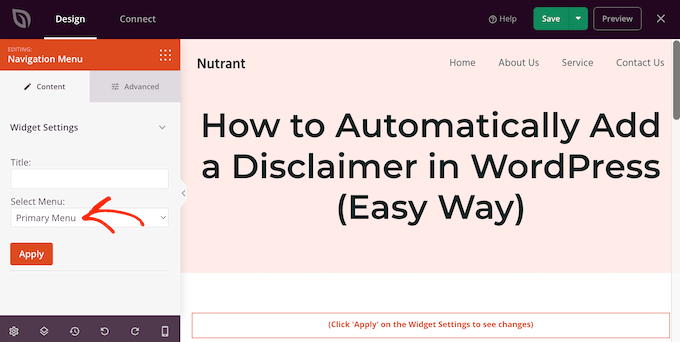
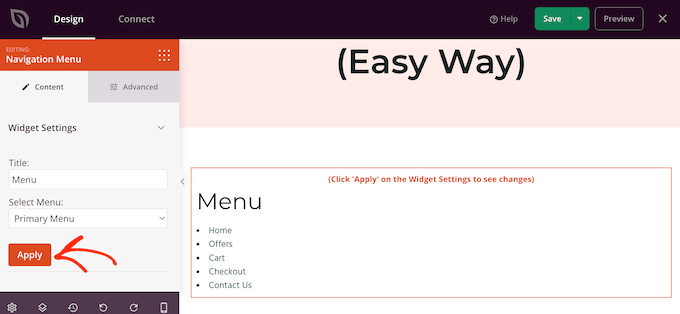
You can now type an optional title into the ‘Title’ field. This will appear above the WordPress navigation menu.
To preview how the menu will look on your website, click on the ‘Apply’ button.
Next, you may want to style the menu by clicking on the ‘Advanced’ tab.
If you added a title, then you can change the text color, adjust the typography, and add more space between the heading and the menu items.
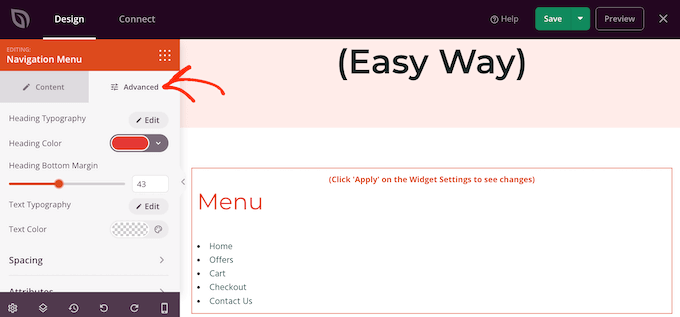
You can also change the color and font used for the menu items.
Simply use the ‘Text Typography’ and ‘Text color’ settings to make these changes.
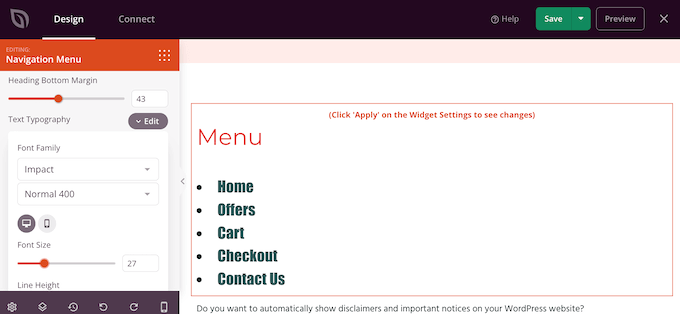
After that, you can change the spacing, add custom CSS, and even add CSS animations using the settings in the ‘Advanced’ tab.
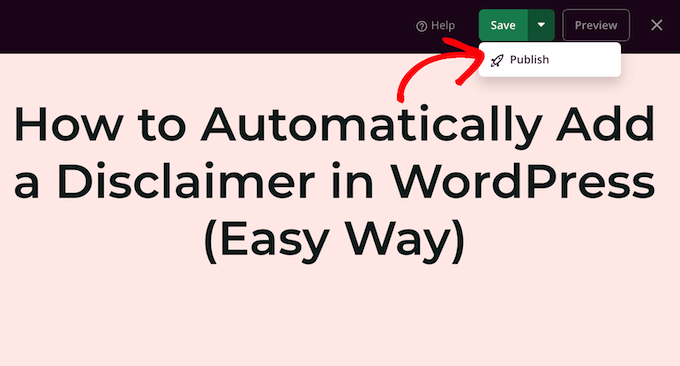
When you are happy with how the menu looks, go ahead and click on the ‘Save’ button in the SeedProd toolbar. Then, select ‘Publish.’
Now, if you visit your website, then you will see the new page or post layout in action.
We hope this article helped you learn how to add a WordPress navigation menu in posts and pages. You may also want to check out our guide on how to create a landing page with WordPress or see our expert picks for the must have WordPress plugins.
If you liked this article, then please subscribe to our YouTube Channel for WordPress video tutorials. You can also find us on Twitter and Facebook.
The post How to Add WordPress Navigation Menu in Posts / Pages first appeared on WPBeginner.


