
Are you looking for a way to cloak affiliate links on your WordPress site?
Cloaking your affiliate links in WordPress provides clean and easy-to-read links, which can increase the likelihood of clicks and conversions. It can also increase user trust.
In this article, we will show you how to easily cloak affiliate links in WordPress.

What Is Affiliate Link Cloaking, and Why Do You Need It?
Link cloaking is a technique used to make long affiliate links into shorter and branded links on your WordPress website.
Often, affiliate links are lengthy, hard to remember, and show your affiliate username or ID like this:
http://www.affiliatesite.com/products/?product_id=123&affiliate=123
With link cloaking, you can shorten your ugly affiliate links into branded URLs like this:
http://www.yoursite.com/refer/productname
This can make your links look more trustworthy and professional to your audience, encouraging more clicks.
If you use affiliate links to make money from your WordPress blog, then you should cloak links, as doing this can increase your click-through rate and conversions.
Many link-cloaking plugins will also help you measure the performance of your affiliate marketing strategies and optimize them for better results.
Cloaking affiliate links also adds an additional layer of security by masking the actual affiliate URL. This can protect your affiliate accounts and earnings from fraud or theft.
This can also help prevent your links from being blocked by social media sites or search engines, increasing the search visibility of your affiliate content.
Having said that, let’s see how you can easily cloak affiliate links on your WordPress website, step by step.
How to Cloak Affiliate Links in WordPress
There are many link-cloaking plugins that you can use in WordPress, including Pretty Links and Thirsty Affiliates. Both plugins are great, but we will use Pretty Links for this tutorial since it’s a little more beginner-friendly for this use case.
You can easily cloak affiliate links in WordPress using Pretty Links. It is one of the best affiliate marketing tools for WordPress that lets you add, manage, and cloak affiliate links.
Install and Activate Pretty Links
First, you need to install and activate the Pretty Links plugin. For detailed instructions, please see our beginner’s guide on how to install a WordPress plugin.
Note: Pretty Links also has a free version that can cloak links. However, we will be using the Pro version in the tutorial to unlock more features.
Create Your Cloaked Link
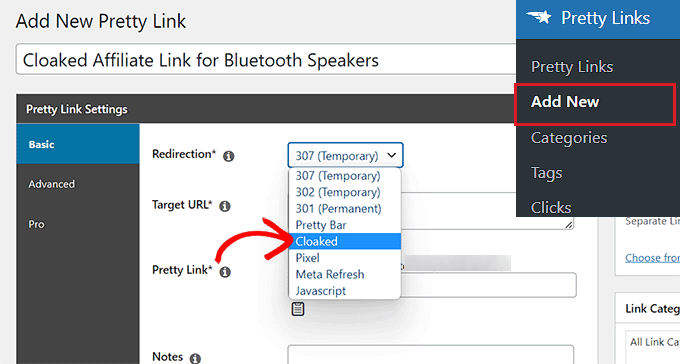
Upon activation, you need to head over to the Pretty Links » Add New page from the WordPress admin sidebar to create an affiliate link.
Once you are there, you can start by typing a name for your link into the ‘Add Title’ option.
After that, you must select a link type from the ‘Redirection’ dropdown menu to create short and branded links for your affiliate program.
If you choose ‘Cloaked’, then the target URL will be hidden in your user’s browser, and they will only see your cloaked link. Some affiliate programs don’t allow this, so you will need to check first.
Another option is ‘307 Temporary’. It will replace the original URL with your new affiliate link and tell search engines that this link may change in the future.
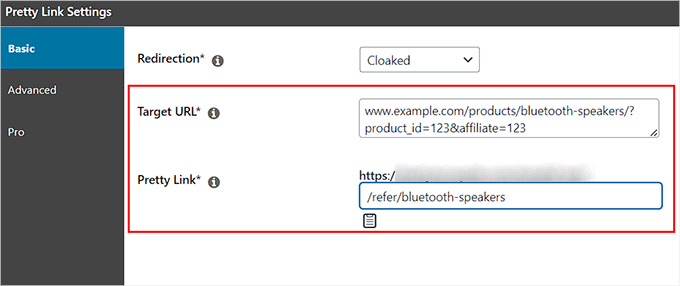
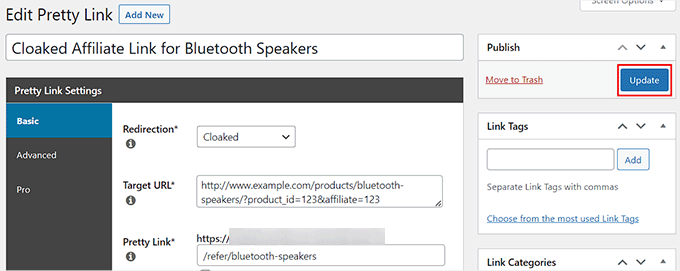
Next, simply copy and paste your affiliate link into the ‘Target URL’ field.
Once you have done that, type the slug you want to use for your cloaked link into the ‘Pretty Link’ field.
For example, if you want your cloaked link to be like the example below, then you will need to type the ‘/refer/bluetooth-speakers’ text into the ‘Pretty Link’ field. You will then get a link like this:
www.example.com/refer/bluetooth-speakers
Choose Attributes for Your Cloaked Link
After that, simply switch to the ‘Advanced’ tab from the sidebar on the left.
From here, you can add different attributes to your affiliate link by checking the box next to these options.
For instance, if you want to add a nofollow attribute to the external link, then simply check the box next to ‘No Follow’. This means that search engines won’t pass on any link authority to the site you are linking to.
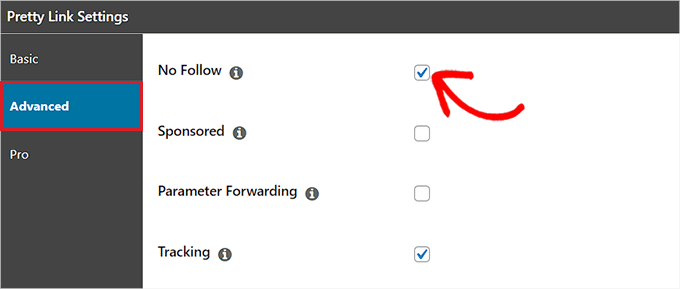
You can also check the ‘Sponsored’ box to tell search engines that your link is a paid advertisement.
Plus, checking the ‘Parameter Forwarding’ box can be handy if you want to pass a coupon code or customer ID to your cloaked link.
It’s also a good idea to check the box next to ‘Tracking’ so that you can view your affiliate link performance in the Pretty Links reports.
Configure Pro Settings for Your Cloaked Link
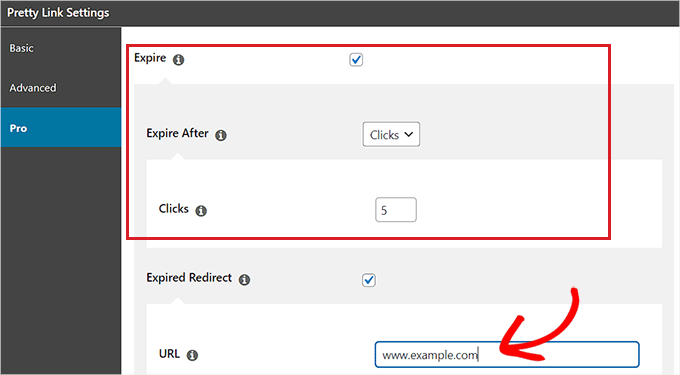
Once you have done that, you need to switch to the ‘Pro’ tab from the sidebar on the left. Now, you can set an expiry date for the affiliate link by checking the ‘Expire’ option.
This will expand a tab on your screen where you can set an expiry date for the link after a specific date or number of link clicks.
For example, if you choose the ‘Clicks’ option from the ‘Expire After’ dropdown menu and type 5 into the ‘Clicks’ field, then your affiliate link will immediately expire once 5 visitors have clicked on the link.
You can also type a URL for the expired redirect into the ‘URL’ field. This will be the link that users will be redirected to if they click on the expired affiliate link.
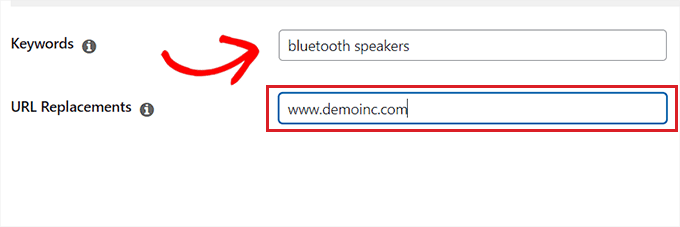
After that, you can type the keywords that you would like to be replaced with your affiliate link into the ‘Keywords’ field.
This means that whenever the keyword you choose is written in your WordPress post or page, the plugin will automatically add its affiliate link to the keyword.
You can also easily replace another URL with your affiliate link by typing it into the ‘URL Replacements’ field.
Now, whenever Pretty Links finds this URL on your website, it will replace it with the cloaked link.
Once you are done, simply click the ‘Update’ button in the Publish section to store your changes.
After that, you need to click the ‘Publish’ button in the same section to publish your cloaked affiliate link.
Add Your Cloaked Link to a WordPress Post or Page
Now, you can visit a WordPress post or page where you want to add the cloaked affiliate link.
Once you are there, simply select the text that you want to link on top of and then click the ‘Pretty Links’ icon in the block toolbar at the top.
This will open up a link prompt on your screen, where you can search for the cloaked affiliate link using its title or the link itself.
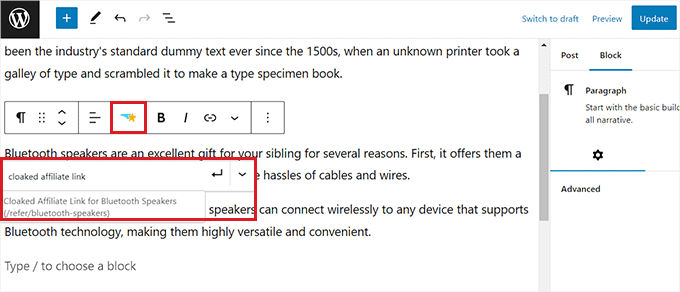
Upon adding the link, just click the ‘Publish’ or ‘Update’ button at the top to store your settings.
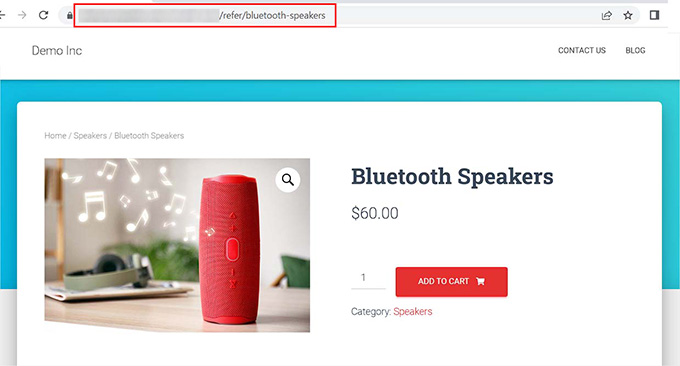
Now, you can visit your website and click on the affiliate link. You will now see the cloaked URL redirecting you to the affiliate product page.
We hope this article helped you learn how to easily cloak affiliate links in WordPress. You may also want to see our tutorial on how to create an affiliate product box in WordPress and our expert picks for the best WordPress themes for affiliate marketing.
If you liked this article, then please subscribe to our YouTube Channel for WordPress video tutorials. You can also find us on Twitter and Facebook.
The post How to Cloak Affiliate Links on Your WordPress Site first appeared on WPBeginner.


