There are some easy ways you can enhance a website so that it looks more professional and stands out. One of these is by adding a slider.
Adding a slider may seem challenging but, in fact, you can create them within minutes and without any coding as long as you use a suitable plugin such as Toolset.
Below I’ll show you how to create your slider. First, I’ll explain the two types of sliders you can build.
What are the different types of sliders
There are two types of sliders which you will want to create on your custom websites: static sliders and sliders with dynamic content.
Static sliders
A static slider is the basic version of a slider. A static slider will contain whatever images you choose to add to it and will not change regardless of where you add it.
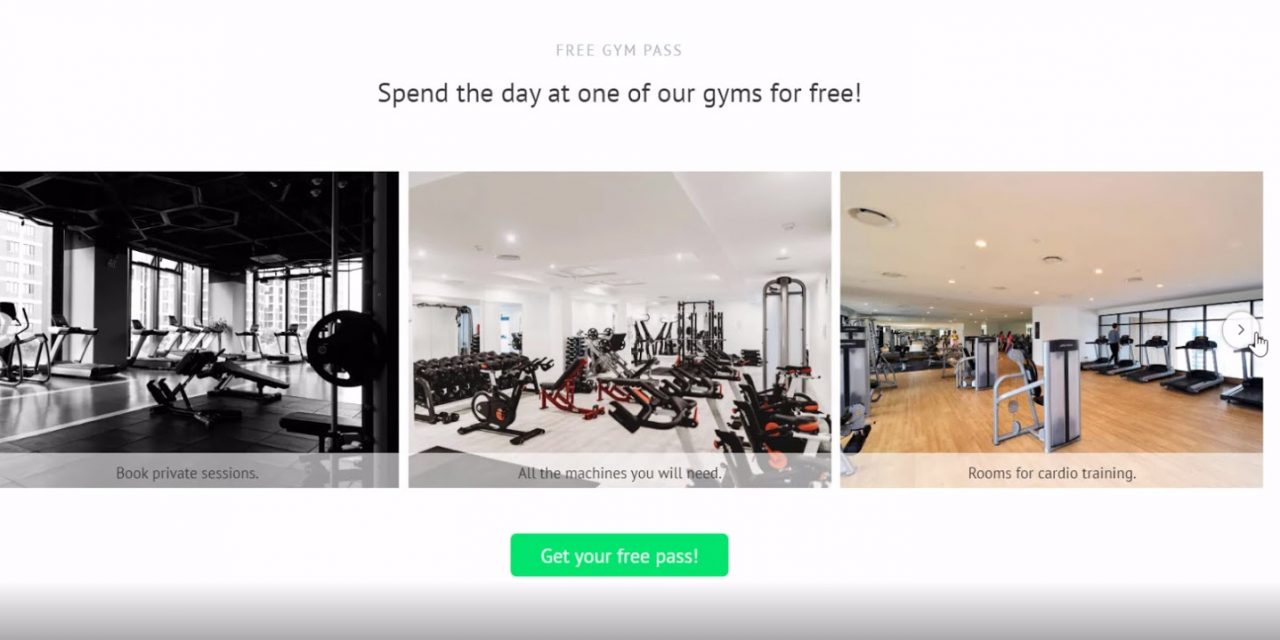
For example, on a homepage for a website advertising gyms, I might include a slider with images of some of my gyms. To do this I would choose one image for each of the gyms I want to display.

You can add static sliders to any pages or WordPress posts that you like. But remember that each time you want to add a static slider with different images to another part of your website you will have to recreate it and add the new images.
This is tricky for certain scenarios in which you might want to display the same slider but with different images. For example, a slider on each of your gym posts will obviously contain different photos as each gym is different.
Luckily there is another type of slider we can create.
Custom sliders with dynamic content
While a static slider might look pretty on your website it is not quite the advanced content which will lift your site and make it look professional.
This is where the custom slider with dynamic content comes in. On your gyms website it is likely that you will have a gyms custom post type which will contain posts for each gym you add.

On each of those gyms posts you might want to show the user what the gym looks like inside using a slider. With WordPress, you can create a template for all of your gym posts. Within this template you can add a slider.
The obvious problem if your slider is static is that the slider will display the exact same images on every gyms post. Of course, you will want the slider to be different for each post. Below, as an example, you can see two of my gyms posts. Even though the content is different, notice how the static slider displays the exact same images.


This is why you need a slider with dynamic content. With a dynamic slider you can create the slider once in the template and the slider will display the correct images for each post.
Below you can see the same two gyms posts as before but this time the slider has dynamic content.


As you can see, the slider now displays the correct images for each post because the content is dynamic.
The best slider plugin to create both static and dynamic sliders
There are a number of great slider plugins out there which you can use to create static sliders. However, if you want to create custom sliders with dynamic content then the best option is Toolset.

With Toolset, you can create both static sliders and custom sliders with dynamic content in minutes and without any coding.
To build sliders you can use Toolset Blocks alongside the WordPress editor known as Gutenberg. With Gutenberg, you can determine what every part of your content is by adding blocks. For example, if you want to add a heading you simply add the Heading block and insert the content. Toolset provides its own set of blocks which I will go into below as I show you how you can create both types of sliders.
How to create a static slider
I will use my gyms website to create a static slider for my homepage. The slider will display images from all of my gyms so that visitors will immediately get an idea of how they look.
On the back-end, you can see where I want to add the slider.

To add a slider you first need to insert Toolset’s own Image Slider block. Toolset offers a number of blocks which you cannot find in Gutenberg’s set of core blocks. One of those is the Image Slider block.

All you now need to do is select and insert the images you want to include in your image slider. Toolset makes it easy for you to switch the order of your images around by simply dragging and dropping.

Once you click to insert the images your slider is basically ready. It’s as simple as that. However, with Toolset there are additional ways that you can style your image slider.
First, on the right-hand sidebar there are four options under Display Settings which you can edit to change your slider:

- Columns Number – To change the number of images you see at any one time on the slider.
- Crop Images – Ensure that all of the images are either the same size or their original sizes.
- Caption – Choose whether or not to display the caption for each image.
- Type of slider – Choose how the slider looks from the three options. For example, you can include a lightbox which you can see when you click on an image.

In addition, you can also style your captions under Caption Style using Toolset without coding. You can edit the font and background color.

Furthermore, under Style Settings you can style the slider itself by changing the background color, adding a margin/padding and even a border.

Something else worth mentioning is that Toolset’s designs are responsive so you can change them for different screen sizes. For example, below I have removed the captions on my slider for anyone viewing it on a mobile device. All I need to do is select the right screen option at the top and make my changes.

When you’ve made your edits you can simply save the page and check it out on the front-end.

How to create a custom slider with dynamic content
A static slider is great if you are looking for a one-off feature to display some images. But what if you want to add a slider to your template so that you see the correct images when you click on each post? For this, you’ll need a dynamic slider.
Below I will show you how I created a slider for my gyms. Each gym displays the same slider but with the correct images. You can create your gym post type using Toolset.

The first thing to consider when creating a dynamic slider is the source for your images. More often than not, you will create a custom field for your images which you will assign as the source. You can create repeating custom fields using Toolset in which you can add as many pieces of information (such as images) as you like.
Below I created an image custom field for my gyms. Notice how to make the field repeating, I just need to check a box.

Once you’ve created the field, all you need to do is head to each of your gyms posts and add the images. I can simply click the button and select the images.

Once you’ve added your images all you need to do is add the slider to your template. If you are unsure, you can find out more about how to create templates.
Just like with a static slider we add Toolset’s Image Slider block wherever we like on our template. The key difference, however, is that instead of uploading images we will select a dynamic source to draw the images from our custom field.

As you can see below, you can select the field group and then the actual custom field itself.

Your slider will now appear with the correct images for each gym post.

You can check if the images are different simply by using the dropdown menu at the top and selecting your other gym posts. The content will then change.

Notice how you can change the source for your images on the right hand sidebar. The same styling options as for static sliders are also available.

What if you need to change the order of the images? You can do so by heading to each of your gym posts and simply switching them around.

Once you’re happy with the order of the images you can save the template and check the slider out on the front-end.

Start building your image slider today!
Now that you have seen how simple and quick it is to build your own image sliders you can try it out for yourself.
You can get in-depth tutorials on how to build sliders of static images and dynamic sliders as part of Toolset’s free course on how to build directory websites.
You can then download Toolset and start adding sliders to your custom website.


