
Would you like to create one-time personalized coupon codes for your WooCommerce store?
Coupon codes are great for promoting your online store, reducing cart abandonment, and increasing overall sales. Creating one-time coupons reduces the risk of abuse.
In this article, we’ll show you how to create one-time personalized coupon codes in WooCommerce.

Why Create One-Time Personalized Coupon Codes in WooCommerce?
Coupons are a great way to promote your online store and make more sales. They reduce shopping cart abandonment and are one of the best ways to thank a customer who joins your email list or leaves a product review.
However, some customers may use multi-use coupons again and again without ever paying full price. That’s why it’s a good idea to place limits on who can use a coupon and how many times they can use it.
With that being said, let’s take a look at how to create one-time personalized coupon codes for your WooCommerce store.
Creating a One-Time Personalized Coupon Codes in WooCommerce
First, you need to install and activate the Advanced Coupons for WooCommerce plugin. For more details, see our step by step guide on how to install a WordPress plugin.
Advanced Coupons is the best WooCommerce coupon code plugin on the market. In this tutorial, we will be using the free version, but Advanced Coupons Premium adds additional features such as the ability to reset a coupon after a set amount of time.
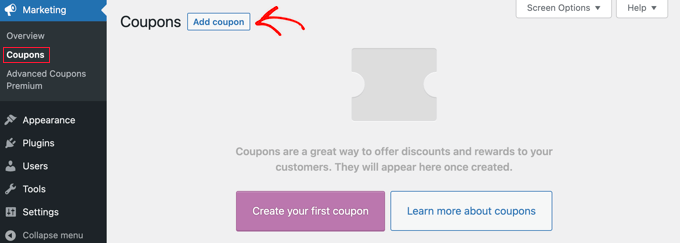
Upon activation, you need to visit the Marketing » Coupons page in your WordPress dashboard. Next, you need to click the ‘Add Coupon’ button to create a new coupon.
Note: If you are using an older version of WooCommerce, then you may need to navigate to WooCommerce » Coupons instead.
You will be asked to type the coupon code you want to use at the top of the screen. You can also generate a code automatically by clicking the ‘Generate coupon code’ button.
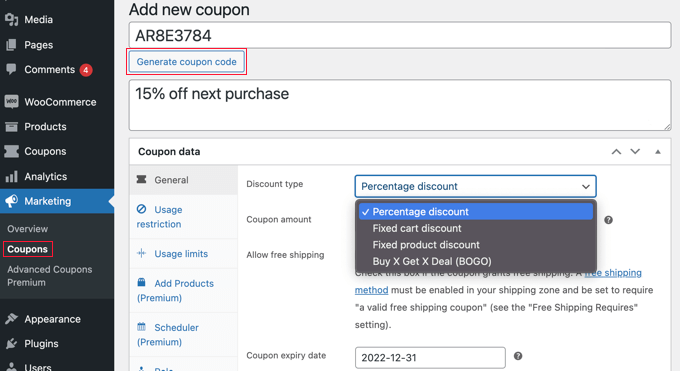
It’s also a good idea to type a clear description so you will remember the purpose of this coupon in the future.
After that, you need to decide what type of coupon you want to create. You need to choose the discount type and amount that you are offering. There are also options for free shipping and a coupon expiry date.
Once you are happy with your choices, you can place limits on who can use the coupon and how many times it can be used. We’ll cover three different methods:
- Method 1: Creating a Single Use or Limited Use Coupon
- Method 2: Creating a Personalized Coupon
- Method 3: Creating a Role-Restricted Coupon
- Publishing and Promoting the One-time Personalized Coupon
Method 1: Creating a Single Use or Limited Use Coupon
This method is the best way to limit the coupon to a single use per user, or a limited number of uses in total.
While still on the ‘Add new coupon’ page, you need to look at the ‘Coupon data’ section and then click on the ‘Usage limits’ tab.
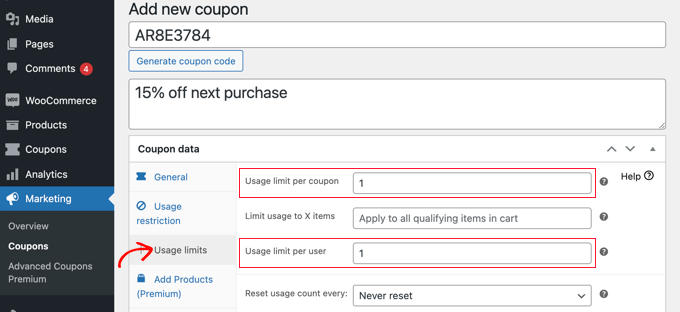
You should now enter the number 1 in the ‘Usage limit per user’ field. This will make sure that each customer who receives the coupon code can only use it once.
Alternatively, you might prefer to enter a number in the ‘Usage limit per coupon’ field instead. This will place a limit on the number of times the code can be used in total by all users.
You can even enter a number in both fields. Let’s say you type 100 in the ‘Usage limit per coupon’ field and 1 in the ‘Usage limit per user field’. Then the first 100 customers will be able to use the code a single time.
Premium users can also reset the code so that it works again after a period of time, say monthly or yearly.
Method 2: Creating a Personalized Coupon
This method lets you personalize a coupon, so it’s only available to certain customers.
You should still be on the ‘Add new coupon’ page. In the ‘Coupon data’ section, you need to click on the ‘Usage restriction’ tab. Now you need to scroll down to the ‘Allowed emails’ field.
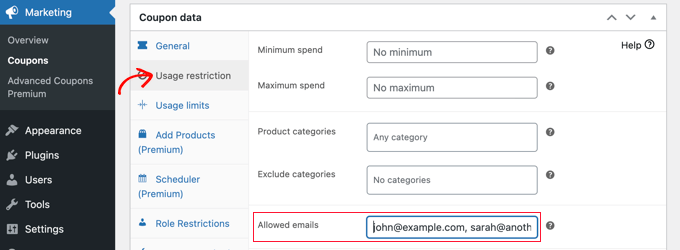
Here you can enter a single email address, or multiple email addresses separated by commas. Only those customers will be able to use the coupon.
You can match multiple emails addresses by using an asterisk as a wildcard. For example, if you enter *@gmail.com, then anyone with a Gmail address will be able to use the coupon.
However, these users will be able to use the coupon more than once. If you need to create a coupon that is both one-time and personalized, then you can combine Methods 1 and 2.
You first need to enter the number 1 in the ‘Usage limit per user’ field we covered in Method 1. After that, you enter the email addresses of allowed users as covered in Method 2.
Now only the users that you listed will have a single use of the coupon.
Method 3: Creating a Role-Restricted Coupon
This method restricts the use of the coupon to customers with a certain WordPress user role. In some cases, this can be simpler than typing a long list of email addresses as in Method 2.
Tip: This method can also be combined with Method 1 to make sure that each customer with that user role can use the coupon only once.
While on the ‘Add new coupon’ page, look at the ‘Coupon data’ section and then click on the ‘Role Restrictions’ tab. You can now check the box to enable role restrictions, and then select one or more user roles. A list of roles will pop up when you click inside the ‘User Roles’ box.
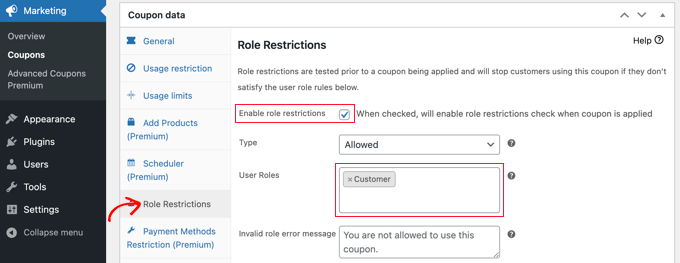
We recommend that you customize the ‘Invalid role error message’ to make it clear why users with other roles can’t access the promotion.
There are a few ways you might like to use this method. For example, you could simply set the user role to ‘Customer’ so that your users need to log in before they can use the code. This will let you keep better track of your customers.
Another idea is to assign your most loyal customers a special WordPress role so that you can offer them exclusive coupon codes.
You can also use this method to create members-only coupons for your membership site.
Publishing and Promoting the One-Time Personalized Coupon
Whichever method you use, once you have finished setting up the coupon, you will need to click the ‘Publish’ button at the top right of the page.

Your coupon is now ready for use and you can start to let your customers know about it. How you do that depends on the type of coupon you have created and who you want to use it.
For example, you might offer the coupon to new members in your welcome email, or reward customers who leave a product review. You could create a coupon popup on your online store, or include a special offer in your email newsletter.
We hope this tutorial helped you learn how to create one-time personalized coupon codes in WooCommerce. You may also want to learn how to run a giveaway or competition with RafflePress, or check out our list of the best WooCommerce plugins for your store.
If you liked this article, then please subscribe to our YouTube Channel for WordPress video tutorials. You can also find us on Twitter and Facebook.
The post How to Create One-Time Personalized Coupon Codes in WooCommerce first appeared on WPBeginner.


