The checkout page is one of the essential parts of your eCommerce website. After all, it’s the last stop before a customer completes a purchase. Furthermore, many shoppers abandon their carts here. Therefore, you may be wondering how to customize your checkout page to maximize conversions.
Fortunately, it’s easy to customize your WooCommerce checkout page and make it more user-friendly for shoppers. Using the Checkout Field Editor plugin, you can add, edit, and rearrange checkout fields as needed.
This post will discuss why the checkout page is so important and what to consider when customizing a WooCommerce checkout page. We’ll then provide a step-by-step guide to help you get started. Let’s jump in!
Why Your Checkout Page Is So Important for Sales
The checkout page is the last step in the sales process, and it must be user-friendly to keep shoppers engaged until the end. After all, up to 17% of customers will abandon their carts due to complicated checkout processes.
There are several ways to improve the user experience of your checkout page and reduce cart abandonment. For instance, consider making the page visually pleasing, the form fields easy to fill out, and the payment process streamlined and straightforward.
You might also focus on eliminating ‘friction’ that prevents users from checking out quickly. This friction might look like having a multi-page checkout process and not allowing visitors to check out as guests.
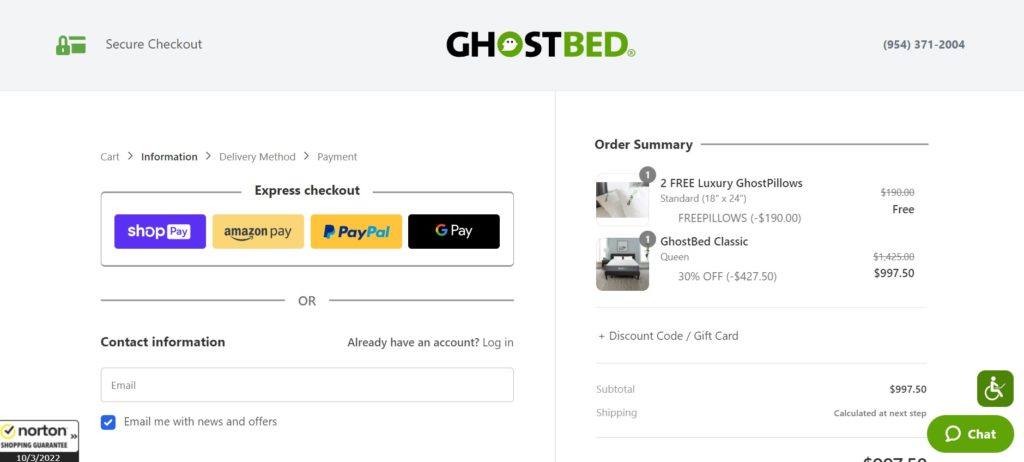
This checkout page shows design best practices, with simple form fields, multiple payment methods (including express checkout), and prominent branding:
Your checkout page doesn’t need to look exactly like other retailers. However, there are some tips you can use to encourage customers to complete their purchases.
Things to Consider When Designing Your WooCommerce Checkout Page
We’ve already established how vital your checkout page design is. Now, let’s discuss what to consider when creating your own.
Ideally, your checkout page should look good and reflect your brand. If it seems like an afterthought, customers may question your credibility as a retailer.
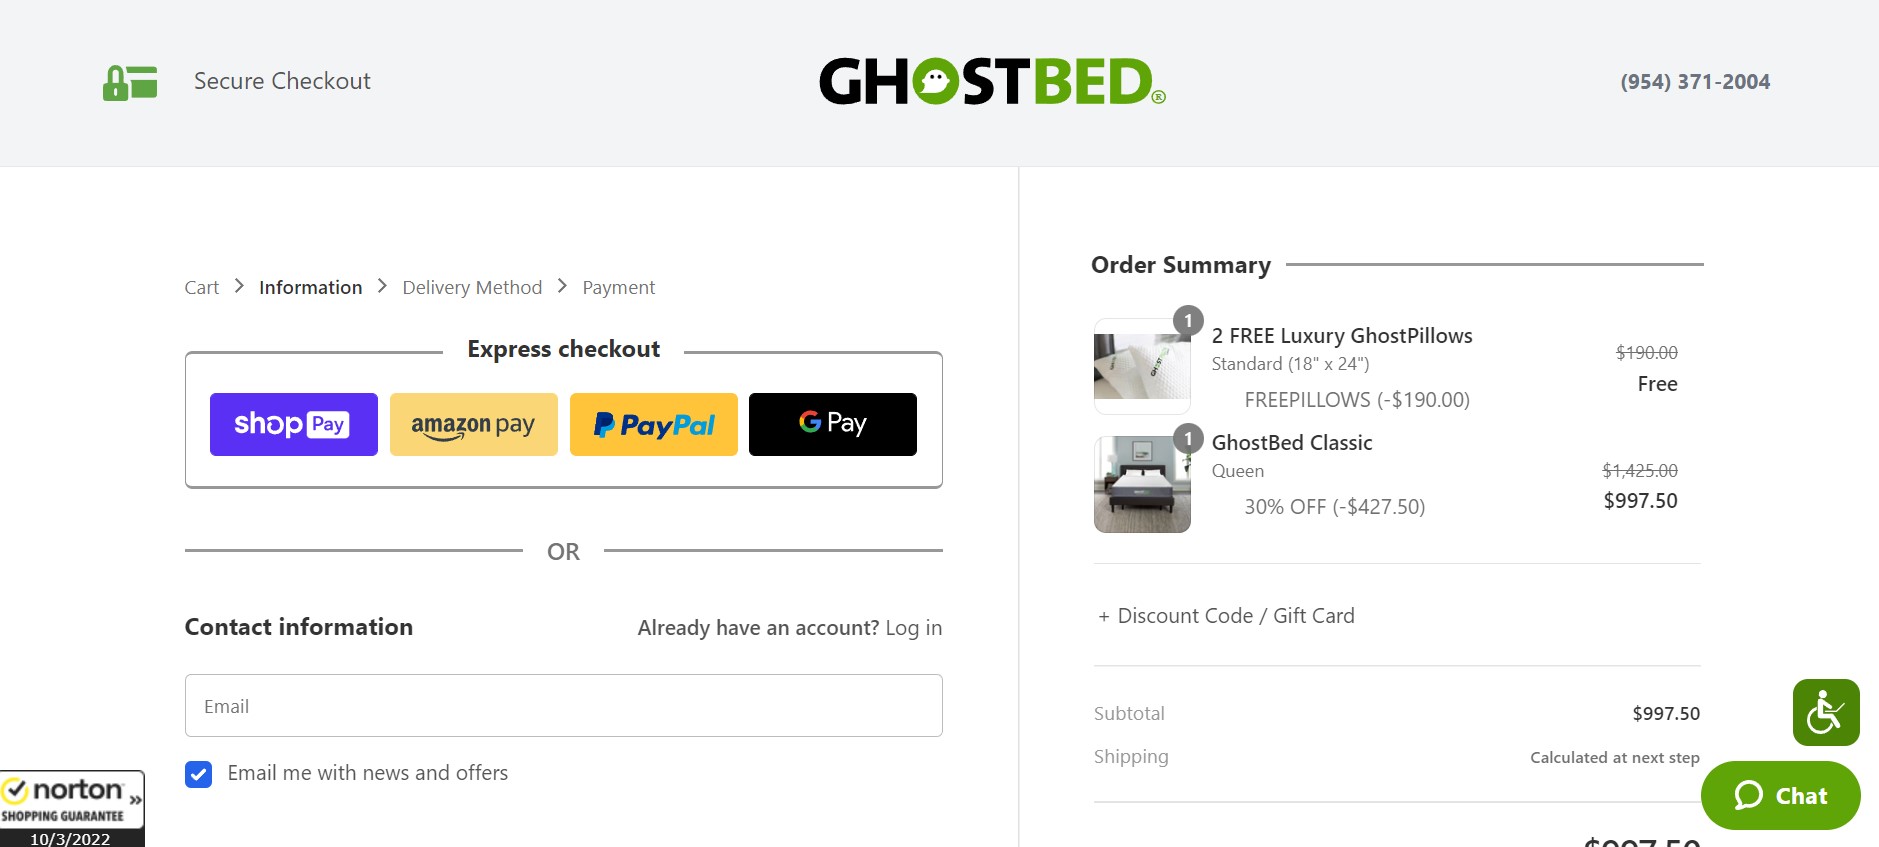
You can make your checkout page look cohesive by using your brand colors, fonts, and logo. Additionally, consider utilizing a minimalistic design with plenty of white space. These features can minimize distractions for the customer so that they can focus on completing their purchase:
User-friendliness is also an essential consideration. For example, the input fields should be easy to read and fill out. It’s also worth limiting the number of fields so that customers don’t have to spend much time filling out information. You might also consider using columns to break up the form fields.
Moreover, your Call to Action (CTA) should be clear, prominent, and in your brand colors to stand out from the rest of the page. This button could say something like “Complete Purchase” or “Place Order”.
Customers should also feel confident that their personal and financial information is secure. You can do this by ensuring that your SSL certificate is up to date and that your payment processor is PCI compliant. Then you can add security logos or symbols to your checkout page to show your store’s commitment to security.
Finally, you should consider offering multiple payment options to your customers. These might include popular choices like credit cards, PayPal, and online wallets. For example, WooCommerce Payments provides several different payment gateway options to choose from.
How to Customize a WooCommerce Checkout Page (In 3 Steps)
Now, let’s jump into how you can customize a WooCommerce checkout page. We’ll be working with the Checkout Field Editor plugin for this tutorial.
Checkout Field Editor enables you to easily add, edit and remove fields from the checkout form. It also lets you re-order the fields and add custom sections. Overall, it’s a handy tool that’s useful for many different types of eCommerce stores.
Before we begin, you’ll need to install and activate the Checkout Field Editor plugin. For more details, you can read our guide on how to install WordPress plugins.
Step 1: Customize Your Basic Settings
After you’ve installed and activated Checkout Field Editor, head to WooCommerce > Checkout Form. This will take you to the main settings page for the plugin:

You should see two settings tabs: Checkout Fields and Advanced Settings. We’ll just be dealing with the first tab for the moment.
You should also see three sub-options for Billing Fields, Shipping Fields, and Additional Fields. You can move these fields around by dragging and dropping them using the icon on the left. Furthermore, by checking the checkboxes, you can mass enable or disable via the buttons above.
All the fields in the section are listed, and you can easily see what details have been inputted. By clicking Edit, you can change any of these:

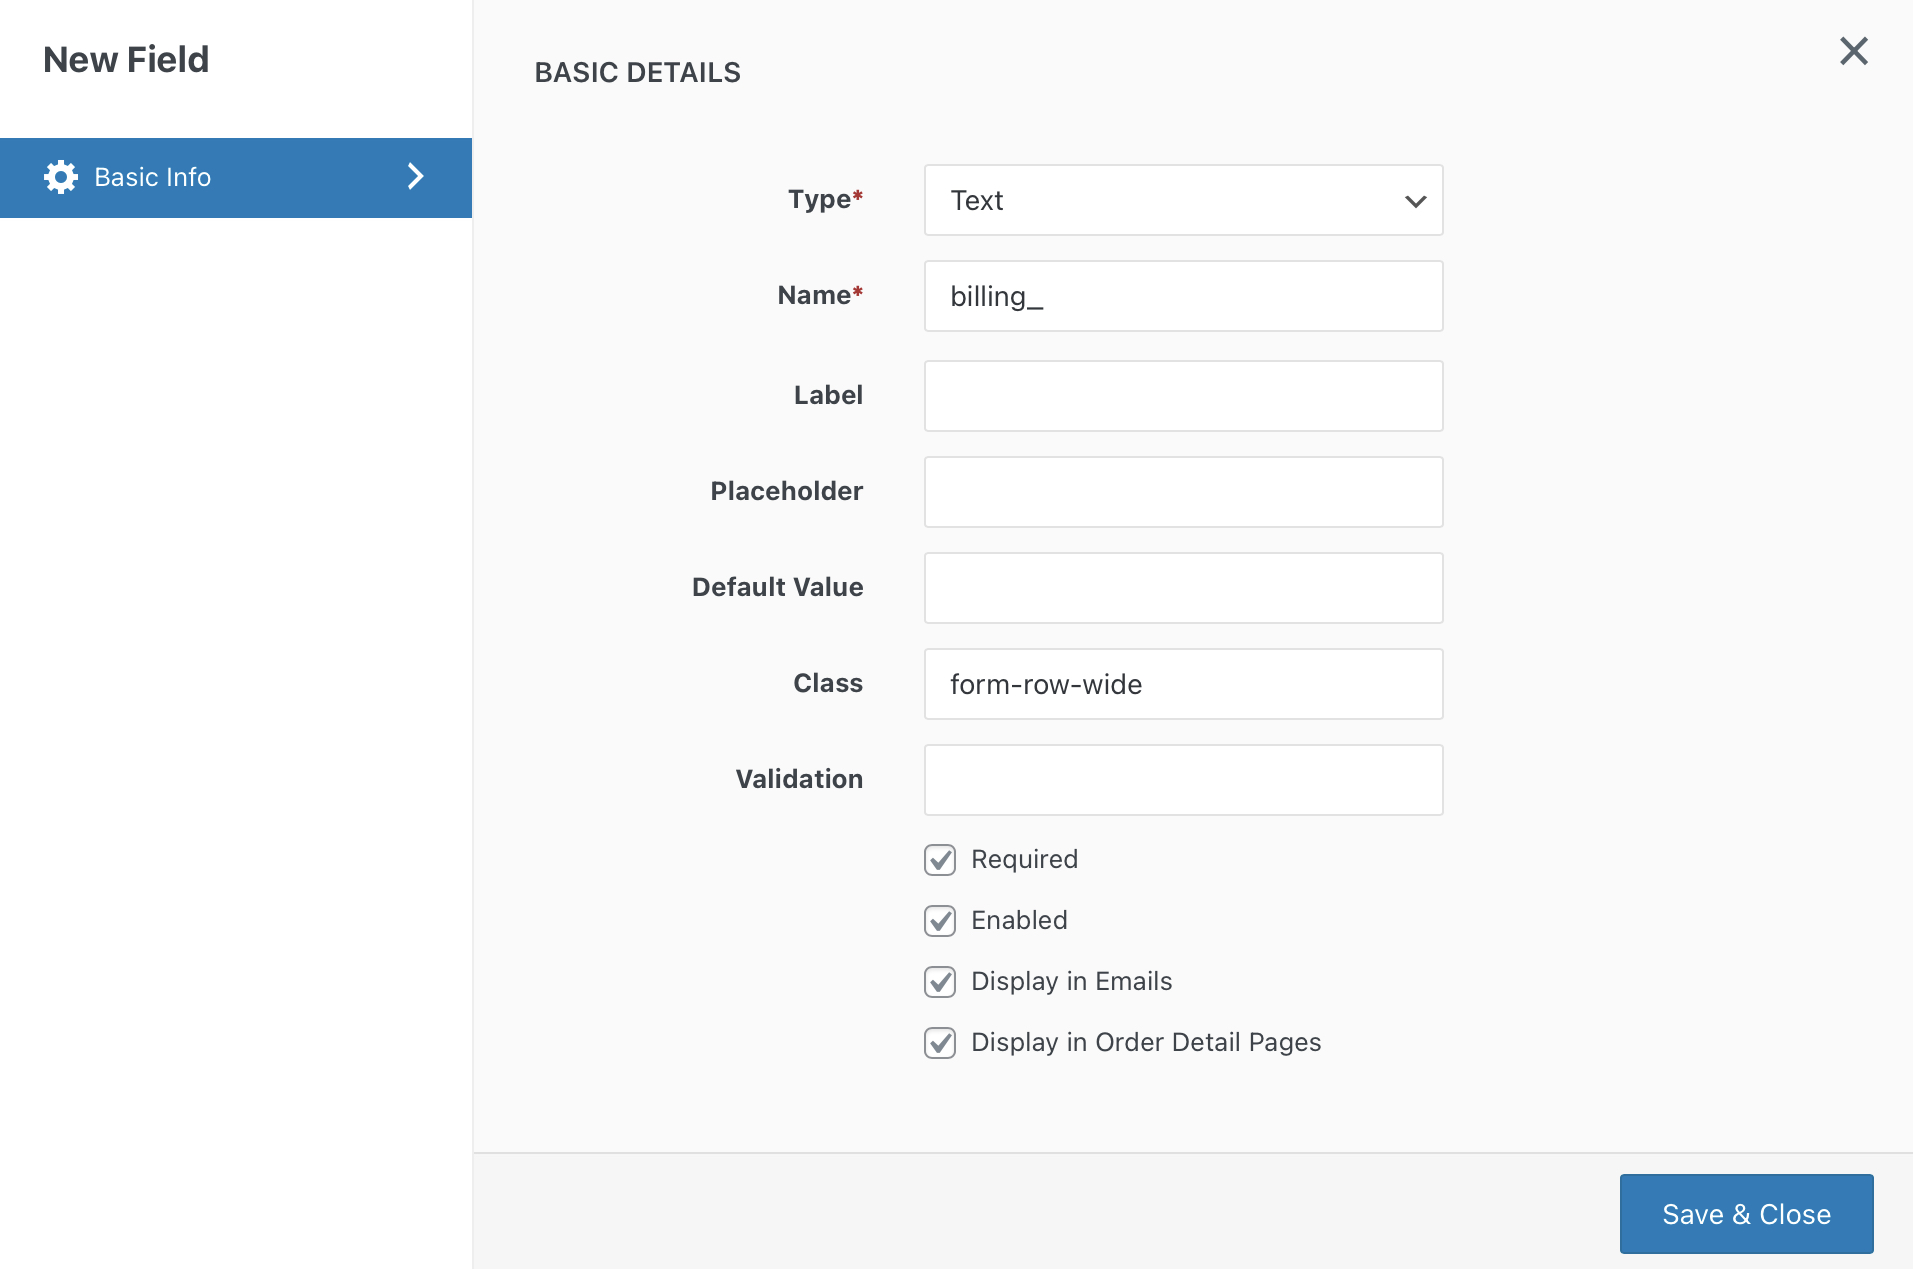
Here you can change the type of input field, the label, the placeholder text, the default value, and the class. You can also make the field required so that customers can’t proceed without filling in the information.
There are various improvements you can implement here to streamline your checkout page. For example, you might remove the phone number field since a customer email address is usually sufficient.
Moreover, if your online store specializes in B2B, you might make it compulsory for customers to enter a business name. Conversely, you can delete the address field if you’re selling digital downloads such as eBooks or audio files.
Step 2: Add New Fields to the Checkout Form
Returning to the main Checkout Fields screens, you can add a new field by clicking on +Add Field. Here you can select the type of input field, the label, the placeholder text, the default value, the CSS class, and whether the field is required:
After clicking on Save & Close, the new field should be added to the list, and you can drag it into place on your checkout page.
You have several options for adding new fields to your checkout form. For example, you might include a phone number if you’ll need a quick way to contact the customer when their delivery is due. However, make sure not to add too many extra fields, or you could annoy customers who just want to check out quickly.
Step 3: Explore the Advanced Settings
Finally, the Advanced Settings tab contains various options for customizing your checkout page even further. They let you enable:
- Label override for address fields
- Placeholder override for address fields
- Class override for address fields
- Priority override for address fields
- Required validation override for address fields
This default data is automatically pulled from the database. However, the advanced settings enable you to override the default data with your custom inputs:
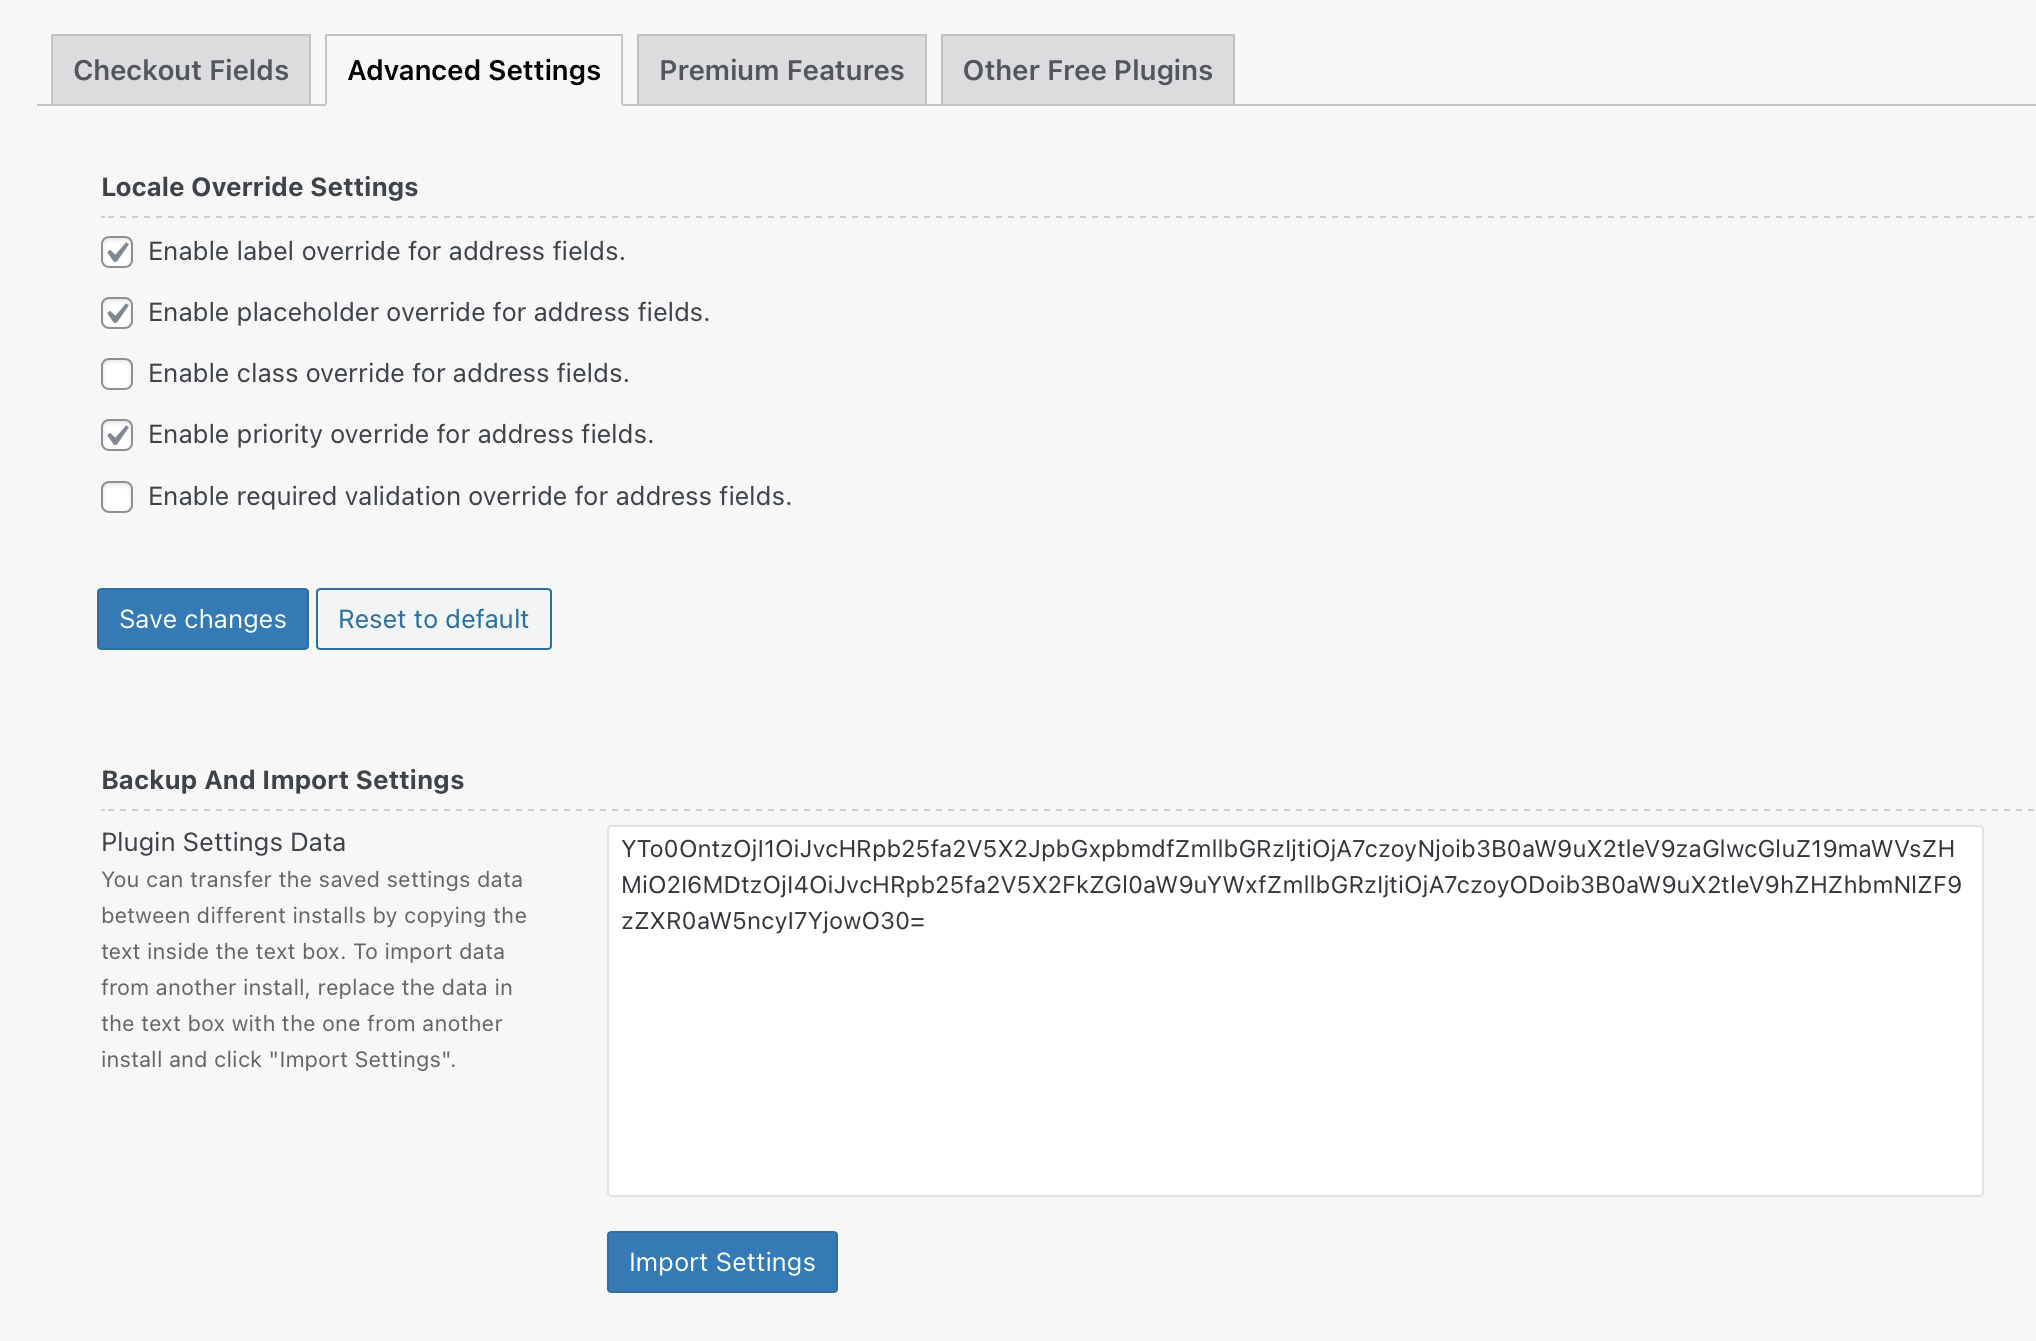
Typically, WooCommerce will change the format of your customer’s address fields depending on their country. However, overriding these settings means all your customers will see the same address format. However, you probably don’t need to play around with these settings unless there is a known issue with deliveries to shoppers in particular areas.
Make sure to Save Changes after all your edits, and that’s it! You’ve now successfully customized your WooCommerce checkout page. We recommend previewing it on the front end to ensure it looks exactly like you want it.
We also recommend keeping an eye on your online store’s analytics to ensure that the changes you’ve made positively affect your conversion rate. If not, you can always revert to the original checkout page or try a different approach.
Conclusion
A well-designed checkout page can be the difference between a customer completing a purchase and abandoning their shopping cart. By following the tips in this article and using the Checkout Field Editor plugin, you can customize your WooCommerce checkout page and create a better user experience.
In this article, we showed you how to customize a WooCommerce checkout page using the Checkout Field Editor plugin:
- Customize your basic checkout page options by clicking on the Checkout Fields tab.
- Add fields to the checkout form by clicking on the +Add Field button.
- Explore the Advanced Settings tab to customize your checkout page even further.
Do you have any questions about customizing your WooCommerce checkout page? Let us know in the comments section below!


