Nobody likes to run into issues with their website. However, sooner or later, you might encounter a problem that requires some troubleshooting skills. One handy trick is to enable WordPress debug mode, which might sound confusing to users who don’t have any development experience.
Fortunately, enabling debug mode in WordPress is relatively straightforward. It helps you identify errors and resolve them quickly, thanks to a detailed log that shows you what went wrong. If you prefer not to touch a line of code, there’s a plugin that can help.
This article will explain what debug mode is and how to enable it in WordPress. Let’s dive right in!
An Introduction to WordPress Debug Mode
Changing your website in any way might disrupt the core PHP of your WordPress site. For instance, when you install a new plugin or theme, or add custom code, it may conflict with other tools. These issues are not always immediately apparent, which is where debug mode comes in handy.
Enabling debug mode in WordPress will display a log of PHP errors and potential warnings, even if they’re not currently causing problems. Therefore, if you’re a web developer who wants to deliver high-quality products, working with this feature is essential for clean code.
Debug mode can also be helpful to regular users who are not web professionals. Suppose you’ve just installed a few new tools, and now your website is no longer working correctly. You could use our instructions below to find out what’s causing the issue, then contact the appropriate support channel for further assistance.
Debug mode might not be necessary in all situations. Still, enabling it can speed up your troubleshooting process and help you identify what’s causing the problem faster than by disabling all your extensions one by one. Therefore, it’s a useful skill for any WordPress user to learn.
How to Enable WordPress Debug Mode (2 Methods)
Now that we’ve explained what debug mode is and how it works, let’s look at two ways to enable it in WordPress. Whichever method you choose, note that you should always disable the feature again after you’re done troubleshooting.
WordPress debug mode will display PHP error codes on the front and back ends of your site, making them visible to visitors. Malicious hackers can use this information to their advantage. Plus, it may unnerve your site’s users and cause concerns that your site isn’t safe.
All that said, debug mode is a popular and helpful solution, and knowing how to use it properly is an excellent skill for any WordPress user to have. Without further ado, here’s how to get started.
Method 1: Enable WordPress Debug Mode With a Plugin
This method will suit users who’d rather not mess with their website’s PHP code themselves. Plugins such as WP Debugging will essentially do that for you in a matter of a few clicks.

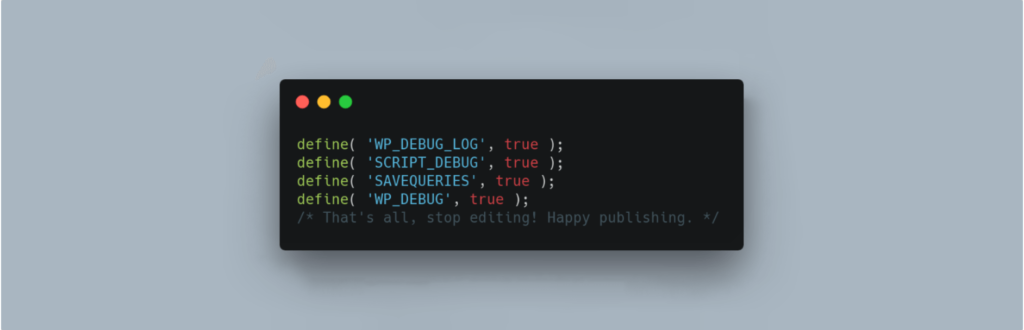
First, install and activate the plugin. As soon as you do so, it will start working immediately. WP Debugging will set the following values to ‘true’ in your wp-config.php file without your intervention:
define( 'WP_DEBUG', true ); define( 'WP_DEBUG_LOG', true ); define( 'SCRIPT_DEBUG', true ); define( 'SAVEQUERIES', true );All errors, notices, and warnings will be saved in a log, which you can access via the Debug Quick Look link in your admin toolbar:

Note that you can apply additional settings, such as WP_DISABLE_FATAL_ERROR_HANDLER. You can find these options via Tools > WP Debugging > Debugging Constants. In this section, you can also disable WP_DEBUG and WP_DEBUG_DISPLAY.

When you’ve finished troubleshooting, make sure to deactivate the plugin to restore the pre-existing constants on your website.
Method 2: Enable WordPress Debug Mode Manually
If you’re confident in your coding knowledge, you can enable WordPress debug mode manually instead. To do so, you’ll need to edit your wp-config.php file. You can access it from your hosting control panel or via your preferred FTP client.
Identify the file, then change the debug mode values to ‘true’ by adding the following code above the line that says /* That’s all, stop editing! Happy blogging. */:
define( 'WP_DEBUG', true);Once you do so, WordPress will display all PHP errors and potential vulnerabilities on the back and front ends of your site. Note that it’s best not to do this with live websites. However, it can still be helpful if other troubleshooting methods fail.
If you want, you can save this information by enabling the debug log functionality with the following command:
define( 'WP_DEBUG_LOG', true);This way, WordPress will create a debug.log file, which you can access in your wp-content directory.
Once you’re ready, disable debug mode by changing its value to ‘false’ in your wp-config.php file, like so:
define( 'WP_DEBUG', false);Alternatively, you can just delete the debug mode code entirely. However, changing the status to false may help you enable this feature more quickly in the future.
Conclusion
Learning how to enable WordPress debug mode is an important skill. It can help you troubleshoot common WordPress errors and identify the cause of problems quickly. Fortunately, this process doesn’t have to be difficult, and you don’t have to mess with your site’s code if you don’t feel confident doing so.
In this article, we’ve shown you two ways to enable WordPress debug mode:
- Use a plugin such as WP debugging.
- Edit your wp-config.php file.
Do you have any questions about using debug mode in WordPress? Let us know in the comments section below!


