One of the great features of Local is its ability to import and export websites. This is, of course, useful to move a local site to a live server and vice versa or to move a local installation to another computer.
If you do this with any other server (local or live), it usually involves copying the entire WordPress file system, exporting and importing the database, and changing the MySQL credentials inside wp-config.php so WordPress can connect to the database. You also have to replace the mentions of the old site URL inside the database.
Working with Local makes this all a bit easier. In this post, we will look at how to import or export your website when working with it.
How to Export Your WordPress Website in Local
Let’s start off with how to export a website stored in Local. Learning this will also inform a lot of the process of importing it.
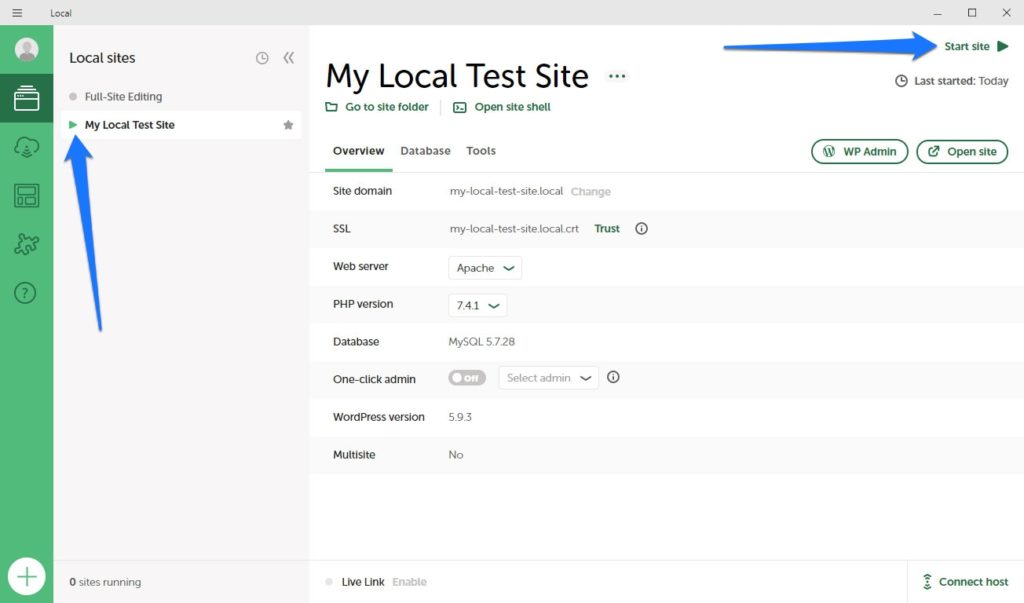
Export is really quick and easy. Simply open Local, find the site that you want to export and start it.

Once you have done that, right-click on the site name and choose Export.

Local will ask you for extensions of file types that you want to exclude from being exported. By default, that’s archives like zip or tar files but you might have reasons to include more.

When you are good with your choices, click Export site to continue. When you do, the program will ask you where it should place the exported files.

You can also already see that the site export is going to consist of a zip archive. Choose where you want to save it and then click Export again. Local will then get to work compressing the files.

Once done, it will show you a short message that, when you click it, will open the location of the export file on your computer.

That’s basically it. You just exported your local WordPress website in Local. I told you it was going to be easy! However, we are not finished yet.
What the Archive Contains
When you open the archive, you can see that it contains a whole bunch of files and folders.

At first glance, they don’t have a lot to do with WordPress. However, when Local exports a site, it does it in such a way that you can easily import it into another installation of the program. For that, it includes backups of add-on data and configuration files for server types and PHP versions that you might have tried out.
The most important parts, however, are located under app.

Here, we have two directories: public and sql. The first one contains all your WordPress files and directories, the second one a backup of the MySQL database belonging to this particular website.
You can use these to import the site into any server of your choosing in the usual way. However, as you will see, importing websites into Local doesn’t need all of this. It’s a lot easier.
How to Import Your WordPress Website Into Local
Now let’s look at the process the other way around.
1. Using an Archive Created by Local
If you have an export file from another Local installation, the process is really easy. Simply locate the zip archive and drag and drop into onto Local. This will automatically start the import process.

Similar to setting up a new website inside Local, the program will ask you to enter the site name. Under Advanced options, you can also determine a site domain as well as the path on the hard drive where you want to store it.

When you have done that and click Continue, you get to the part where you configure the environment.

It allows you to choose a PHP version, web server type, and MySQL version that you want to use for this website. Alternatively, simply choose Preferred to go with the default settings. A click on Import site starts the import process where Local extracts files and imports them.

Once done, the imported site should appear in your list of local websites.

2. Importing Any Other WordPress Website
Of course, you can also import websites that have not been created in Local. You might also be surprised how little you actually need for that. All that’s really required is your wp-content folder (which contains all your plugins, themes, and media) and the SQL file of your database.

Local will automatically add all the other stuff needed to create a WordPress website. In case you don’t know, wp-content is located directly inside the WordPress root directory. To get the database file, you can use a program like phpMyAdmin that many hosting providers offer their clients. In addition, it’s possible to use backup plugins like UpdraftPlus or BackWPup to download the files.
Of course, it also works if you have the entire WordPress file system but that usually takes longer to download. The important thing is that you combine what you have in a zip archive together with your exported database so you can input it into Local.
Running the Import
Importing the site into Local this way also works same as before. Drag and drop the archive into the program or use the menu and choose Import site and then browse to and pick the archive.

The process will then be the same: give the site a name, configure its local domain and site path, and choose the environment, then start the import and wait until Local is done.

You will notice that during the process, it says Adding WordPress.

As already mentioned, Local will automatically add the file system that is missing from the archive. Once done, when you go to the path where the imported site resides, you can also see that all WordPress files are there even though you did not provide them.

Using Direct Upload and Download
There is one more way that you can import and export sites in Local and that is Local Connect. It allows you to connect the program directly to a hosting provider and upload and download websites with the click of a button. Currently it is only available for WP Engine and Flywheel customers but more options are in the works.
If you want to take advantage of it, first go to the Connect menu on the left and then click Connect to a platform. Alternatively, use Connect host at the bottom of the screen in the site view.

Each will get you to a prompt to log in to your WP Engine or Flywheel account.

Click on Log in for what is appropriate and follow the prompts. Once logged in, you can establish a connection at the bottom of the screen when looking at any of your active sites.

Once you have done so, simply use the icons in the lower right corner to download from or upload to your live server.

Another add-on that allows you to move websites between servers is Cloud Backup. You can read all about how to use it here.
Start Importing and Exporting Websites in Local Now
Importing and exporting websites in Local is super useful to move WordPress from a local to a live server and vice versa. It can be a bit of a hassle, especially if you have to do it often.
Luckily, the developers of Local have done their best to make it as frictionless as possible. If you are a WP Engine or Flywheel customer, the easiest way is to directly connect to your hosting account and use one-click upload and download. However, even if you are using any other hosting provider, the whole thing is pretty painless and takes only a few easy steps.
You don’t even have to have a complete site to import it into Local, the wp-content directory and SQL file is enough. It’s just one of many ways Local makes development easier.
What’s your workflow to move sites from local to live and back? Let us know in the comments below!
The post How to Import and Export Websites in Local (By Flywheel) appeared first on Torque.


