Running a brick-and-mortar business is challenging. You have to deal with customers face-to-face, organize products, manage inventory, track sales, and more. Figuring out how to start an eCommerce store and manage it on top of your existing responsibilities may seem out of reach.
However, if you don’t have an online sales platform for your business, you’re missing out big time. By learning how to start an eCommerce store, you’ll be able to do sales 24/7 with minimal involvement on your part. Moreover, getting started with virtual retail is not as complex as you might imagine, particularly in 2021.
In this article, we’ll teach you how to start an online eCommerce store in seven steps, covering everything from research to eCommerce site maintenance. Let’s get right to it!
How to Start an eCommerce Business (In 7 Steps)
For this process, we’re going to assume that you already have a booming brick-and-mortar store. As such, you likely already know who your customers are and understand their needs. Thanks to that information, you can skip a lot of preparation that would be necessary if you were starting a new business from scratch.
With that in mind, here are the steps that this tutorial will cover:
- Identifying the products you want to sell online
- Researching competitors in your niche
- Registering a domain for your eCommerce store
- Choosing an eCommerce-friendly hosting provider
- Picking a Content Management System (CMS) for your store
- Publishing your first products
- Creating a maintenance plan for your store
We have a lot of ground to cover, so let’s dive in and talk about what your eCommerce business plan should include.
Step 1: Identify The Products You Want to Sell Online
Since you already have a brick-and-mortar business, that means that you have some existing inventory. You know what products your customers like to see and in broad strokes, it’s a good idea to promote all of those items online as well.
However, some products or services that you sell might not necessarily be a good fit for the online branch of your store, such as:
- Very low-cost items. Unless you sell these in bulk, shipping expenses may outweigh the revenue you can bring in from cheaper products.
- Products that are difficult to ship. Online sales mean that you’ll need to deal with shipping orders to customers. If you think some products in your inventory might be too difficult or expensive to deliver, they might not be a good fit for your eCommerce store.
Aside from those product categories, your goal should be to publicize all of your regular inventory online.
Just as some items are easier to sell in person than online, you can also look into adding eCommerce-exclusive products to your website. For example, you might be able to expand into downloadable prints or ebooks that complement your physical merchandise.
Moreover, having an online store will also enable you to test new products more efficiently. For instance, you can more easily track which items customers are showing interest in but ultimately not buying. This will give you a starting point for determining why sales are low for those products.
Plus, with an eCommerce store, you can reach shoppers from all over the country or even the world (depending on the audiences you want to target). That gives you a much broader customer pool in which to test new products and see how they sell before you bring them into your brick-and-mortar store.
Step 2: Research Competitors in Your Niche
You probably have a solid idea of who your most direct competitors are. Until now, those would be stores in your area that sell similar products and that target your same customer base.
Some of those physical stores might also have eCommerce sites that you need to research. However, you’ll have to consider a new group of competitors, too. There are likely many online-only retailers vying for your same customers.
Your competition isn’t limited to big players such as Amazon, either. There are plenty of online Small-to-Medium Businesses (SMBs) focused on specific niches that may overlap with yours.
At this stage, we recommend compiling a list of online stores that you might compete against and take notes on what they’re doing well. For example, it’s important to consider:
- What products your competitors are offering, and which ones are their best sellers
- How your competitors handle shipping (including fees)
- Which payment methods your competitors support
- Which online retailers come up in search engine results for keywords related to your niche
- How your competitors engage with customers (email, social media, a blog, etc.)
- Anything else that stands out to you
It can also be beneficial to identify any areas where your competitors are lacking so that you can fill needs that they aren’t meeting. For instance, you might read some of their FAQs or negative reviews to learn from their mistakes.
You already know how to run a brick-and-mortar shop. However, eCommerce business models can be very different. By compiling information about how your competitors run their online storefronts, you’ll be able to spot trends and see what the best approach should be for your own.
Step 3: Register a Domain for Your eCommerce Store
Once you feel you’ve sufficiently planned out what your online store needs to include, you can start actually building your eCommerce website. The first step is to choose a domain name.
For those unfamiliar with this term, it refers to your website’s address, such as wpengine.com. If you already have an active website for your business and simply want to add an online store component to it, you can skip this step.
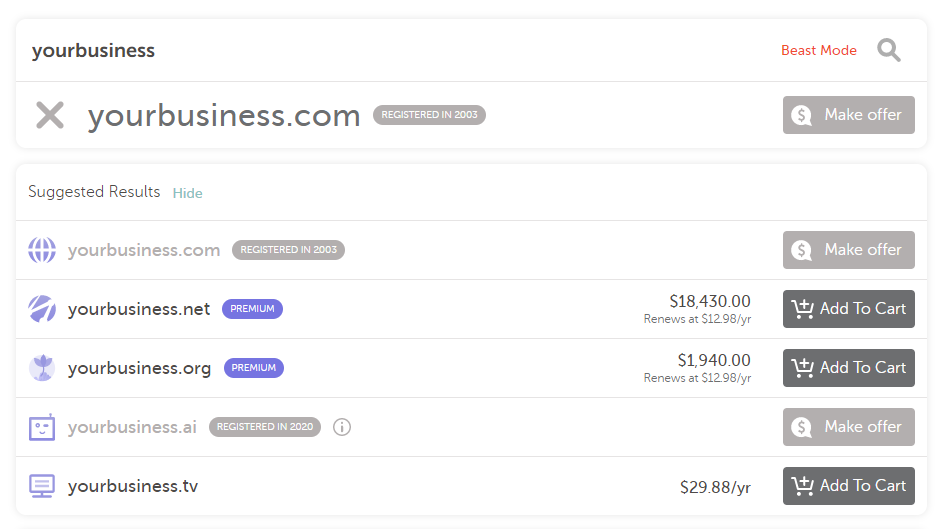
Usually, picking the perfect domain name can take a while. However, since you already have a successful business with its own name, the logical next step is to see if your existing name is available as a domain (preferably with a .com extension).
You can do so through a domain registrar such as Namecheap. Registrars enable you to look up web addresses to see if they’re available, and then purchase them for your website:

If your business’ name is already taken as a domain, you have a few options. First, you can look into alternative extensions, also called Top-Level Domains (TLDs). For instance, if the .com version of your preferred domain isn’t available, you could use .net or even a TLD for your industry such as .auto for car dealerships, or .pet for pet supplies.
Alternatively, you can look into adding an extra word to make your domain unique. For example, you could include your city after your business name, or a word related to your industry such as games or cosmetics. Just make sure your domain doesn’t become too long for users to easily remember and type into their browsers.
Once you find a domain name that’s relevant to your business and available, you can add it to your cart and complete the registration and checkout process. Your registrar will ask you a series of questions about your business including how long you want to register your chosen domain for:

When you register a domain, you pay for the rights to use it for a specific period of time. Once that time is up, you have priority when it comes to renewing your registration. However, if you don’t, the address will become available to the public once more.
On average, a .com domain will cost around $10–$15 per year. However, you can often get better deals on registration if you pay for several years up front.
Step 4: Choose an eCommerce-Friendly Hosting Provider
A web host is a company that stores your website on its servers and makes it available to the public. However, not all of them offer the same quality of service or features. More importantly, some providers are optimized to work with specific types of websites, such as eCommerce stores.
Ideally, you’ll choose a web host that offers eCommerce-friendly features. In a nutshell, these might include:
- Automatic setup for your eCommerce software of choice
- Access to online store templates so you can get your site up and running faster
- Support from eCommerce specialists
WP Engine, for example, offers a range of eCommerce-friendly plans that you can use to launch an online store in a few clicks:

Aside from features related to eCommerce, you’ll also want to use a web host that offers top-notch performance. Online stores can be very demanding on a server, particularly if you have a lot of traffic and customers. If your site crashes or slows down to a crawl because you’re using a cheap hosting plan, you’ll miss out on sales.
For this reason, you may want to consider looking into a new hosting plan even if you’re adding eCommerce functionality on to an existing business site. The needs of these two types of platforms can be quite different, and you’ll want to make sure you have the resources needed to support your online store.
Hosting can be the most significant of your eCommerce startup costs. Depending on your store’s size, you may be out dozens or hundreds of dollars per month.
As a rule of thumb, we recommend that new eCommerce stores stick to managed hosting if possible. This solution usually doesn’t cost that much for a single website and it offers a significantly better experience than, for example, a shared hosting plan.
Overall, we recommend that you take your time and look at all the hosting options in your price range. Choosing a web host is an important decision, so don’t rush it.
Step 5: Pick a Content Management System (CMS) for Your Store
A Content Management System (CMS) is a type of software that’s designed to help you launch a website and create, manage, and update its content. Using one means that you won’t have to code your online store from scratch, which is a time-intensive process that can cost thousands of dollars if you hire a qualified developer.
With WordPress, for example, you can have a website up and running in a matter of a couple of hours:

However, WordPress isn’t an eCommerce CMS, at least not out of the box. It was originally designed for blogs, but over the years has morphed into a platform that enables you to create almost any type of website you want, including online stores:

It accomplishes this through the use of ‘plugins’. The most popular WordPress eCommerce plugin is WooCommerce:

It adds all of the features that you need to set up an eCommerce store with WordPress, including support for multiple online payment processors, shipping and inventory management, and sales management. Plus, WooCommerce supports both physical and virtual products.
Of course, there are many other CMSs available that are also capable of helping you build an eCommerce site. However, WordPress and WooCommerce offer the following advantages, just to name a few:
- They are both entirely free to use.
- There are no limits on what you can sell or the quantity of products you can sell.
- You do not have to hand over a portion of your sales to WordPress or WooCommerce.
- WordPress offers nearly limitless customization options.
At this point you have the three key components you need to create an online store – your domain, a hosting plan, and a CMS. How you put them together will vary depending on the providers and platform you’ve chosen.
Your host’s support team should be able to help if you’re not sure how to proceed. If you’re using one of WP Engine’s eCommerce plans, then you can start an eCommerce store with WordPress and WooCommerce in just a few clicks.
Step 6: Publish Your First Product
How you publish a product online can vary dramatically depending on which CMS or eCommerce platform you’re using. Fortunately, figuring out how to use WooCommerce shouldn’t be all that difficult.
Once you install and enable WooCommerce, you’ll be able to see all of your existing products by going to the Products > All Products tab in your WordPress dashboard:

Initially, your All Products tab should be empty. To publish your first item, click on Add New at the top of the screen. This will open the WooCommerce product editor:

You can start by adding a title and description for the item. Then you can create categories to organize your products and assign this specific item to one of them:

You can also use the editor to configure what type of product you’re dealing with (physical or virtual) and to set its price:

Beyond configuring each product’s settings, you can also upload a featured image and photo galleries for each item that you publish in your store:
Once you’re done, you can publish your product and will appear on your site’s shop page, which WooCommerce generates automatically. For this example, we went ahead and set up multiple test products:

Keep in mind that WooCommerce has plenty of features that you can play with. Now that you have a rough idea of how to publish new items for your shop, there are many other options that you can explore.
Here are several articles from the Torque archives that we recommend checking out:
- The Ultimate WooCommerce Tutorial for Absolute Beginners
- 5 WooCommerce Design Mistakes to Avoid
- 4 Ways to Create Better WooCommerce Product Pages
- 21 Best WooCommerce Plugins for Your Online Store
Although WooCommerce is a plugin itself, there are also hundreds of additional extensions that you can use to enhance its functionality. In any case, we recommend that you get acquainted with how base WooCommerce works before you start adding new features to it.
Step 7: Create a Maintenance Plan for Your Store
Now that you’ve learned how to start a small business online using WooCommerce, it’s time to talk about maintenance. It’s vital that you take care of your eCommerce store so it’s always running in top shape and everything is up to date.
Here’s a quick overview of some tasks a maintenance plan for your store should include:
- Regular product and inventory updates
- Checking that there are no problems with any of your recent sales
- Ensuring that your payment processing solutions are working
- Making sure that your eCommerce store is loading fast
- Backing up your store regularly in case you run into any technical issues
- Keeping your CMS and any other software up to date
These are just a few of the tasks that you’ll need to carry out regularly if you run an online store. With WordPress and WooCommerce, website maintenance isn’t all that difficult, particularly if you use a managed hosting service.
Managed hosting platforms will take care of a lot of optimization work behind the scenes so your store is always in top form. This frees you up to focus on other tasks, such as managing sales and your inventory.
Another option is to use a WordPress maintenance service that offers support for eCommerce stores. With a team of WordPress maintenance experts, you won’t have to worry about ensuring that your website is secure or wondering what to do if you run into an error.
People Also Ask – FAQs
By now you have a fairly comprehensive picture of how to start an online eCommerce store. However, you might still have questions about certain details, so we’ve discussed some of them below.
How Much Does It Cost to Start an eCommerce Business?
If you already have inventory from a brick-and-mortar store and your business is registered, your biggest costs will be domain registration and hosting. If you’re using WordPress and WooCommerce, you might also want to purchase premium themes and plugins. Overall, your eCommerce startup costs can be less than $100 if you want to spend as little as possible.
How Do I Start an eCommerce Store?
The easiest way to launch an eCommerce store is to use a CMS such as WordPress. There are also dedicated eCommerce tools that you can use, but a lot of them lock you into third-party platforms, which is not ideal. WordPress gives you a lot of flexibility while also keeping your expenses to a minimum.
Is eCommerce Profitable?
If your brick-and-mortar store is profitable, there’s no reason why your eCommerce project should fail to bring in revenue. How much money you make will depend on how many visitors you can get to your site and how effective you are at ‘converting’ them (i.e. convincing them to make purchases). As such, it’s important to invest in a digital marketing strategy.
Conclusion
Learning how to start an eCommerce business in the UK, the US, or anywhere else in the world works much the same. If you already have a physical store, then you’ll need to bring it online by registering a domain, purchasing hosting, and setting up an eCommerce CMS.
From that point on, your work is all about maintaining that store and ensuring that the buying process is as smooth as possible. If you can do that while also managing to bring in new customers, you have everything you need for a successful eCommerce enterprise.
Are you ready to launch an eCommerce store for your small business? WP Engine’s eCommerce hosting plans offer all of the features that you need. Check them out today!
Featured Image credit: Pixabay.


