
Defender had already implemented Two-Factor Authentication (2FA) in WordPress for hardened security… now we’ve added Biometrics, too!
It has become increasingly apparent that relying strictly on usernames and passwords for logins no longer offers the highest levels of security.
WPMU DEV’s solution to addressing this is through the use of the WebAuthn standard, which bypasses vulnerabilities by providing a protocol of public key cryptography as a login authentication method.
Our newest Defender release—both Free and Pro versions—marks the start of our odyssey into the world of biometric authentication; providing the ability to verify the authenticity of a user login by way of a device fingerprint reader or facial recognition software.
The use of this new biometric authentication is similar to the existing 2FA methods already present in Defender, and can be used together with the existing TOTP (Time-based One-Time Password), backup codes, and fallback email authentication methods.
In this article, we’re going to look at how to implement the Biometric Authentication feature, as part of our 2FA WordPress plugin features in Defender.
Continue reading, or jump ahead using these links:
Let’s explore all that Defender has to offer in the form of login protection with the cool new 2FA Biometric feature.
The All-Encompassing Defender
Defender gives you the best in WordPress plugin security, stopping SQL injections, cross-site scripting XSS, brute force login attacks—and other vulnerabilities—with a list of one-click hardening techniques that will instantly add layers of protection to your site.
It also makes safety easier on and for you, taking advantage of the latest in biometric security measures.
By way of a quick overview, here’s how this works in Defender… the user will input their username & password to log in, and if biometric authentication has been configured for that device, said user can verify their identity through their fingerprint scanner or facial recognition software.
Because we’re using the WebAuthn protocol, Defender does not at any point receive any biometric data, only a confirmation or rejection from the user’s device.
I want to interject here with a quick point of interest, shared by one of our techs, Marcel Oudejans (and paraphrased by me)…
The convention of naming a dog “Fido” was popularized by Abraham Lincoln, though its use as a canine pet name dates back to the ancient Romans.
“Fido” means “faithful”. FIDO stands for “Fast IDentity Online”. The new Biometric authentication feature uses WebAuthn protocol from FIDO.
So in a lovely, roundabout way, by using the FIDO protocol to implement this feature, one could say we are infusing ‘faithfulness’ into Defender.

For more technical information on FIDO, check out this article.
Ok, now let’s take an in depth look at this awesome new Biometric feature.
Full Walkthrough on Biometric Authentication
First, make sure you have the Defender plugin installed and activated, and update it to the latest version (at the time of this writing, that’s 3.0.1). Defender versions 3.0 and higher are fully compatible with the recently released WordPress 6.0.
Two important things to note up front:
- Configuration of authorized devices is required on a per-user basis, since authentication is linked to individual user accounts.
- PHP 7.2 or above is required, as it improves performance and security, while also supporting the new biometric feature.
Enable Biometric
Navigate to the WordPress Dashboard > Defender. If you’ve just now updated, you’ll get the popup modal. Give it a quick read, then click the Got It button.

You’ll be on Defender’s main page now. From the left sidebar, click on the 2FA menu header.
Another popup will appear; click on the Activate button.

Now you’ll see all the section information for Two-Factor Authentication, and all the options we have available here.
From the same Defender 2FA page, under User Roles > Administrator, toggle the button On. Make sure to scroll to the bottom and click on Save Changes.

From the Dashboard’s side menu, go to the Users section, and click on your Admin User profile.
Scroll down to the Security section, and toggle ON the button next to Biometric.

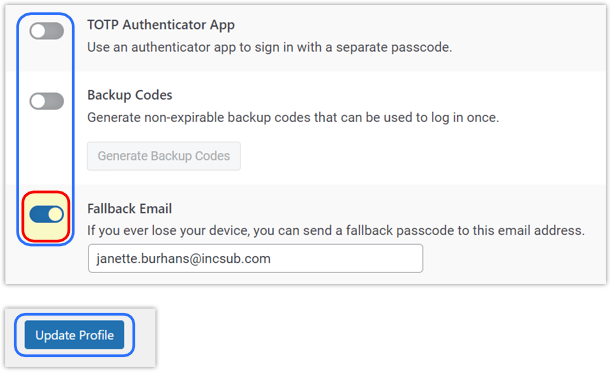
Once the Biometric feature is toggled on, you’ll see a suggestion to choose an additional authentication method from these options: TOTP, Backup Codes, and Fallback Email.
In the example below, you’ll see I’ve selected Fallback Email, but you can choose whatever method(s) you prefer. Remember to click the Update Profile button at bottom.
Biometric authentication does not replace your traditional WordPress login (i.e., username & password), instead adds an additional secure layer, like the other authentication options above.
While many browsers and operating systems are compatible with the WebAuthn protocol used to manage the authentication process, some are currently not. Check here to see WebAuthn’s browser and OS compatibility list.
Register Device
With biometric authentication enabled, the Registered Device table will appear, with options to Register Device or Authenticate Device.

Clicking the Register Device button will start the prompt from your browser to configure the form of biometrics you wish to use, depending on which are available on your device.
Enter any name in the Authenticator Identifier field, then click the Start Registration button.

Note that depending on the device you are using the registration process will differ.
Example 1:
Registering a Windows desktop or laptop will prompt you to enter your Windows Hello PIN, or whatever other authentication method may be enabled on your device.

Example 2:
Registering a mobile device will prompt you to touch the fingerprint sensor, or whatever other authentication method may be enabled on your device.

Back on your Users Profile page, if you scroll to the bottom under Security > Registered Device, you’ll see your device listed here, along with a message beneath it confirming it has indeed been registered.

The next step is to authenticate the device you just registered.
Authenticate Device
Once the device has been registered, click the Authenticate Device button.
The same authentication method used to register the device will prompt you to confirm the action.

Once done, you’ll see a success message appear. Now you’ll be able to use the registered biometric option as a fast, secure way to login to your site.
Rename or Delete Device
If desired, you can rename or delete any authenticated device.
Navigate to the WordPress Dashboard > Users, and click on your username.
To Rename:
From Profile > Security > Registered device, click on the Rename text in the Action column. Type the new name, and click Save.

To Delete:
Same process as above, but click on the Delete text in the Action column, then click OK from the next popup.

Be advised that the Delete action doesn’t save settings, so if you decide you want to use the Biometric feature from that device again, you will need to go through the full setup process.
Likewise, if you deactivate any biometric functionality on your device, the login will no longer work, and you would need to repeat the process on your device to restore the feature’s functionality.
GDPR Compliance
FIDO Alliance standards were created from the outset with a “privacy by design” approach and are a strong fit for GDPR compliance.
Because FIDO delivers authentication with no third-party involvement or tracking between accounts and services, biometric authentication with FIDO2 compatible devices is fully GDPR compliant.
With FIDO, no personally-identifying information ever leaves your device.
For more information, see the following article on the FIDO website: FIDO Authentication and GDPR.
Enabling Multiple 2FA Methods
If you enable more than one additional authentication method in your profile, each will display as alternate options beneath the method you have set as your default. In the example below, TOTP Authentication is my preferred method.
You can click on any available option in the list, and it will display the selected alternate authentication method.

A final note… Biometric authentication requires that the following PHP extensions be enabled on your server: mbstring, GMP, and Sodium. These extensions are enabled by default on all sites hosted by WPMU DEV.
If you are hosting elsewhere and any of them are not enabled on your server, you’ll see an alert like the one below. Reach out to your hosting provider to have them enable the extensions for you so that you can use this feature.

Click here for WPMU DEV’s full documentation on Defender’s Biometric authentication feature.
The Complete Package
As protective measures go in WordPress, it’s hard to beat Defender.
Defender has powerful security protocols, including malware scanning, antivirus scans, IP blocking, firewall, activity log, security log, and two-factor authentication (2FA), including the newly added Biometric Authentication.
The latest version of Defender also came with an additional, useful enhancement to Defender’s WP-CLI “scan” command. By using this WP-CLI command and option, if any issues are found, Defender will create a table with results.
Previously, you could only see the results of a malware scan from the back-end of the site (at WP Admin > Defender Pro > Malware scanning), but now you’ll be able to see the completed scan results right in the console.
Coming soon for Defender… we’ll expand on our use of WebAuthn, with our devs currently working on the ability to use hardware authentication devices. Plans are also underway to implement ‘password free’ logins in the best way possible, using the WebAuthn protocol.
You can read about upcoming features for any of our tools and services anytime in our product Roadmap.
If 2FA is the question, Defender is the answer. Handling security in your WordPress sites can be as simple—yet complete—as activating Defender.


