
Learn how to give your clients an easy and professional white label portal experience where they can access their account, sites, and pay you via a secure and self-hosted checkout.
Imagine having your own unique portal where your clients can login, access their billing accounts, even make payments – all hosted on your own site, with your own branding.
Well, good news, with WPMU DEV it’s possible and simple! And in this article we’re showing you how to create the client portal of your dreams.
You’ll learn:
- How to create custom login pages for clients,
- How to invite clients to your portal using branded emails,
- How clients can make payments to you quickly and easily.
By the end of this article you will have set up a sleek portal under your own brand that clients can use to access information about their sites and make secure payments for your services.
Here are the section breakouts:
- What You Will Need To Create Your Portal
- Configuring Menu Navigation Items
- Inviting Clients To Your Custom Portal
- What Your Clients Will See Inside Their Portal
- Giving Your Clients a More Customized Experience with The Hub Client
And we’re off!
What You Will Need To Create Your Portal
Before we get started, here’s what you’re gonna need if you want to follow along, or eventually create your own portal:
1. The Hub, to establish the base of your portal and integrate billing tools
The Hub is your central interface as a WPMU DEV user, and it’s where our web developer members manage every aspect of their client sites.
You can learn more about how it works in our how to get the most out of The Hub article.
This all-in-one site interface also includes a built-in client management and billing dashboard – where you can invoice clients, set up subscriptions, track monthly recurring revenue (MRR), and more.
And most importantly and relevant to this article… you can invite your clients to have customized access to your billing dashboard (and specific areas of your overall Hub), where they can view their account and subscription info, and even pay invoices directly via a built-in Stripe checkout.
All of the above lays the groundwork for your white label client portal. But it’s still all under WPMU DEV’s branding up until this point.
That’s where this next tool comes into the equation…
2. The Hub Client, to brand your portal as your own
The Hub Client allows you to take your Hub interface, including billing tools and checkout, and white label the entire thing with your own branding, logos, etc.
This instance will be on your own site at your own domain, so when your clients login they see your brand, not ours.
3. A Hosted Site For Your Portal
Finally, you’ll also need a hosted site to host your client portal…
This can be either a 3rd-party hosted site, or there’s always our own dedicated WordPress hosting, which you can also manage right from your Hub dashboard.
All of the above tools are included with the WPMU DEV Agency plan, which you can also trial for free right now.
Okay, now that you know what’s needed, we’ll get down to it!
How To Create and Brand Your Client Portal
Okay, first things first… since the white label client experience comes courtesy of The Hub Client, we want to install and configure that straight away.
Once you’ve signed up for a paid WPMU DEV membership, The Hub Client plugin will be available to install for free via the plugin landing page, The Hub plugin manager, or the WPMU DEV dashboard plugin (shown below).

Once activated, click on it to see the Welcome screen, then click on Get Started. This puts you directly into Settings.
By default, your Hub Client will inherit the Brand Name and Logo you have set in your own Hub, but you can customize it to be whatever you like.

We’ll quickly set up our first three brand customizations under Site Profile.
- Click the arrow icon for Brand name, type what you’d like to call it, and Save Changes.
- Next, click the arrow icon for Your Logo, upload your graphic, and Save Changes.
- Under Color Scheme, click the arrow icon for Navigation Background, select desired shade from the color picker, then Save Changes. You can also select your Navigation text and Navigation text selected & hover colors here, to match your fully branded color scheme.
You can see all of your changes in real-time via the Preview strip at the top of the Settings page.

Configuring Menu Navigation Items
We want to make getting around in our branded portal a satisfying, sensible experience for our clients.
We can easily accomplish this through the Hub Client’s settings.
Let’s look at personalizing the rest of the branded portal for your clients.
First up, we’re going to set up what will be displayed as the main menu of your branded portal.
From the main screen in The Hub Client; scroll down to Configuration, and click the chevron arrow to the right of Navigation.
Select from the dropdown options, or create a site specific menu in WordPress’ Appearance > Menus, then come back to this page and select it.

Now we’ll set the client page as the hub.
Click the chevron arrow to the right of Client Page, and from the resultant popup, select as desired from the dropdown options, then Save.

Now you’ll see this additional linked text – View Page, next to Client Page, along with the name of the page you selected to the right. In this case, “hub”.

Click on View Page and it will open this instance of the Hub in a new webpage, where you’ll see the page you selected, with the menu you selected at the top of the site.

You can also customize the link used for the Back text on your Client Login page. We’ll knock that out right now.
From the WP Dashboard > The Hub Client > Settings > Configurations > Home Site URL, click Add to open the configuration module.
Enter the site URL and site name (Title), and Save changes. (You can also click the checkbox to Open in a new tab prior to saving, if you prefer.)

Note: if no customizations are made here, the back button will direct to the default home page for that site.
If you ever want to revert back to the default state, simply click the Reset button.
Setting Up a Help Button
Having help resources readily available for your clients is a big plus. It goes a long way to making them feel calm and collected, knowing answers are just a click away.
“Provide enough customization options so that we can tweak the look and feel of the interface to some degree. And the ability to put in our own info, such as contact info and links to our own help pages/customer support and things like that.” – Julian (WPMU DEV member)
Getting the Help Button in The Hub Client is a cinch. I’ll walk you through how to do that now.
From the WP Dashboard > The Hub Client > Settings > Configuration; to the right of the Help Button, click Add.
Enter the URL for your Help page, then Save Changes.
Tada! You’ll now have a floating help bubble on your Hub page that when clicked, will direct the user to your chosen URL. By default, the Help page will be opened in a new tab.
Once you’ve set up your Help Button, it will display in the lower right corner of The Hub main page, ready for action.

Integrating Live Chat
Live Chat is a fantastic feature to provide to your clients. And The Hub Client offers three highly-rated chat platform integrations to choose from.
If you head over to the WordPress dashboard, The Hub Client > Settings > Integrations, you can configure a Live Chat widget on your Hub Client.
Three of the most popular third-party services are available: LiveChat, Tawk.To, and HubSpot.


Depending on which live chat service you choose, the setup will vary.
If you’d like a basic walkthrough on setting these up in The Hub Client, read How to Set Up Live Chat on WordPress. Or get the full rundown in our Integrations help docs.
Inviting Clients To Your Custom Portal
Time to roll out the red carpet! With customizations set, we’re ready to bring our clients inside.
Let’s start by manually adding a new client.
Navigate to The Hub > Clients & Billing, and click + New Client.

Enter all the client’s required (and optional, as desired) information in the form fields.
User Roles play a very significant part in Client setup. Basically, these decide what each client will have access to in your hub, in terms of viewing and taking action. You have full control on these by selecting permissions.
We’ll take a deep dive into User Roles in our upcoming Clients & Billing article. For now, click on the dropdown arrow under User Role, and select View All & Access billing.

If you opt for a Custom Role – you can make one on the spot by clicking on + Create custom user role.
This will bring up the screen where you can select options from the main and nested menus. Name your new role, and save it.
Now if you go back to that client, you can assign this custom role to them.
While adding a client, you will also determine what Primary Hub they’re associated with.
If you have more than one Hub, it will be available in the dropdown. If you are using The Hub Client on a site, and select it as the Primary Hub, when that client clicks on a Confirm Invitation or Pay Invoice link from your Client & Billing automated email, they’ll be taken to the your white labeled Hub site instead of wpmudev.com.
Our best pro WP tools in one bundle

At the bottom, switch the Invite Client toggle to on, then click Add.

Boom! Client has been added, and sent a white-labeled invitation to your client portal, which will look like this:
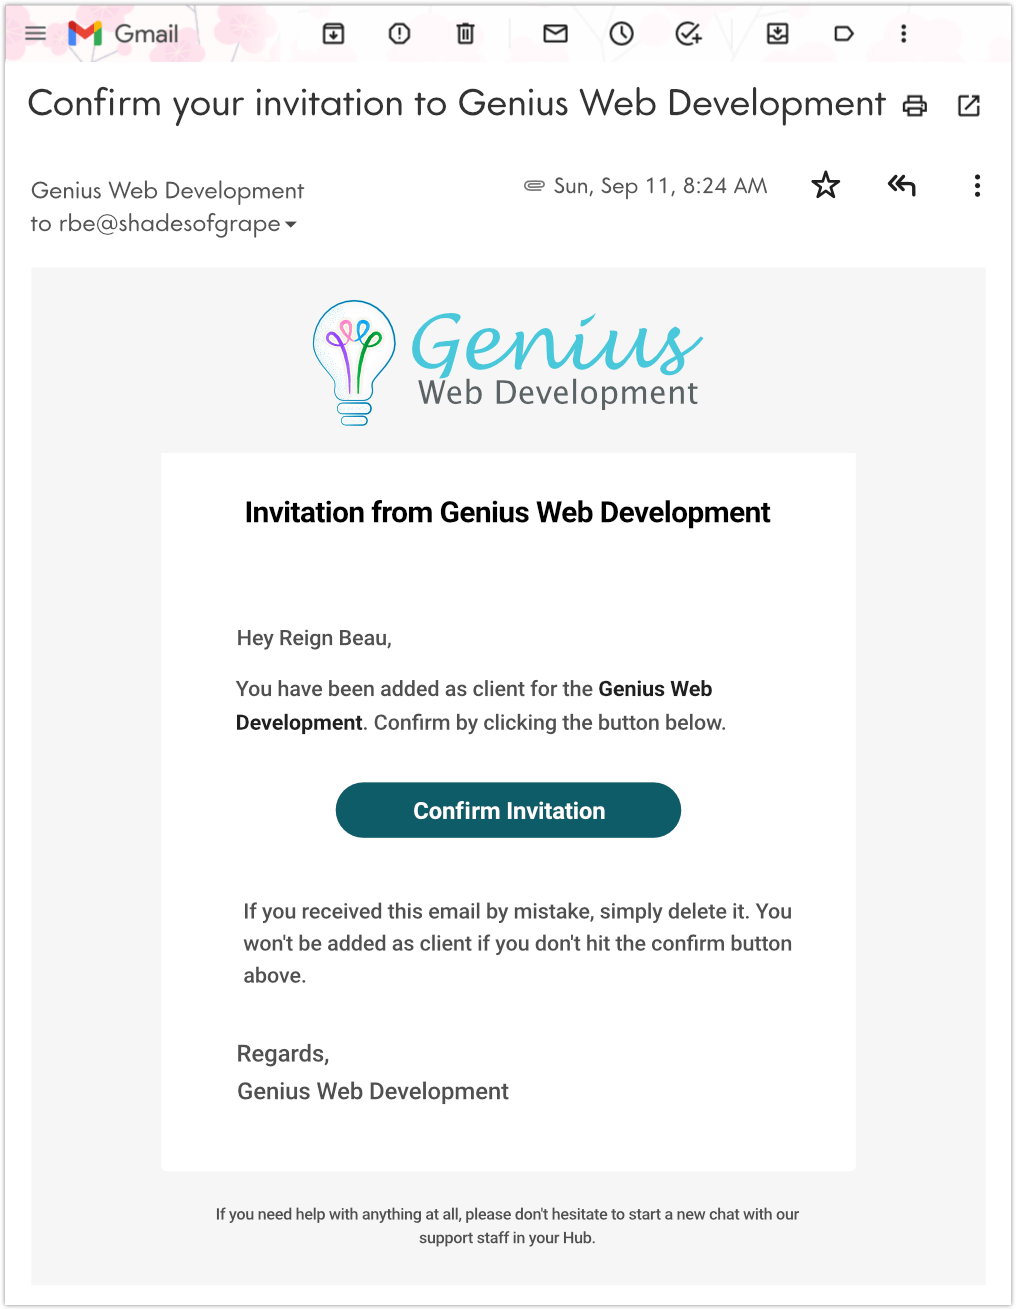
Once the client confirms by clicking the Confirm Invitation link in your email, they’ll have access to your branded portal.
If they already had an existing Hub account with you, it will take them directly to the login page of the Hub they were invited from.
If they’re new to your account, they’ll be taken to the account creation page of that Hub instance.
From the account creation page, they’ll get a popup modal with their email address already in the form field. They’ll just need to create a password, then click the Create Account button.

What Your Clients Will See Inside Their Portal
Every client experience in your portal will be unique to them.
Your branding will be prevalent throughout, and what your clients will be able to view and access is dependent on the permissions you’ve granted them through User Roles.
It’s a fantastic way to custom serve each client a perfect fit for your combined business interests and needs.
The Client Dashboard
Once your clients have logged into your client portal, they’ll be greeted by a dashboard with access to any content you’ve given them permissions for.

Clients can organize single or multiple sites in your portal, and organize them in their dashboard area as they see fit.

The roles you’ve assigned to a client are editable by you and can be changed at any time in the management and billing platform.
For example, if we assign Billing permissions to a client, he/she will have the ability to view and edit anything in that section, but they’ll be cut off from any other pages/screens in Client Billing.

Read this post for a closer look at User Roles and Permissions.
Letting your clients view and manage their own billing details saves you the time and effort you would otherwise spend on their admin activities, and allows them to feel connected to their account.
There is a lot your clients can accomplish here. For example, managing their billing info and account details, viewing their services and subscriptions, filtering on payment status (due or paid), assessing what their average spend is, and much more.

In the billing section, clients can see all of the details by drilling down through the various menu options.

Any line item here can be clicked on for full details, and/or to take certain actions. For example, canceling a subscription.

Invoices can also be examined in full detail.

The built-in filter functionality is great, offering distillation options for date, payment status, and website.

If you’ve given them permissions to do so, clients can view details and take action on services and bills, such as making payments or downloading PDF versions of invoices.

Client Profile
Clients can freely edit their personal content – profile info (including their profile pic, if they have one set in Gravatar), make a password change, setup 2FA (requires an authenticator app), or sign out, all through the cog icon menu in the upper right corner.

Everything updates in real time. For example, if the client changes the email addy in their profile, it will also update in their billing profile, since the Hub and Clients & Billing profiles are synced. Easy peasy!
Clients Can Pay Invoices via The Client Portal
With the Clients & Billing modal, your client will have the convenience of paying you directly through your branded client portal (with secure Stripe checkout fully integrated)!
As mentioned earlier, all client management activities including payments take place securely inside your own domain and fully custom-branded screens.

Throughout the course of their business journey with you, clients are kept in the loop with automated emails, which reflect your custom brand and company details.

Clients can readily make payments by clicking on the invoiced email link, taking them to the payment portal.

The client can enter their payment information, then click the Pay button, which will have specific information on it regarding the amount of money and service they are approving.
Note, if they previously added a payment method, it will auto populate here, with an option to change it if desired.

The client can check all of their info on the next page, then click to pay.

With the payment made, the invoice will load up, reflecting the details and paid status.

Now if you go to the Invoices tab, you’ll see all current and outstanding invoices.

In the Status column, red indicates payment is due, and green indicates payment has been made.
The top-level Invoices menu has a notifier icon (a number in a red circle), indicating the quantity of outstanding invoices – for quick visual reference.
The client can download a copy of any paid invoice by clicking the PDF Invoice button at the top-right of the invoice screen.
Clients Can Access Invoices Directly in The Billing Modal of The Hub
Your clients can easily view and manage billing activities from any sites in their Hub, related to specific billing. It will be nearly identical to what you see in your Hub Billing area, of course specific only to their site(s).
Clients can use the left sidebar menu to navigate to their billing section.
Clients need only click the Billing link in the sidebar menu of any site they’re viewing to get started. Any invoices you’ve sent to them will be accessible to them here.

Clients who you’ve added a website for but haven’t yet sent an invoice to will still see the site, it just won’t have any specific billing info.
Once the first site-specific invoice has been paid, data will immediately populate in the Summary section, along with the Products & Services and Invoices sections’ Status, which will reflect as Active and Paid.
If you’ve stuck with us through the full breakdown, congrats! You’re now very well versed in many of the great features in the Client Portal – ie your branded Hub. We have no doubt you’re going to do amazing things.
If you do ever need an assist, reach out to our highly-trained (and top-rated) support team. They’re always on, 24/7/365.
For a complete guide to everything on the client portal, see The Hub Client documentation.
Giving Your Clients a More Customized Experience with The Hub Client from WPMU DEV
The Hub Client lets you run WPMU DEV on your own domain as a 100% white label experience for your clients.
You can fully customize your branding, colors, links, logins, emails, and users access…even allow clients to edit certain areas at your discretion.
“It’s like giving your clients backstage access, but as a VIP experience.” – Josh Hall (JoshHall.co)
Check out our Hub Client plugin through a trial of one of our paid plans, or our Hosting – fully dedicated and optimized for WordPress. We offer a 100% satisfaction guarantee, and our support team helps with all things WordPress, not just our products and services.
See you on the inside!


